


Last Updated on August 23, 2026 by John Patterson
Step across the floor.
Two months after moving into a newly built home, every step across the living room triggers sharp, rhythmic wood squeaks under the hardwood.
The framing contractor saved fifteen dollars on a box of smooth nails and rushed the fastening schedule.
Now fixing that floor requires pulling finished flooring, driving hundreds of retrofit screws, and repairing expensive drywall ceilings below.
Subfloor squeaks are completely preventable.
Eliminating floor squeaks permanently requires understanding how wood joists shrink, why smooth nails fail in withdrawal, and how to execute the exact International Residential Code (IRC) fastener spacing.
PERMANENT SQUEAK-PROOF FORMULA
3/4″ T&G OSB/Plywood + 8d Ring Shank (.131″) + Continuous Adhesive Bead + 6″ Edge / 12″ Field = Zero Squeaks
Before buying subfloor fasteners, review our structural guide on what size nails for framing.
Quick Answer: Subfloor Nail Size and Spacing Requirements
Short version?
For standard 3/4-inch (23/32-inch) OSB or plywood subflooring, building codes require **8d ring shank nails (2-3/8″ x .113″ or 2-1/2″ x .131″)** spaced **6 inches apart along supported panel edges** and **12 inches apart across intermediate joists**.
To guarantee a squeak-free floor, combine 8d ring shank nails with an **APA-AFG-01 certified subfloor adhesive** applied in a continuous 1/4-inch bead along every joist flange.
IRC Fastener Spacing Schedule: 6 inches on-center along all perimeter and supported panel edges; 12 inches on-center across intermediate field joists (reduced to 6 inches for high shear seismic/wind zones).
Approved Nail Sizes: 8d ring shank nails (2-1/2″ x .131″) or 8d common nails (2-1/2″ x .131″). Smooth 6d nails are code violations on 3/4″ panels.
The Primary Squeak Cause: Smooth shank framing nails back out when joists shrink, creating vertical nail slip that produces loud rubbing squeaks.
Mandatory Adhesive Protocol: Apply a 1/4-inch continuous bead of polyurethane construction adhesive and fasten within 15 minutes before the glue skins over.
Need high withdrawal grip data? Read our technical breakdown on ring shank vs. smooth shank framing nails.
IRC Building Code & APA Fastener Schedules for 3/4-Inch Subfloors
Codes dictate structural safety.
The International Residential Code (IRC Section R602.3 and Table R602.3(1)) sets the legal minimum fastening requirements for wood structural subfloor panels.
APA – The Engineered Wood Association establishes performance standards designed to exceed minimum code limits and prevent mechanical failure.
Edge Spacing (6″ On-Center): Drive fasteners every 6 inches along all panel edges where two sheets meet over a framing joist. Maintain a minimum 3/8-inch edge distance to prevent panel blowout.
Intermediate Field Spacing (12″ On-Center): Drive fasteners every 12 inches along joists that run beneath the center of the panel. In high-wind or seismic categories, codes mandate 6-inch field spacing.
Panel Thickness Rules: For panels up to 3/4-inch thick on joists spaced up to 24 inches on-center, 8d deformed shank (ring or screw shank) fasteners are required.
Nail Depth Setting: Drive nails flush with the subfloor surface. Sinking nail heads 1/8-inch deep punches through the top wood veneer, reducing holding power by 40%.
All structural subfloor installations must comply with International Residential Code (IRC Table R602.3(1) and
APA Engineered Wood Construction Guidelines.
Why Smooth Shank Nails Guarantee Floor Squeaks (Withdrawal Physics)

Physics never lies.
When green or kiln-dried framing lumber is installed on a jobsite, it carries a moisture content between 15% and 19%.
Over the first two heating seasons, the lumber dries down to an equilibrium moisture content of 8% to 10%, causing solid joists to shrink in width and depth.
The Shrinkage Gap: As the joist shrinks downward, a smooth shank nail stays locked to the subfloor panel, leaving a 1/16-inch micro-gap between the joist and the plywood.
Friction Squeaking: When a person walks across the floor, the subfloor deflects down and slides up and down the smooth steel nail shank.
The Ring Shank Lock: Ring shank nails feature concentric annular ridges that lock directly into wood grain fibers, providing 200% higher withdrawal resistance that pulls the panel tight as the joist shrinks.
SUBFLOOR FRICTION MECHANISM
Joist Shrinkage (19% to 9% MC) + Smooth Shank Slip = Chronic Subfloor Squeaking
Nail Size Standards: 8d Common vs. 8d Ring Shank vs. 6d Fasteners
Choose the right pennyweight.
Using the wrong nail diameter or length is an automatic inspection red tag and a major cause of bouncy, unstable floors.
8d Ring Shank Nails (.131″ Shank): 2-1/2 inches long with a thick .131-inch shank. Delivers maximum lateral shear and withdrawal strength. The gold standard for 23/32″ and 3/4″ subfloors.
8d Gun Nails (.113″ Shank): 2-3/8 inches long with a thinner .113-inch wire. Acceptable under certain manufacturer schedules but provides lower lateral shear than true .131″ wire.
8d Common Nails (.131″ Smooth): 2-1/2 inches long with a smooth .131-inch wire. Meets structural shear code for wind loads, but lacks withdrawal ridges, leading to squeaks over time.
6d Nails (Prohibited on 3/4″): 2 inches long with a thin .113-inch shank. Strictly restricted to thin 1/2-inch wall sheathing. Using 6d nails on 3/4-inch subfloors violates building code.
For full wire gauge comparisons, check out our guide on 16d common vs 16d sinker nails.
The APA Subfloor Adhesive Protocol: Glue + Nail Squeak-Proof System
Glue is structural.
Nails alone provide structural shear, but adhesive creates a unified T-beam assembly that stiffens the entire floor system by up to 30%.
Follow this professional adhesive protocol on every sheet:
Certified Adhesives: Use only subfloor adhesives conforming to ASTM D3498 or APA-AFG-01 specifications (e.g., polyurethane or heavy-duty elastomeric formulas).
Bead Sizing: Apply a continuous 1/4-inch diameter bead along the top of every joist. Apply two parallel 1/4-inch beads where panel edges butt together over a single joist.
Groove Gluing: Run a continuous 1/8-inch bead of adhesive inside the groove of tongue-and-groove (T&G) joints before driving panels together.
The 15-Minute Rule: Lay only two sheets of subfloor at a time and nail them off completely within 15 minutes. If adhesive skins over, it forms a rubbery cushion that causes chronic squeaks.
Tongue-and-Groove (T&G) Expansion Gaps: Preventing Buckling & Popping
Allow wood to breathe.
Wood structural panels expand when exposed to jobsite rain and interior humidity.
Driving subfloor sheets tight against each other with a sledgehammer forces panel edges to crush together, causing the floor to crown, ridge, and pop fasteners.
1/8-Inch Perimeter Gap: Leave a full 1/8-inch (3mm) expansion space at all panel ends and edge joints. Most 4×8 T&G sheets are manufactured slightly undersized (47-7/8″ x 95-7/8″) to allow for this gap.
Protecting the Tongue: Use a heavy 2×4 block against panel tongues when hammering sheets home. Striking the tongue directly crushes the interlocking joint.
Comprehensive Vertical Infographic
Use this visual diagnostic guide for Pinterest, mobile channels, and jobsite framing trailers:
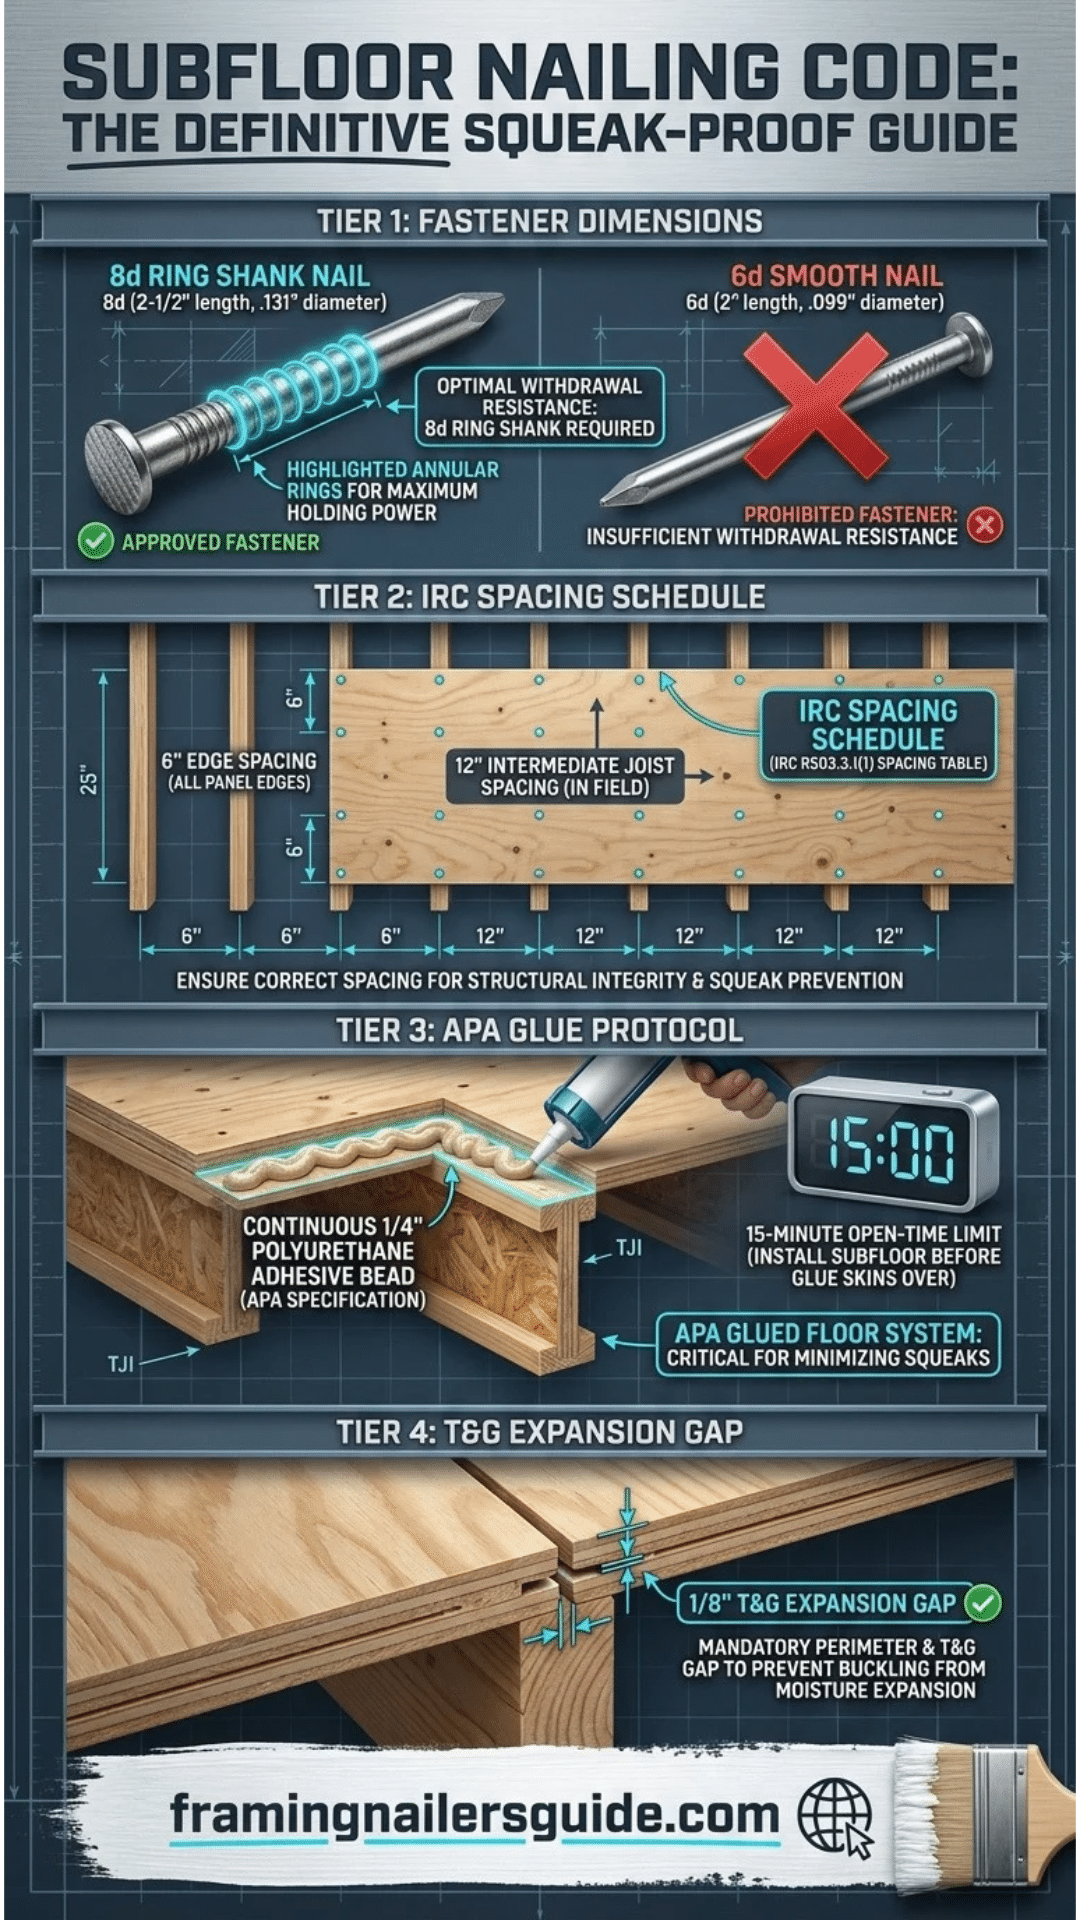
Pre-Drywall Subfloor Inspection Checklist
Run this check before installing interior wall plates or underlayment:
Nail Specification: Are all fasteners 8d ring shank nails (minimum 2-1/2″ x .131″ for 3/4″ panels)?
Edge Spacing Check: Are nails spaced exactly 6 inches on-center along all supported panel edges?
Field Spacing Check: Are nails spaced no more than 12 inches on-center along intermediate field joists?
Adhesive Application: Is there a continuous 1/4-inch bead of ASTM D3498 adhesive under every joist flange?
Open Time Compliance: Were panels nailed down within 15 minutes before the adhesive developed a surface skin?
Flush Drive Depth: Are all nail heads seated flush with the panel surface without over-driving or tearing face veneers?
Expansion Clearance: Is there a 1/8-inch expansion gap maintained between all panel ends and perimeter walls?

Frequently Asked Questions
What size nails are required for 3/4-inch subflooring?
Building codes require 8d ring shank nails measuring 2-1/2 inches long with a .131-inch shank diameter (or 2-3/8″ x .113″ under specific engineered approvals).
Can I use smooth shank nails for subflooring?
While smooth 8d common nails meet structural shear code, they lack withdrawal resistance. As joists shrink, smooth nails loosen and cause loud, permanent floor squeaks.
How far apart should subfloor nails be spaced?
Subfloor nails must be spaced 6 inches on-center along all supported panel edges and 12 inches on-center along intermediate joists in the field.
Can you use screws instead of nails for subfloor installation?
Yes. High-performance #8 or #9 structural subfloor screws (2-1/2″ long with aggressive threads) provide superior withdrawal resistance and virtually eliminate squeaks.
What happens if you do not leave a 1/8-inch gap between subfloor sheets?
Without a 1/8-inch expansion gap, panels absorb moisture and expand, causing edges to crush, buckle upward, and pop fasteners beneath finished flooring.
Final Summary & Key Takeaways
Build squeak-proof from the start.
Fasten 3/4-inch subfloors with 8d ring shank nails spaced 6 inches on edges and 12 inches in the field.
Lay down a continuous bead of certified subfloor adhesive, leave a 1/8-inch expansion gap, and guarantee a silent, rock-solid floor for the lifetime of the home.
