


Last Updated on August 21, 2026 by John Patterson
A framing nail is only correct when it matches the connection.
That sounds obvious. On a real framing job, it is one of the easiest details to overlook.
A stud-to-plate connection does not automatically use the same fastener as a joist-to-sill connection. Roof framing, blocking, rim joists, and structural panels each bring their own requirements.
This guide organizes those connections into one practical reference.
It uses selected examples from Table R602.3(1) of the 2024 International Residential Code (IRC) and APA guidance for roof sheathing. The IRC lists multiple permitted fastener options for many connections, so the examples below should never be read as the only acceptable choice. (ICC Codes)
Important: Always follow the code adopted in your jurisdiction, approved construction drawings, engineered details, and manufacturer instructions. Those requirements take priority over any general online nailing chart.

Quick Framing Nailing Schedule
If you came here for the numbers, start here.
The table uses selected common-nail examples where the current IRC schedule provides them. Other approved fasteners may appear in the same code row. (ICC Codes)
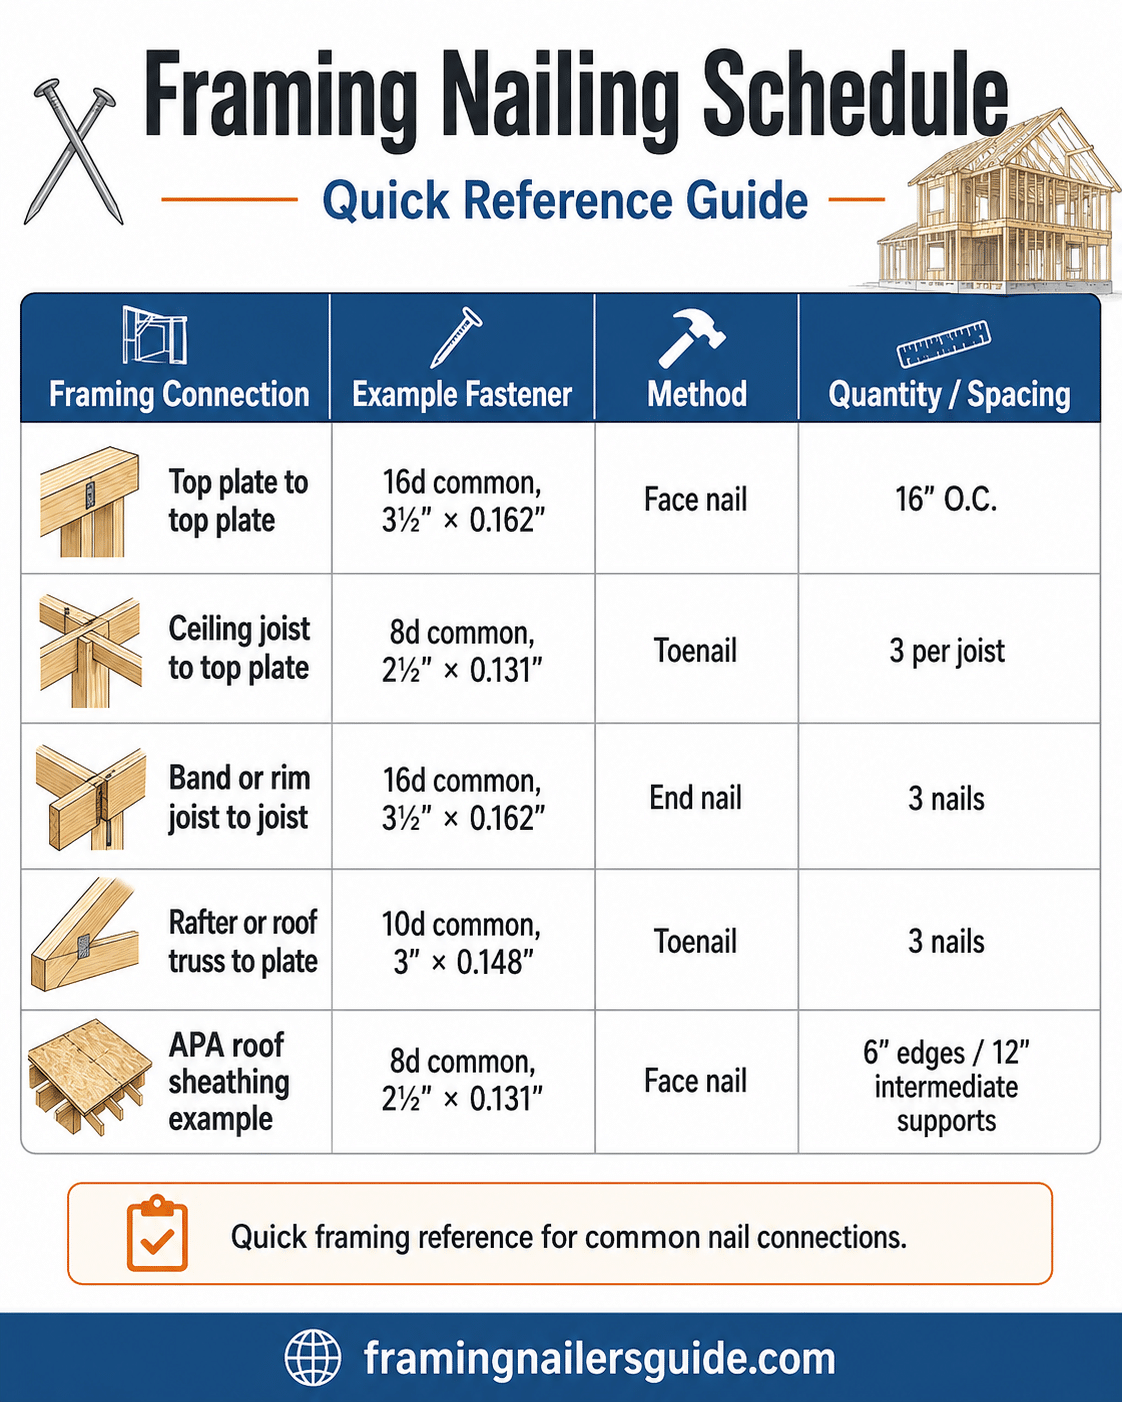
The top-plate, ceiling-joist, rim-joist, and rafter examples come from the IRC fastening schedule. The roof-sheathing example comes from APA’s installation guidance. (ICC Codes)
O.C. means “on center.”
So 16 inches O.C. means the center of one fastener is approximately 16 inches from the center of the next.
What Is a Framing Nailing Schedule?
A framing nailing schedule tells you how specific wood-framing connections should be fastened.
A useful schedule normally answers five questions:
- What two members are being connected?
- What fastener is permitted?
- How many fasteners are required?
- What spacing is required?
- How should the fastener be driven?
That last question matters more than many beginners expect.
The code may call for:
- Face nailing
- End nailing
- Toenailing
- Edge or field spacing
- Connection-specific hardware
So “use 16d nails for framing” is incomplete advice.
You need the connection first.
Why Nail Length Alone Is Not Enough
Two nails can be similar in length and still be different structural fasteners.
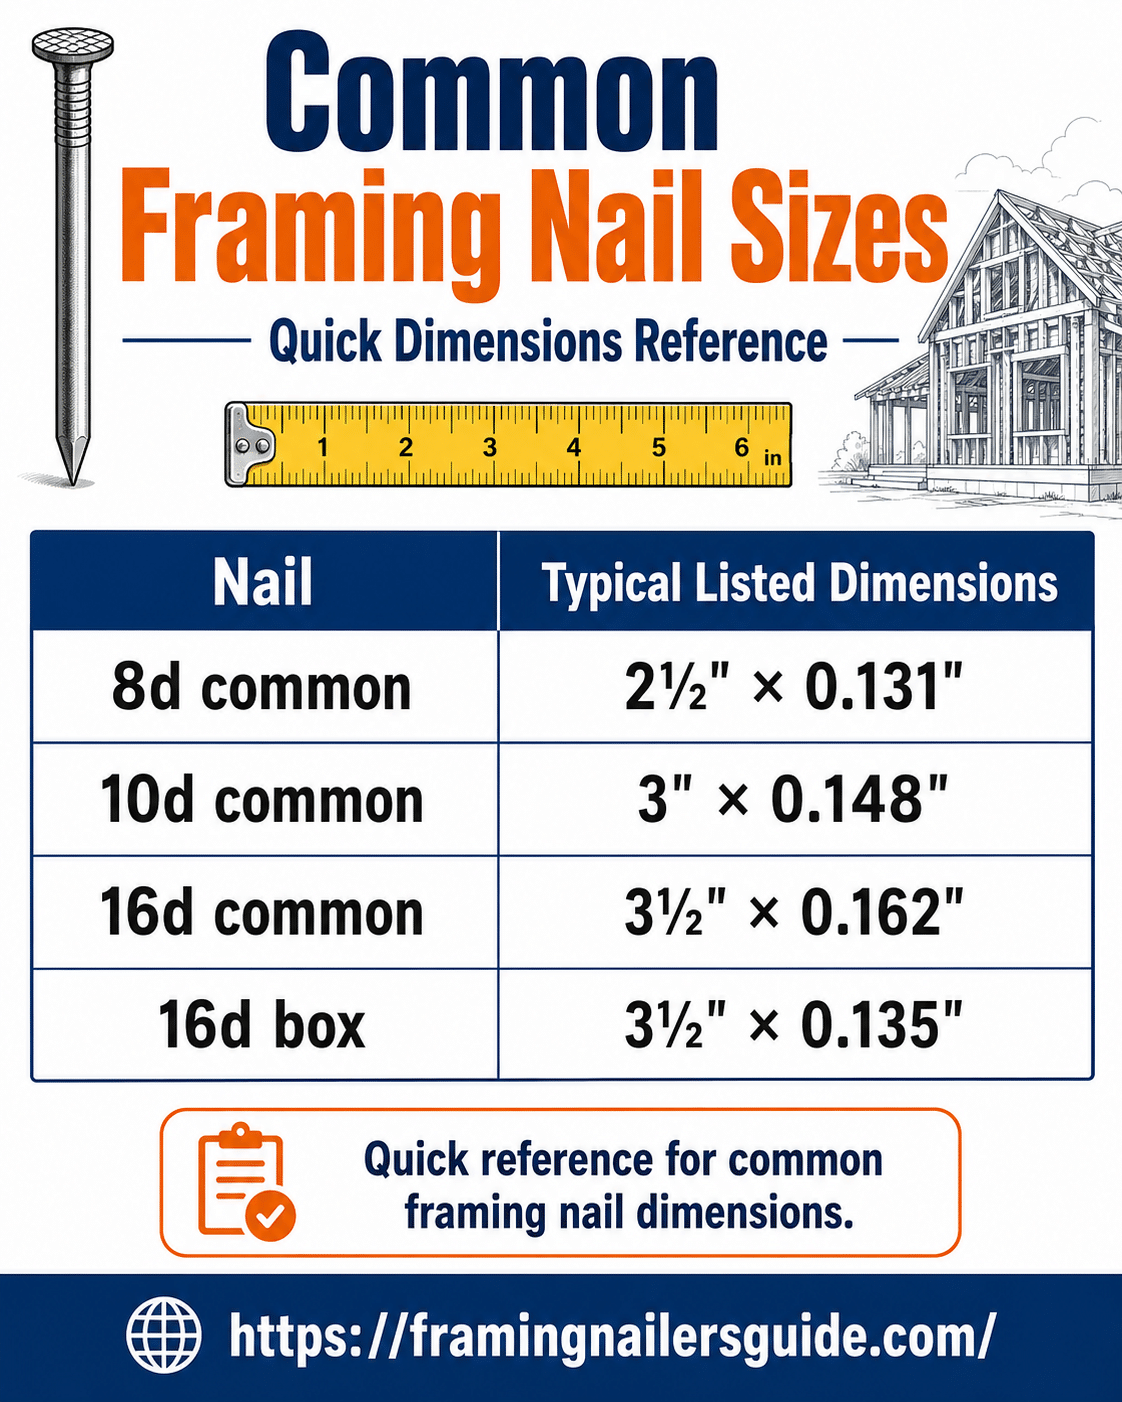
The IRC identifies many nails by both length and shank diameter, not just their penny designation. For example, its fastening tables distinguish different common and box nail dimensions. (ICC Codes)
Common examples include:
The important difference is easy to miss.
A 16d common nail and a 16d box nail can have the same length while using different shank diameters. The IRC therefore treats fastener dimensions as part of the specification. (ICC Codes)
Read the nail box
Before loading a framing nailer, check more than the marketing name.
Look for:
- Nail length
- Shank diameter
- Head style
- Collation angle
- Collation material
- Coating
- Nail material
- Tool compatibility
- Any applicable evaluation or approval information
A nail fitting your magazine does not prove that it satisfies the required structural connection.
End Nailing, Toenailing, and Face Nailing
The fastening method changes how the connection works.
It can also change the permitted nail size or quantity.
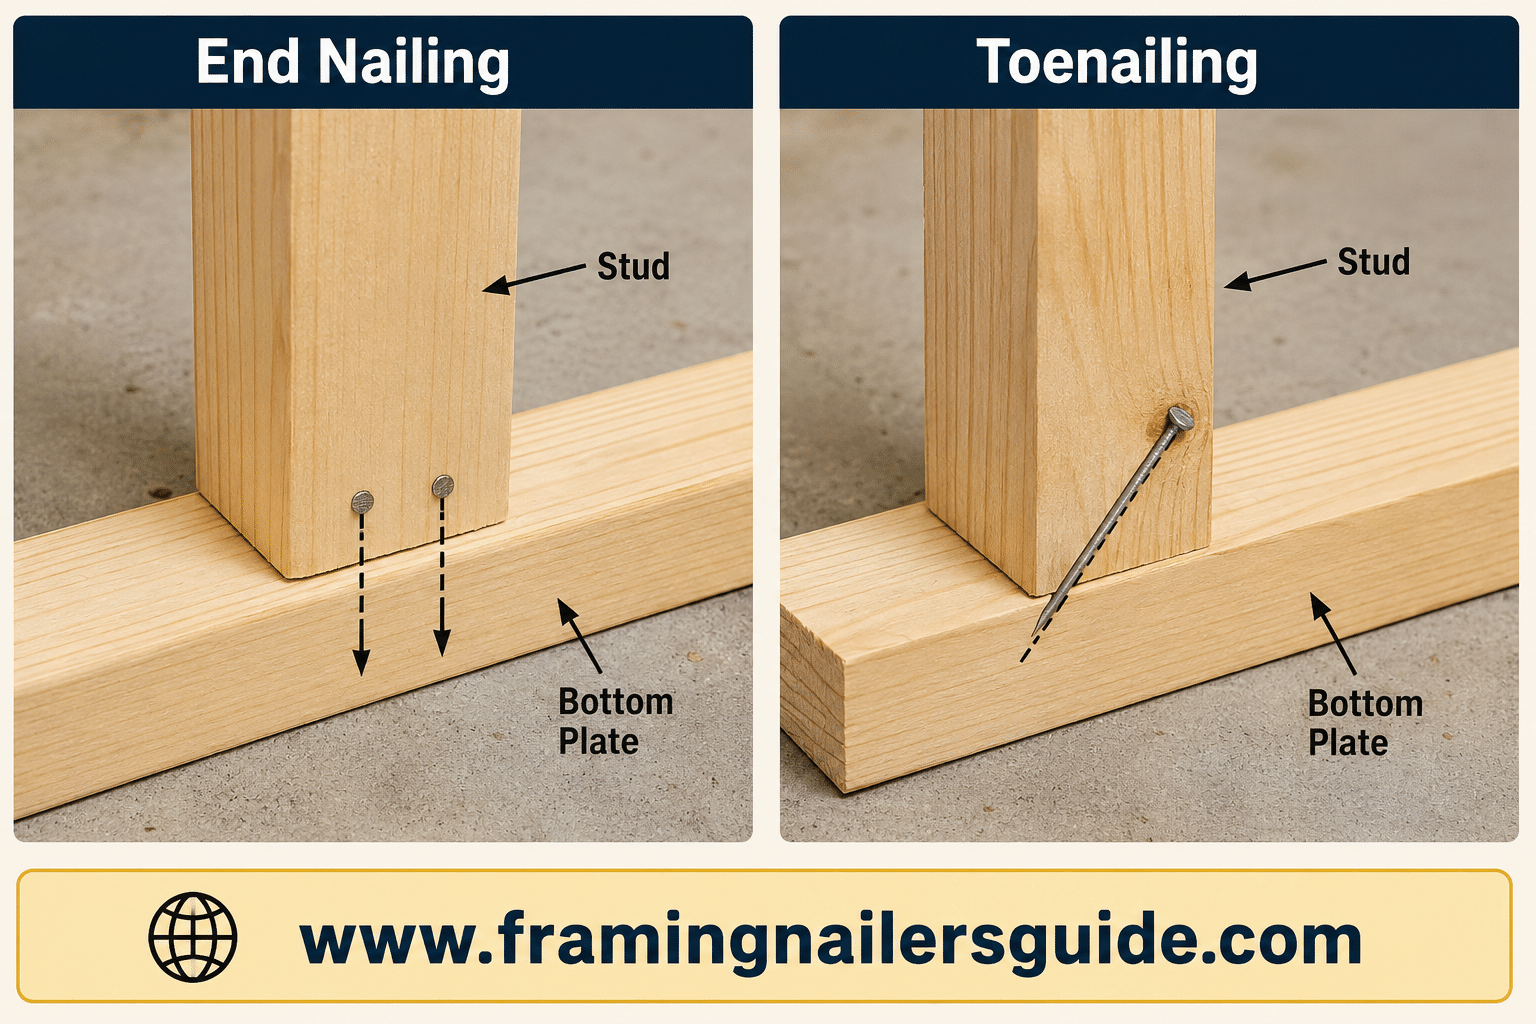
End nailing
End nailing drives the fastener through one framing member and into the end of another member.
You commonly see this where access to the end of a stud, joist, or similar piece is available during assembly.
The main point is simple:
Do not turn an end-nail schedule into a toenail schedule without checking the applicable requirement.
Toenailing
Toenailing drives the fastener at an angle through one member into another.
Common locations include:
- Stud-to-plate joints
- Joist connections
- Ceiling-joist connections
- Rafters
- Blocking
- Bridging
A good toenail needs enough penetration without splitting the wood or placing the fastener too close to the edge.
The IRC, for example, lists three 8d common nails as one permitted ceiling-joist-to-top-plate option, installed as toenails. (ICC Codes)
Face nailing
Face nailing sends the fastener through the face of one member into the member behind it.
You will see it in connections such as:
- Built-up framing
- Top plates
- Some splices
- Headers
- Certain roof-framing connections
For top plate to top plate, the 2024 IRC lists a 16d common nail at 16 inches O.C. as one face-nailing schedule. (ICC Codes)

Wall Framing Nailing Schedule
Wall framing is where the phrase “framing nail” becomes misleading.
There are several different joints inside one wall, and each needs to be read separately.
Studs and plates
A stud may be attached to a plate using a connection specifically identified in the fastening schedule.
The 2024 IRC table lists several permitted fastener combinations for plate-and-stud connections, including different common nails, box nails, and other specified nails. (ICC Codes)
This is why you should avoid choosing a fastener based only on habit.
Before fastening a wall, confirm:
- Whether the joint is being end-nailed or toenailed
- Required nail dimensions
- Nail quantity
- Whether the wall is part of a braced or engineered system
- Whether the plans provide a different detail
A regular partition wall and a braced wall panel should not be treated as though they are automatically identical.
Top plate to top plate
This connection has a clear reference in the 2024 IRC.
One listed option is:
- Fastener: 16d common nail
- Length: 3½ inches
- Diameter: 0.162 inch
- Spacing: 16 inches O.C.
- Method: Face nail
The schedule also contains different fastener options in other connections, so do not use this row as a universal plate-fastening rule. (ICC Codes)
Before fastening the plates
Check that:
- Plates sit tight together
- Wall members remain aligned
- Corners and intersections match the plans
- Splices meet the required detail
- Fastener spacing remains consistent
Good framing is easier to inspect when the layout is clean.
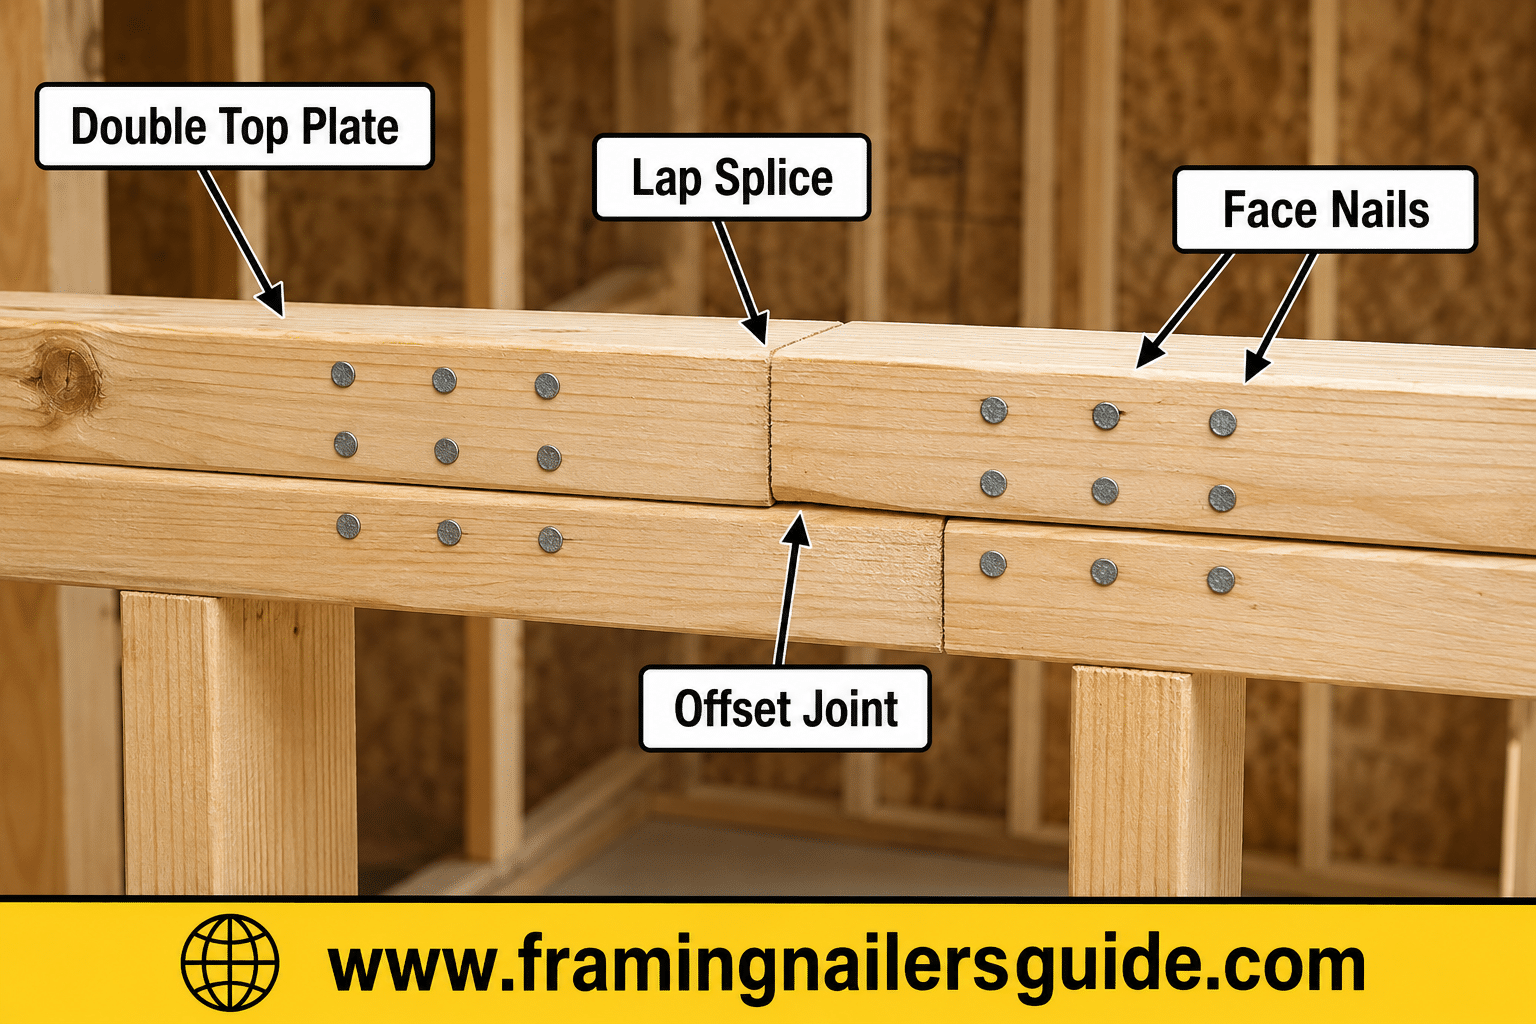
Double top-plate splices
A plate splice deserves its own check.
It is not the same thing as routine fastening along the full length of two stacked top plates.
The IRC fastening schedule contains a separate double-top-plate-splice requirement and specifies fasteners on each side of the joint. (ICC Codes)
That distinction matters because a splice has to transfer forces across a break in the member.
Always check:
- Required lap
- Nail quantity
- Nail dimensions
- Fastener location
- Whether seismic, bracing, or engineered details change the connection
Do not copy the ordinary top-plate spacing across a splice unless the applicable detail allows it.
Floor Framing Nailing Schedule
Floor framing brings joists, rim members, blocking, girders, and subfloor into the same assembly.
They do not all use the same fastening pattern.
Joist connections
The IRC fastening schedule provides connection-specific requirements for joists attached to sills, top plates, or girders.
The schedule includes several fastener alternatives rather than one universal joist nail. (ICC Codes)
Before fastening a joist, check:
- Required bearing
- Joist position
- Layout marks
- Specified fastener
- Nail count
- Whether a hanger or other connector is required
If engineered I-joists are being used, follow the product-specific installation details rather than assuming solid-sawn lumber rules apply without modification.
Band or rim joist to joist
For a band or rim joist connected to a joist, the 2024 IRC includes this option:
- 3 × 16d common nails
- 3½” × 0.162″
- End nailed
Other fastener options are also listed in the same schedule. (ICC Codes)
This is a good example of why quantity matters.
A correct nail used in the wrong number is still an incorrect fastening pattern.
Blocking and bridging
Blocking may look like minor framing, but it still needs proper fastening.
The IRC fastening schedule includes separate entries for blocking between joists, rafters, and trusses, including connection-specific toenailing requirements. (ICC Codes)
Watch for simple installation problems:
- Blocks cut too short
- Split ends
- Nails missing the framing
- Poor toenail angles
- Loose blocks
- Fasteners placed too close to edges
Clean cuts make clean fastening easier.
Roof Framing Nailing Schedule
Roof framing deserves more care because the connection may be affected by gravity loads, uplift, bracing, and engineered details.
A generic framing chart cannot replace the roof plan.
Ceiling joist to top plate
The 2024 IRC lists several permitted fasteners for this connection.
One common-nail option is:
- 3 × 8d common nails
- 2½” × 0.131″
- Per joist
- Toenail
Other listed options include different box nails and specified 3-inch nails. (ICC Codes)
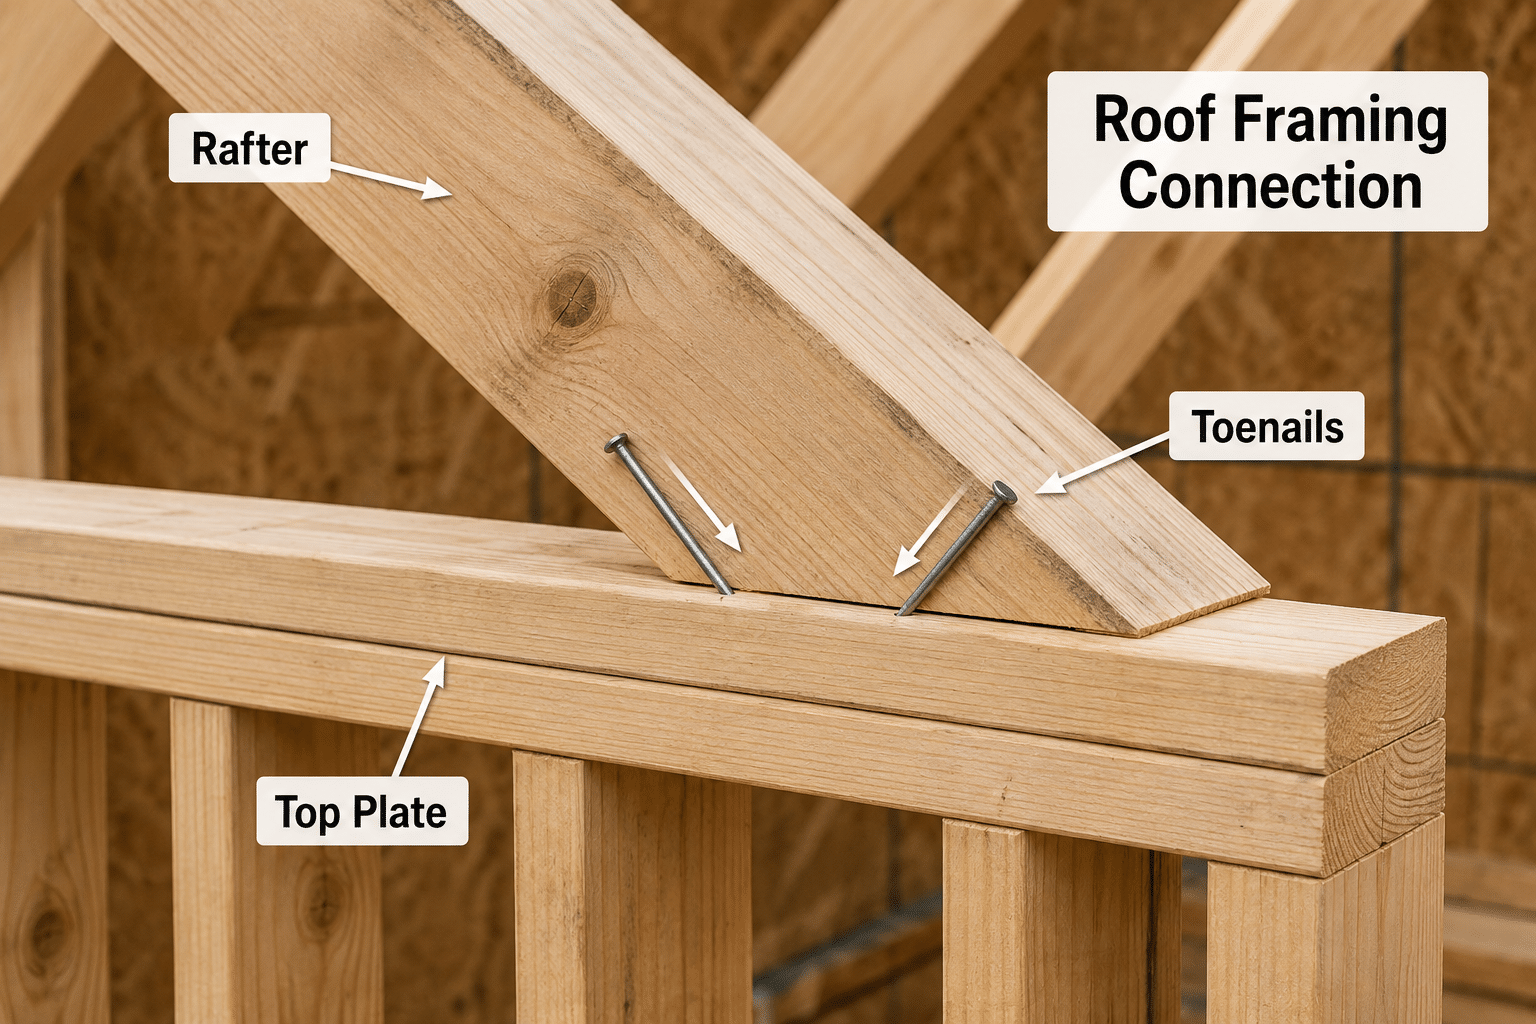
Rafter or roof truss to plate
The 2024 IRC also provides a specific fastening row for the rafter or roof-truss-to-plate connection.
One option uses:
- 3 × 10d common nails
- 3″ × 0.148″
- Toenailing
The same schedule lists alternative fasteners. (ICC Codes)
Do not assume those toenails satisfy every possible uplift requirement.
Braced-wall conditions, high-wind design, engineered trusses, and project-specific plans can require straps, clips, ties, or other connection details in addition to ordinary fastening. The IRC itself contains additional provisions for connecting braced wall panels to roof framing. (ICC Codes)
Rafter to ridge
Treat the ridge as its own connection.
A rafter-to-ridge joint should not automatically inherit the nail schedule used at the wall plate.
The IRC has separate roof-ceiling provisions governing ridge boards and conventional rafter framing. A ridge board used between opposing rafters must meet minimum dimensional requirements, and the surrounding roof framing needs to follow the applicable roof design. (ICC Codes)
Check the plan for:
- Ridge board or ridge beam
- Rafter fastening
- Hip or valley details
- Ceiling joist or rafter-tie requirements
- Connector requirements
- Engineered roof notes
One roof can contain several very different joints.
Roof Sheathing Nail Spacing

This is one place where a visual spacing pattern is genuinely useful.
APA’s guidance for APA Rated Sheathing gives a common roof installation example using minimum 8d common nails measuring 0.131 inch × 2½ inches. (APA – The Engineered Wood Association)
For that installation, APA recommends:
- 6 inches O.C. maximum at supported panel ends and edges
- 12 inches O.C. at intermediate supports
- Fasteners approximately 3/8 inch from panel ends
- Fasteners approximately 3/8 inch from panel edges
APA also notes that high-wind conditions may require additional fasteners. (APA – The Engineered Wood Association)
The 6/12 pattern
For this APA example:
6 inches at supported edges.
12 inches in the intermediate field.
That is useful to remember, but it should not be treated as a universal sheathing rule.
Panel type, roof design, wind conditions, diaphragm requirements, local codes, and project drawings can change the fastening schedule.
Leave Space Between Roof Sheathing Panels
Wood structural panels need room for normal dimensional movement.
APA recommends a 1/8-inch space between adjacent panel edge and end joints unless the panel manufacturer indicates otherwise. (APA – The Engineered Wood Association)
APA even notes that a 10d box nail can be used as a convenient spacer when setting that gap. (APA – The Engineered Wood Association)
Do not force panels tightly together just because the deck looks cleaner that way.
Follow the panel manufacturer’s instructions and project requirements.
Do Not Overdrive Sheathing Nails
Nail depth matters.
APA states that roof-sheathing fasteners should be driven flush with the panel surface. (APA – The Engineered Wood Association)
That means the nail head should not be:
- Left noticeably proud
- Buried deeply into the panel
- Breaking through the face material
A pneumatic nailer can drive hundreds of fasteners quickly.
That speed makes a bad depth setting expensive.
Test before production
Use scrap material first.
Check:
- Air pressure
- Depth adjustment
- Nail head position
- Panel thickness
- Lumber density
- Consistency between shots
Then inspect the first few fasteners after moving onto the actual work.

Framing Nailer Nails vs. Common Nails
This is where many practical questions begin.
A framing nailer may use collated nails that look similar to the nails listed in a code table, but appearance and magazine fit are not enough.
Match the actual specification.
Compare:
- Length
- Diameter
- Head configuration
- Material
- Coating
- Required quantity
- Installation method
- Applicable approval
The IRC’s fastening schedule repeatedly distinguishes nails by both length and diameter. (ICC Codes)
A thinner nail should not be treated as structurally identical simply because the length is close.
What Size Nails Should You Use for 2×4 Framing?
There is no useful one-number answer.
The better question is:
What are you connecting?
A 2×4 can be used as:
- A wall stud
- A plate
- Blocking
- A header component
- Roof framing
- Temporary bracing
- Part of a built-up assembly
Each connection can call for something different.
So instead of asking, “What nail should I use for a 2×4?” use this sequence:
- Identify the connection.
- Find the applicable fastening row.
- Check nail length and diameter.
- Check quantity or spacing.
- Check the fastening method.
- Confirm whether another engineered or manufacturer detail controls.
That sequence is far more reliable than memorizing one nail size.
Can You Use 3¼-Inch Framing Nails Instead of 16d Common Nails?
Not automatically.
A traditional 16d common nail listed in the IRC is commonly identified as 3½ inches long with a 0.162-inch diameter in applicable schedule rows. (ICC Codes)
A 3¼-inch collated nail may differ in:
- Length
- Shank diameter
- Head
- Collation
- Structural listing
The code may provide an approved alternative for a particular connection.
But you need to match that alternative, not assume equivalence because two nails look close.
Are 21-Degree and 30-Degree Framing Nails the Same?
The angle primarily relates to the nailer’s magazine and collation system.
It does not, by itself, tell you whether the nail meets a structural fastening requirement.
When comparing 21-degree and 30-degree framing nails, check:
- Tool compatibility
- Nail dimensions
- Head style
- Collation type
- Local code requirements
- Manufacturer specifications
Choose the nail for the connection first.
Then make sure your nailer can run it.
Can Screws Replace Framing Nails?
Sometimes a specifically approved structural screw can be used.
A random wood or deck screw should not be substituted simply because it is easier to install.
Structural fasteners are selected around defined performance and installation requirements.
Use screws only when they are permitted by:
- The applicable code
- Approved construction documents
- An engineered detail
- A recognized evaluation
- The connector or fastener manufacturer
This matters especially with structural connectors.
Use the fasteners specified for the connector rather than whatever happens to be nearby.
8 Framing Nail Mistakes to Avoid

Most fastening problems are not complicated.
They usually come from skipping one basic check.
-
Choosing by nail length alone
Length is only part of the specification.
Check shank diameter too.
-
Using one nail for every connection
Walls, floors, roofs, and sheathing contain different joints.
Read each connection separately.
-
Confusing end nailing and toenailing
The direction changes.
The required nail size or quantity can change with it.
-
Ignoring spacing
Spacing is part of the schedule.
This is especially important with plates and structural panel fastening.
-
Overdriving sheathing
Set the nailer so fasteners finish flush where required.
APA specifically calls for flush fastening in its roof-sheathing installation guidance. (APA – The Engineered Wood Association)
-
Missing the framing
Perfect 6-inch spacing does nothing if part of the nail line misses the rafter or stud.
Mark framing locations clearly before fastening panels.
-
Splitting the lumber
Poor angles and fasteners placed too close to an edge can damage the framing.
Slow down when toenailing near ends.
-
Ignoring engineered details
Trusses, I-joists, hangers, straps, shear walls, hold-downs, and engineered lumber may carry specific fastening instructions.
Do not replace those details with a generic nailing chart.
How to Set Up a Framing Nailer Before You Start
A good nail schedule can still produce poor work when the tool is set badly.
Spend a minute on setup.
Confirm the fastener
Check:
- Length
- Diameter
- Collation
- Head style
- Coating
- Tool compatibility
Then compare it with the required connection.
Test the depth
Use scrap material of similar density and thickness.
Adjust the nailer until the fastener seats properly without excessive overdrive.
Watch the first few shots
Look for:
- Proud nail heads
- Overdriven heads
- Bent nails
- Splitting
- Inconsistent depth
- Misfires
- Nails missing the target member
Fix the tool before repeating the problem across the whole frame.
30-Second Framing Nail Check
Before fastening a structural connection, run through this short check.
Connection
What am I fastening to what?
Specification
What nail or fastener is permitted?
Dimensions
What length and diameter are required?
Quantity
How many nails do I need?
Spacing
Is there an O.C. requirement?
Method
Face nail, end nail, or toenail?
Project detail
Do the drawings, local code, or manufacturer instructions override the general schedule?
That is usually enough to stop the most common mistakes before they happen.
Framing Nailing Schedule FAQs
What does O.C. mean in a nailing schedule?
O.C. means on center.
A fastener spacing of 16 inches O.C. means each fastener center is positioned approximately 16 inches from the next.
What nails are commonly used for framing?
8d, 10d, and 16d nails all appear in residential framing schedules.
The correct fastener depends on the connection, nail dimensions, installation method, and applicable code requirement. (ICC Codes)
How many nails attach a ceiling joist to a top plate?
The 2024 IRC lists three 8d common nails as one permitted option for a ceiling joist to top plate connection.
The nails measure 2½ inches × 0.131 inch and are installed as toenails. (ICC Codes)
How many nails attach a rim joist to a joist?
One 2024 IRC option uses three 16d common nails, measuring 3½ inches × 0.162 inch.
They are end-nailed for the band or rim joist-to-joist connection. (ICC Codes)
How many nails attach a rafter or roof truss to the plate?
One option in the 2024 IRC uses three 10d common nails for the rafter or roof-truss-to-plate connection.
Project-specific uplift and roof-framing details can require additional measures. (ICC Codes)
What nail spacing should I use for roof sheathing?
APA’s published roof-sheathing example uses minimum 8d common nails at a maximum of 6 inches O.C. along supported panel ends and edges and 12 inches O.C. at intermediate supports.
APA notes that high-wind conditions may require additional fastening. (APA – The Engineered Wood Association)
How far from the edge should roof-sheathing nails be?
APA recommends placing the fasteners about 3/8 inch from panel ends and edges in its roof-sheathing installation guidance. (APA – The Engineered Wood Association)
Should roof-sheathing nails be flush?
Yes, for the APA installation discussed here.
APA directs installers to drive fasteners flush with the panel surface. (APA – The Engineered Wood Association)
Can nail-gun nails replace common nails?
They can only be treated as an approved alternative when their specifications satisfy the applicable requirement.
Compare dimensions, fastener type, quantity, connection method, and any required approval rather than relying on magazine compatibility alone.
How This Guide Was Prepared
Accuracy matters more here than word count.
This guide was organized around two primary technical references:
- 2024 International Residential Code, Table R602.3(1) for wood-framing fastening examples
- APA Builder Tips: Proper Installation of APA Rated Sheathing for Roof Applications, Form N335 for the roof-sheathing installation example
The current IRC fastening table contains connection-specific fastener sizes, quantities, spacing, and fastening methods. APA’s roof guide provides additional panel-installation details, including fastener placement, the 6/12 spacing example, flush driving, and recommended panel gaps. (ICC Codes)
The purpose of this page is not to replace construction documents.
It is to help you understand what information a real framing nailing schedule is asking you to check.
Before You Use This Schedule
Codes are adopted locally.
Your jurisdiction may use the 2024 IRC, an earlier IRC edition, local amendments, or another applicable building code.
APA likewise advises users to consult the local jurisdiction or design professional to confirm compliance with code, construction, and performance requirements. (APA – The Engineered Wood Association)
Before structural fastening, check:
- Locally adopted building code
- Approved construction drawings
- Structural notes
- Engineering details
- Truss drawings
- Connector instructions
- Engineered wood instructions
- Fastener manufacturer requirements
- Sheathing manufacturer instructions
When a project-specific requirement differs from a general reference chart, follow the requirement that legally and technically governs the project.
Final Takeaway
A useful framing nailing schedule does not begin with the question:
“What size nail should I use?”
It begins with:
“What connection am I fastening?”
From there, check the fastener dimensions, quantity, spacing, and installation method.
That small change in thinking removes most of the guesswork.
And it makes a framing chart useful for what it should be: a quick reference, not a substitute for the plans.
