


Last Updated on December 10, 2025 by John Patterson
I’ll never forget the first time I realized there was more than one way to frame a house.
I was twenty-three, fresh out of trade school, convinced I knew everything about construction.
My foreman walked me past a historic Chicago bungalow under restoration and pointed at the exposed wall framing. “Balloon framing,” he said. “Those studs run continuous from foundation to roof. Two stories on a single piece of lumber.”
My mind… kind of exploded.
See, I’d only learned platform framing—the modern standard where you build floor by floor, creating a platform at each level.
But standing there, looking at those uninterrupted vertical studs stretching twenty-plus feet into the air, I realized something important: the technique you choose for framing dramatically affects everything. Strength. Cost. Energy efficiency. Construction speed. Even fire safety.
That moment sent me down a rabbit hole. I’ve since worked with seven distinct framing methods across residential and light commercial projects.
Some techniques save you 25% on materials but require precision planning. Others cost more upfront but slash your energy bills by 40-60%. A few are dead simple for DIYers. Others? You’ll need specialists.
Here’s what I’ve learned: knowing which framing technique to use—and why—separates weekend warriors from master builders. Let’s dive into the seven methods that actually matter in 2026, starting with the evolution that got us here.
The Evolution of Wood Framing Techniques in Construction
From Post-and-Beam to Modern Stick Framing
Wood framing didn’t just appear fully formed. It evolved.
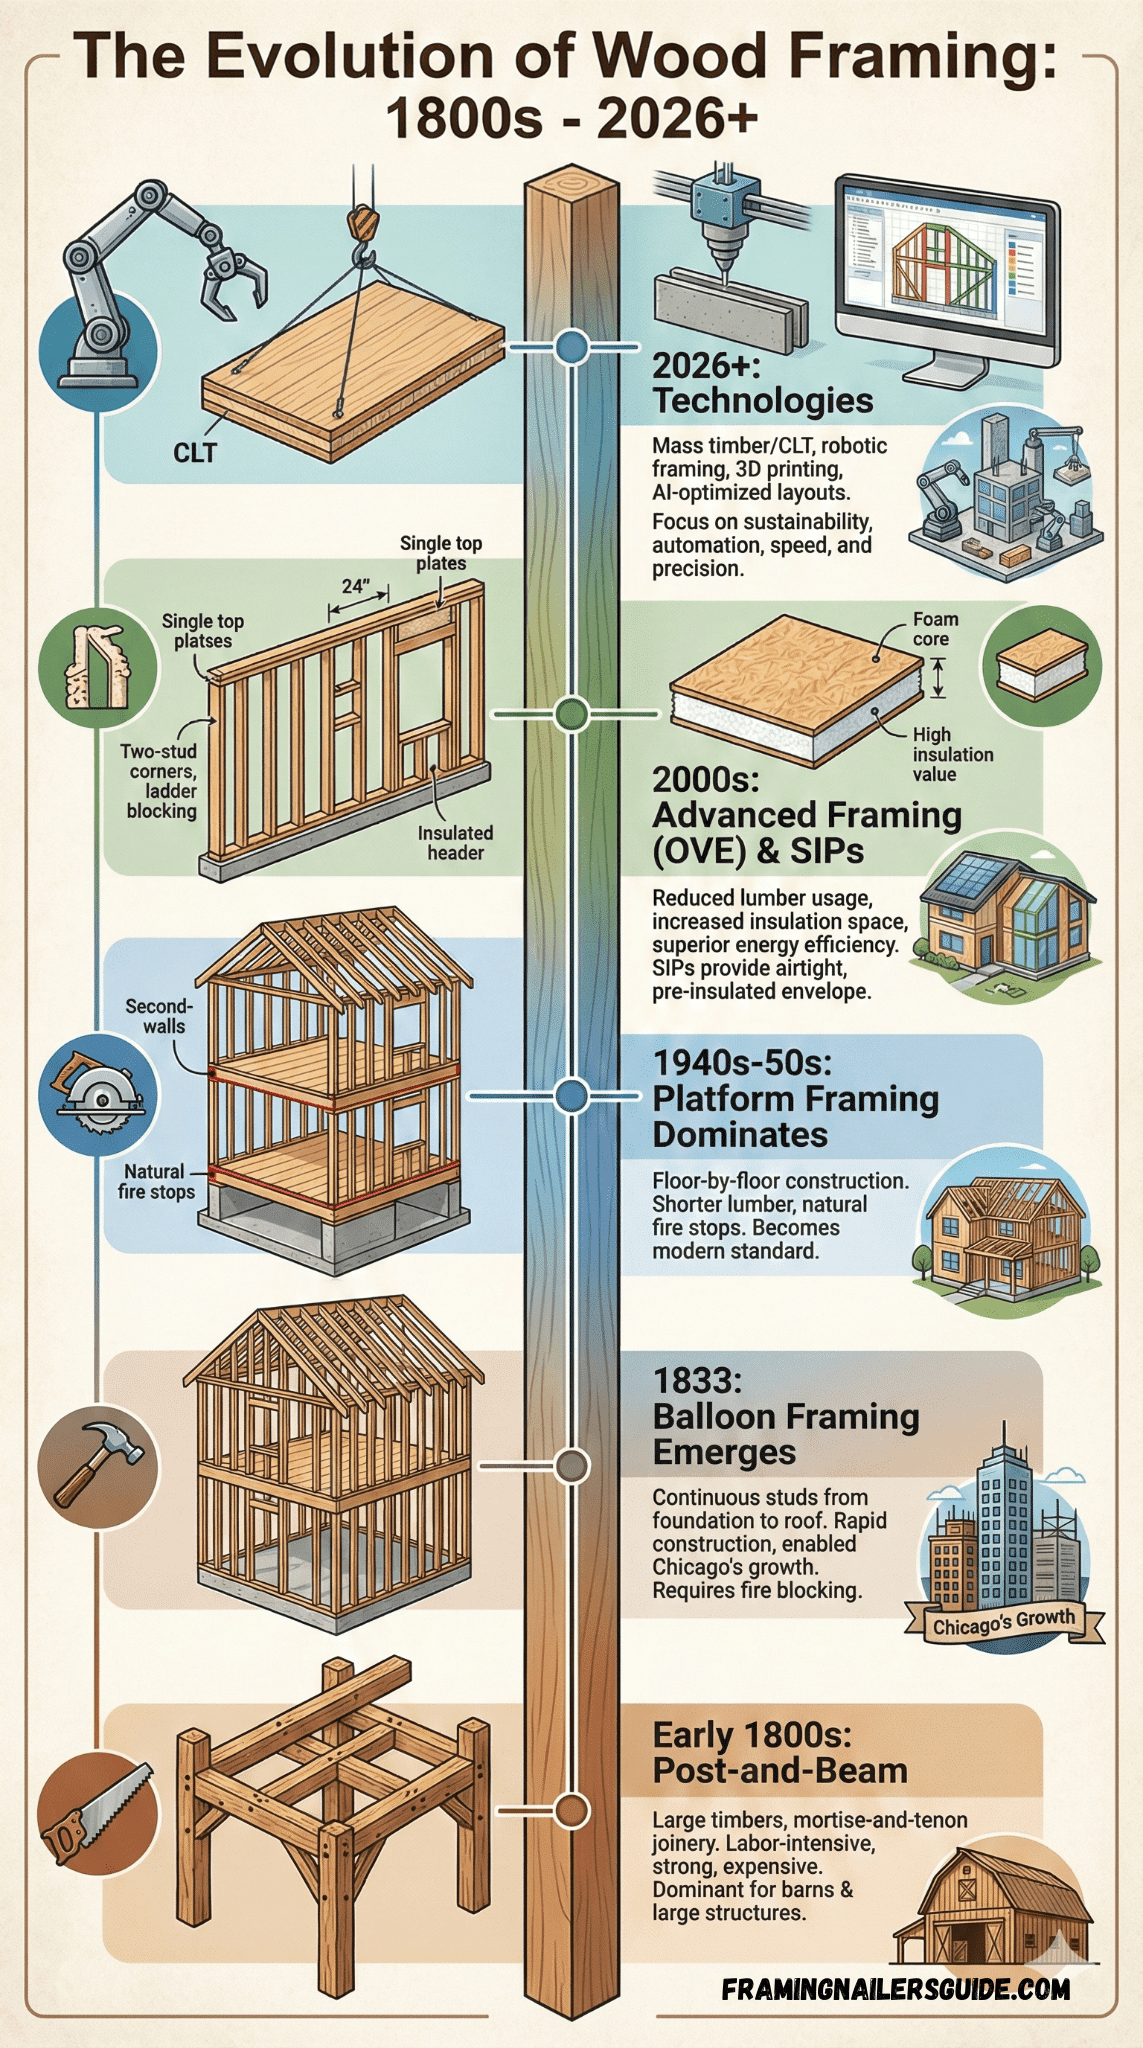
In the early 1800s, post-and-beam construction dominated—massive timbers joined with complex mortise-and-tenon joinery.
Beautiful. Sturdy. Labor-intensive. Expensive. Each joint required a skilled craftsman and hours of hand-chiseling. Great for barns and churches. Not so great when Chicago needed to build 5,000 homes… fast.
Enter balloon framing around 1833. Revolutionary at the time. Instead of heavy timbers, builders used dimensional lumber (2x4s, 2x6s) with simple nailed connections.
Studs ran continuously from foundation to roof, creating the “balloon” effect. Suddenly, three workers could frame a house in days instead of weeks. Chicago’s explosive growth? Largely thanks to this technique.
But balloon framing had problems. Fire spread easily through those continuous stud cavities. Lumber prices increased as old-growth forests disappeared. Long 20+ foot studs became expensive and difficult to source.
Platform framing emerged in the 1940s-1950s as the solution. Build a floor deck, frame walls on that platform, stand them up, repeat. Shorter lumber. Safer construction. Natural fire stops between floors. By 1960, it was the dominant technique.
Now? We’re seeing the next evolution. Advanced framing reduces lumber by 25-30% while increasing energy efficiency. Prefabrication brings factory precision to job sites. Engineered products like CLT (cross-laminated timber) enable wood structures previously impossible.
Why Framing Technique Selection Matters
Structural Performance Differences
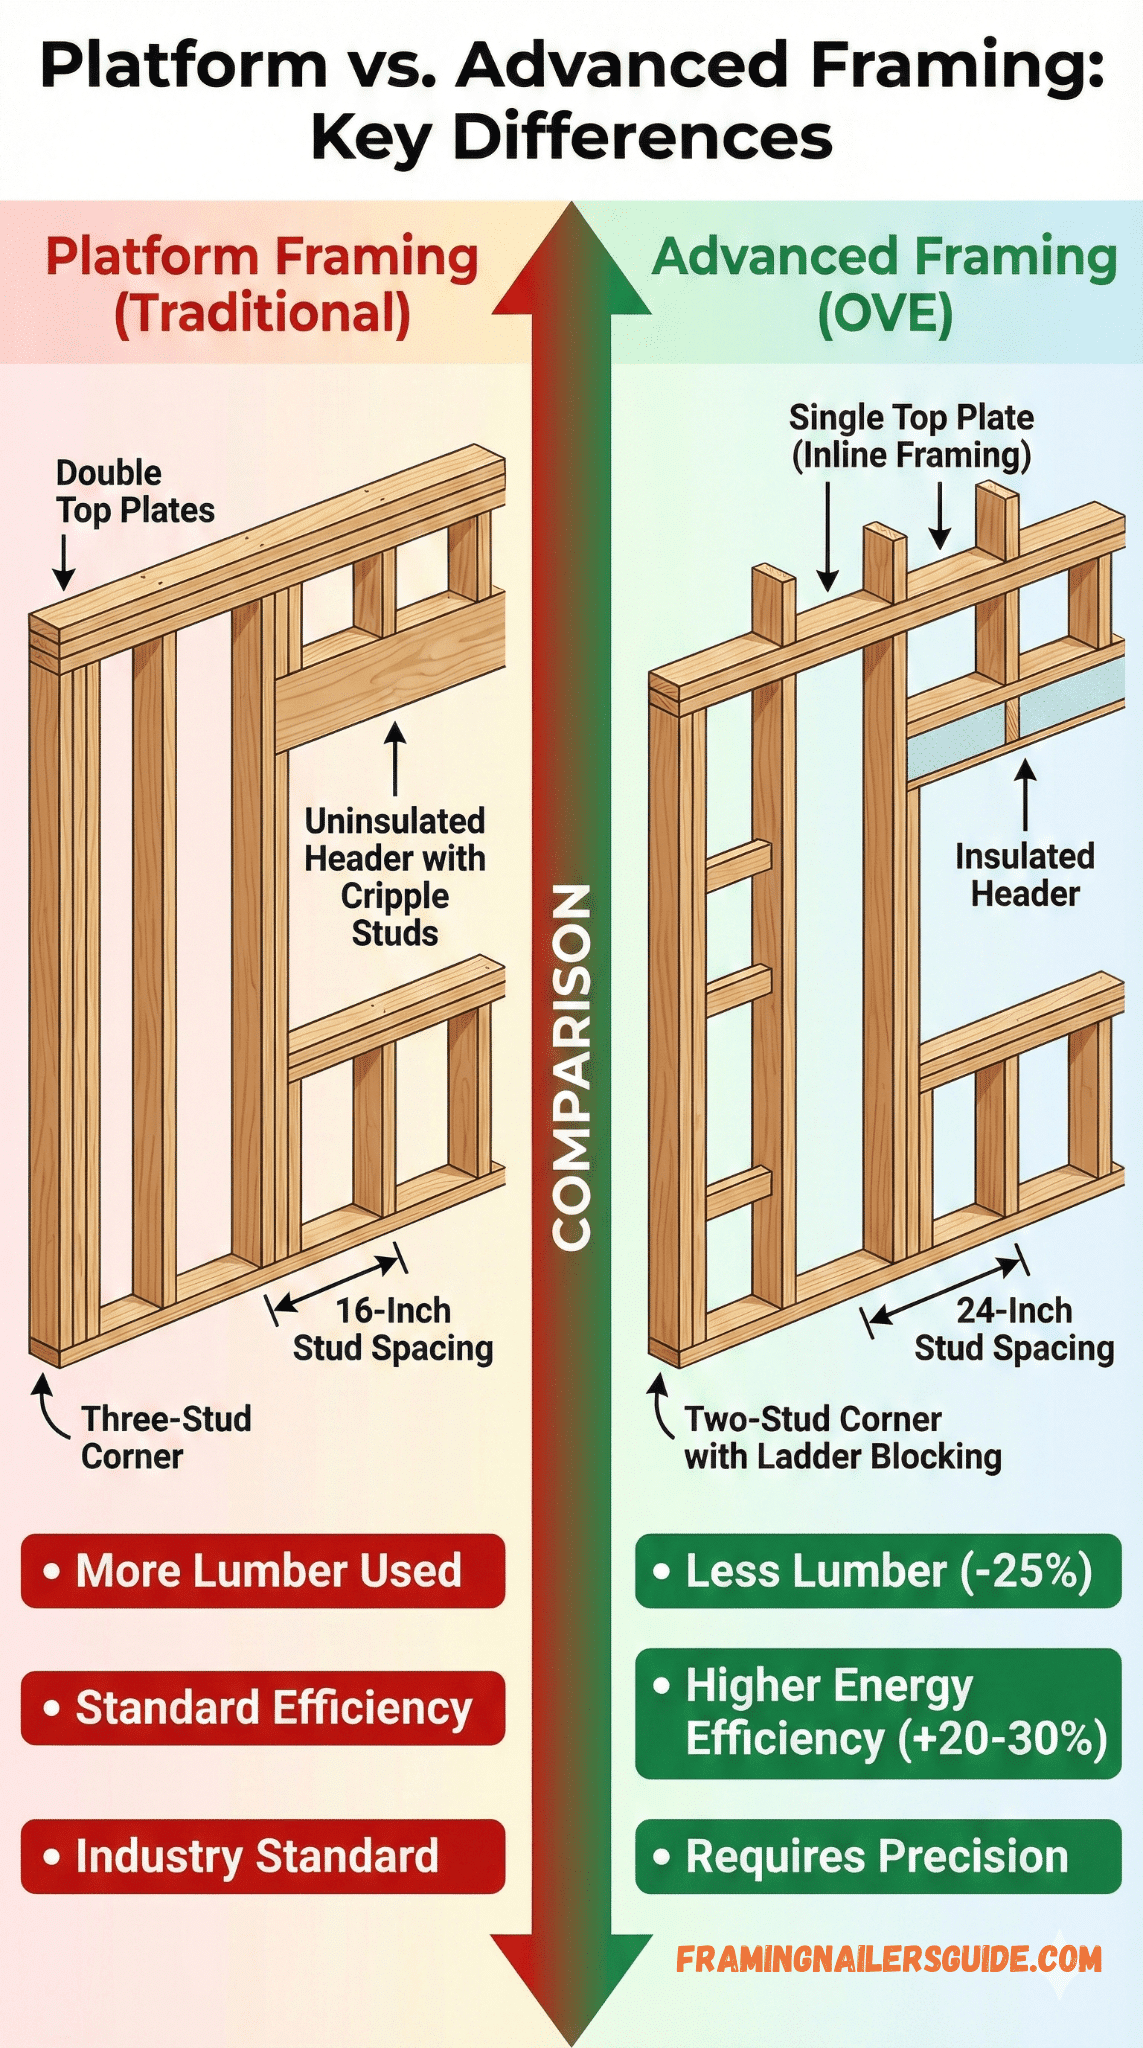
Every framing method distributes loads differently. Platform framing creates natural horizontal breaks—good for spreading weight across bearing walls, but you get some settling as wood shrinks.
Post-and-beam concentrates loads on fewer, larger members, creating dramatic column-free spaces but requiring careful engineering.
Advanced framing with 24-inch spacing reduces lumber but demands proper load alignment—studs, joists, and rafters must stack vertically for optimal load transfer.
Cost Implications (Can Vary 20-40%)
Material costs alone can swing wildly. Platform framing with standard 16-inch spacing runs $4.50-6.50 per square foot.
Advanced framing cuts that by 20-25%. Steel framing? Add 15-30% over wood. Post-and-beam with quality timber? You’re looking at $15-30/sq ft just for materials.
Then there’s labor. Experienced platform framing crews work fast. Advanced framing requires more planning but uses less material. SIPs install 2-3x faster than stick framing but need cranes.
Energy Efficiency Considerations
Here’s where it gets interesting.
Traditional platform framing with 16-inch stud spacing creates lots of “thermal bridges”—wood conducts heat 10x faster than insulation. You lose energy through every stud.
Advanced framing with 24-inch spacing? You replace wood with insulation, improving energy efficiency by 20-30% without compromising structure. SIPs take this further, achieving 40-60% energy savings versus conventional framing.
In 2026, with energy codes tightening globally, this matters more than ever.
Speed of Construction
Platform framing a 2,000 sq ft house: 5-8 days with a four-person crew. SIPs? 1-2 days. Prefab wall panels? Same timeline, walls installed in a day or two.
But speed isn’t everything. That SIP house required months of planning before the first panel arrived. The platform-framed house? You can adjust on the fly.
Technique #1 – Platform Framing (Industry Standard)
Platform Framing Fundamentals
If you’re in North America and you’re building a house… you’re probably using platform framing.
It’s the workhorse. The default. The technique that 90% of residential construction relies on because it just works.
Here’s the concept: Build your first-floor deck on the foundation. That deck becomes your work platform—hence the name. Frame your first-floor walls, assemble them lying flat, then tip them up into place. Add a second-floor deck on top of those walls. Frame second-floor walls. Keep going until you hit the roof.
Why did it become dominant after 1950? Safety. Fire protection. Economics.
Step-by-Step Platform Framing Process
- First Floor Deck Construction
You start with floor joists spanning from the foundation to your center beam or bearing wall. These are typically 2x10s or 2x12s spaced 16 inches on-center (though 24 inches works for many applications).
Snap chalk lines. Install joist hangers or rest joists on a ledger. Make sure everything’s level—this is your foundation for everything that follows. One-quarter inch off here becomes half an inch by the time you reach the roof.
Then comes 3/4-inch tongue-and-groove OSB or plywood subfloor. Glue and screw it down (nails work, but screws eliminate squeaks). This creates a solid, safe work platform.
- First Floor Wall Assembly
Now the magic happens. Layout is critical.
You’ll mark your top and bottom plates simultaneously—where every stud goes, where every door and window opening sits. Mark both plates at the same time so they’re perfectly aligned. Common studs are 16 inches on-center, but remember—you can often use 24 inches with proper engineering.
Cut your studs to length. For standard 8-foot ceilings, that’s usually 92-5/8 inches (accounts for two 1-1/2″ plates top and bottom, plus 1/2″ drywall on ceiling). Assemble walls flat on your deck platform. Nail everything together. Install headers over door and window openings—usually doubled 2x6s, 2x8s, or 2x10s depending on the span.
- Raising and Bracing Walls
This is where having help matters. Two people minimum for short walls. Four or more for longer sections. You lift the assembled wall, tip it up, slide the bottom plate to its chalk line, and brace it temporarily with diagonal 2x4s.
According to California OSHA residential framing regulations, employees cannot work from or walk on structural members until they’re securely braced and supported. This isn’t just code—it’s common sense. I’ve seen walls twist and fall when bracing was inadequate.
- Continue Process for Additional Stories
Once first-floor walls are up, plumbed, and straightened, you install a band joist around the perimeter. Second-floor joists rest on top of those first-floor walls. Another subfloor deck. Second-floor walls. Repeat until done.
Platform Framing Advantages
- Safety: You’re working on solid platforms at each level, not scaffolding
- Efficiency: Shorter lumber is cheaper and easier to handle
- Cost-effective: Standardized materials and methods keep costs down
- Fire safety: Each floor platform creates a natural fire stop
- Easier labor: Forgiving for less experienced crews
Platform Framing Limitations
Nothing’s perfect.
Platform framing creates multiple horizontal breaks in your structure. As lumber dries and settles, you can get differential movement—maybe a quarter to half-inch on a two-story house. For most applications? Not a problem. For precision-fit finishes? You need to account for it.
There’s also thermal bridging at every floor level where exterior walls meet floor platforms. Cathedral ceilings require special consideration since platform framing assumes horizontal breaks.
Cost Analysis:
- Material cost: $4.50-6.50/sq ft
- Labor cost: $3.50-5.50/sq ft
- Total: $8-12/sq ftfor complete framing
Technique #2 – Advanced Framing (Optimum Value Engineering)
What Makes Advanced Framing Different
This is where things get smart.
Advanced framing—also called Optimum Value Engineering or OVE—asks a simple question: “What if we stopped using lumber where we don’t need it?”.
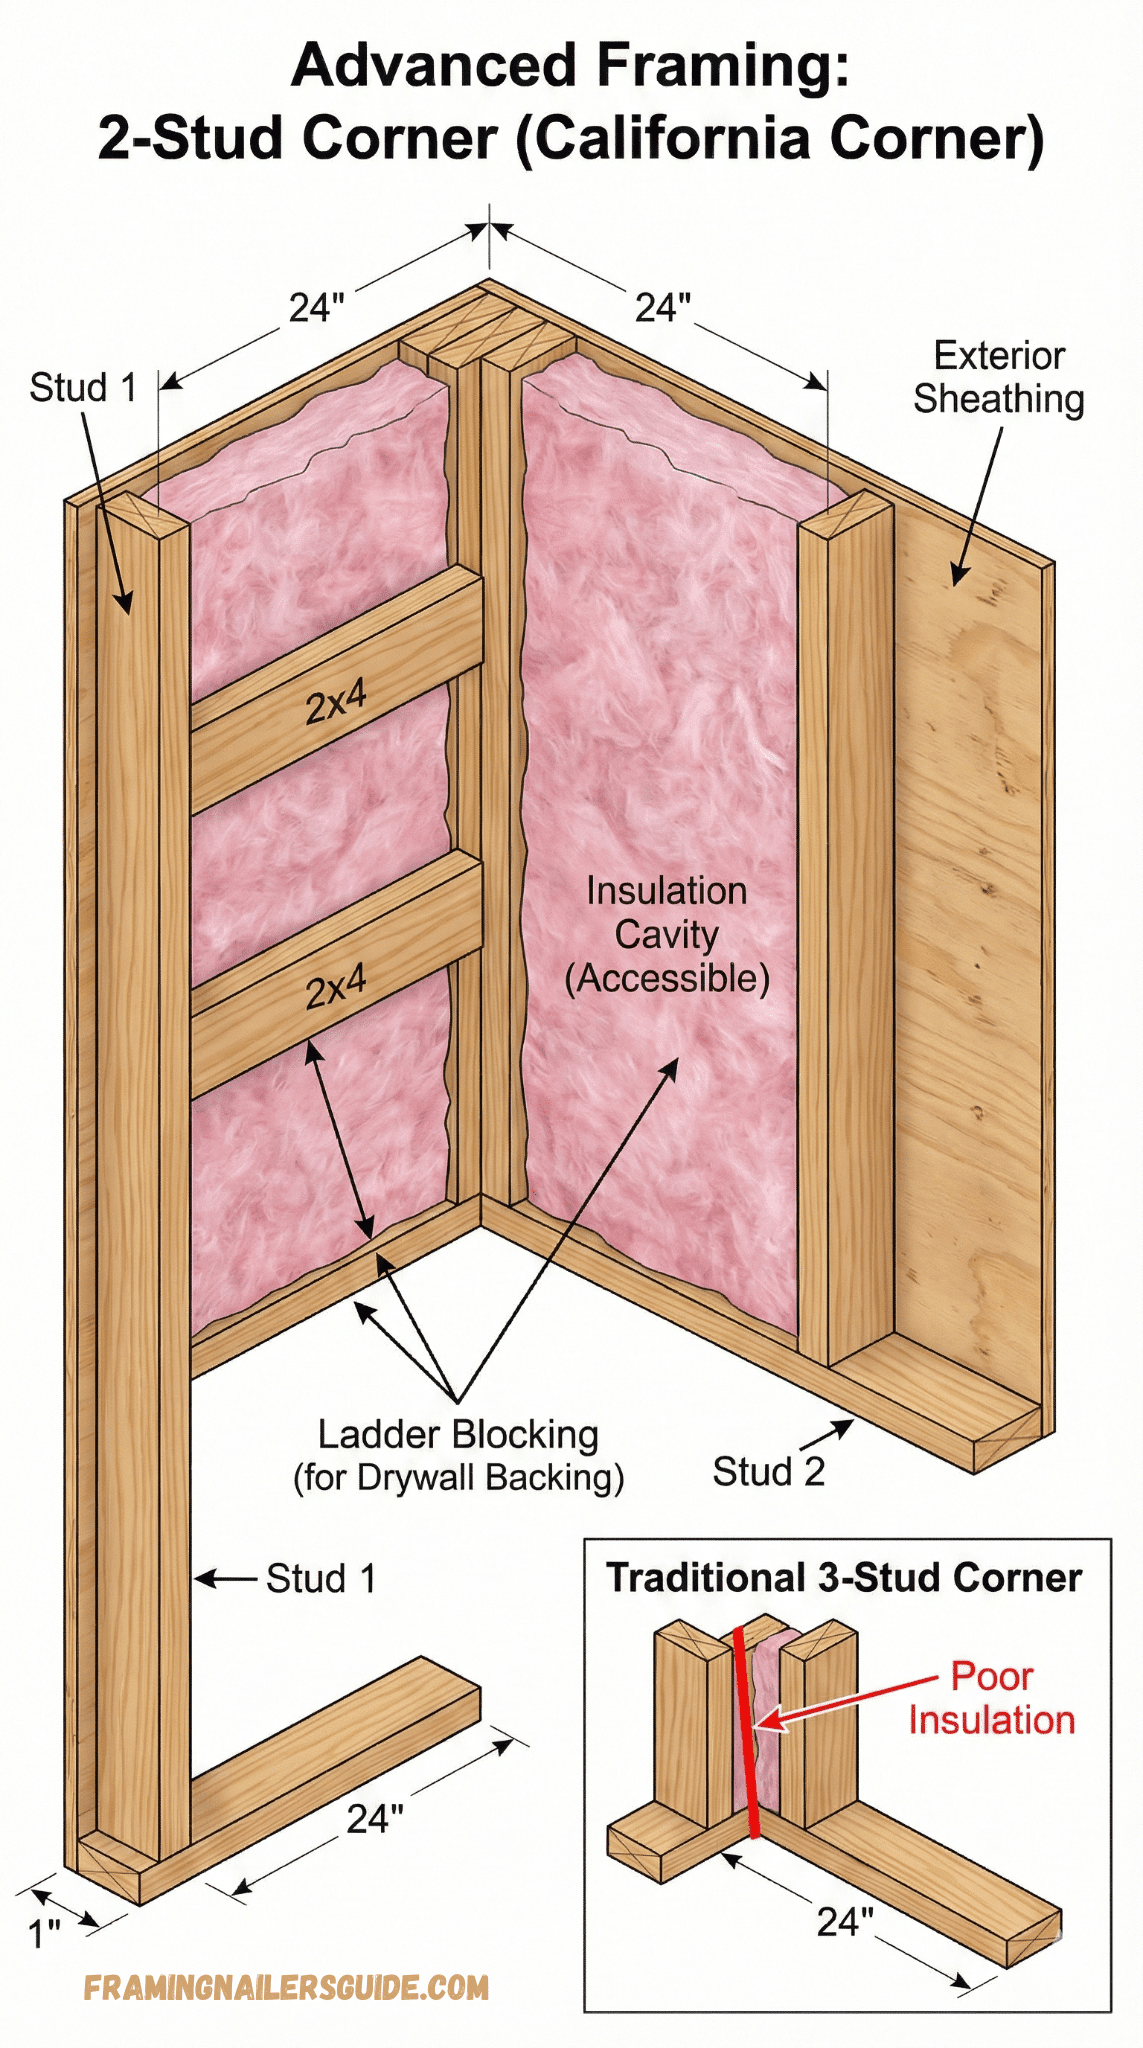
Traditional framing uses 16-inch stud spacing because… well, because that’s what we’ve always done. But engineering shows 24-inch spacing is structurally adequate for most residential applications. Traditional corners use three studs forming a rigid connection. But a two-stud corner with ladder blocking works just fine and leaves room for insulation.
The goal: reduce lumber, increase insulation space, improve energy efficiency.
Key Advanced Framing Principles
24-Inch On-Center Spacing
Instead of a stud every 16 inches, go to 24 inches. You just eliminated 25% of your wall studs. Structural integrity? Fine, as long as you use 1/2-inch minimum drywall (5/8-inch is better) and align your floor joists and roof rafters with those studs.
The math: A 40-foot-long wall with 16-inch spacing needs 30 studs. At 24-inch spacing? Just 20 studs. That’s savings of $40-60 per wall in materials alone, and you’ve created 33% more insulation space.
Advanced Corner Framing
Traditional three-stud corners are thermal disasters. Three pieces of 2×4 lumber bunched together with almost no insulation? You’re pumping heat straight through that corner.
Advanced corners use two studs with ladder blocking (horizontal pieces connecting them). You get the same drywall backing. Same structural connection. But now you can insulate that corner cavity.
Energy impact: Corners represent maybe 1-2% of wall area but can account for 5-10% of heat loss. Fix them.
Insulated Headers
Standard practice puts a header over every window and door—usually doubled 2x10s or 2x12s. But in non-load-bearing walls? That’s overkill. And even in load-bearing walls, the space above the header is often filled with cripple studs and wasted insulation space.
Advanced framing uses properly-sized headers (not oversized) and fills the space above with rigid foam insulation.
Cost: Maybe $50-100 more per opening. Energy savings: $200-400 annually in heating/cooling.
Single Top Plates with Inline Framing
This is the precision element. Traditional framing uses a double top plate—two 2x4s stacked. The second plate helps transfer loads when studs don’t align between floors.
Advanced framing uses a single top plate… but requires that studs, floor joists, and roof rafters align vertically. Perfect load transfer, less lumber, more planning required.
Two-Stud Partition Corners
Where interior partitions meet exterior walls, traditional framing uses extra studs for drywall backing. Advanced framing uses ladder blocking—horizontal pieces that provide the same backing with less lumber.
When to Use Advanced Framing
Advanced framing works best for:
- New construction(retrofitting existing is impractical)
- Energy-efficient building goals(passive house, net-zero, etc.)
- Experienced framers(requires precision in layout and execution)
- Supportive building departments(some inspectors resist unfamiliar techniques)
Potential Drawbacks
Let’s be real. Advanced framing has tradeoffs.
With fewer studs, walls feel slightly less “solid” when you knock on them. Homeowners used to 16-inch spacing sometimes notice the difference, even though structural performance is identical.
You need 1/2-inch drywall minimum (3/8-inch won’t span 24 inches without cracking). That’s a small cost increase.
Cabinet installation and fixture mounting requires more planning. With studs 24 inches apart, you can’t always hit a stud where you want. Blocking or toggle bolts solve this, but it requires forethought.
Not all building inspectors are familiar with advanced framing. Even though it’s code-compliant per the IRC (International Residential Code) sections R602.3 and R602.10, you may need to educate your inspector. Bring code references. Consider a pre-inspection meeting.
Cost-Benefit Analysis:
- Material savings: $800-1,500 per house
- Labor increase: $300-600 (more planning required)
- Net first cost: $500-900 savings
- Energy savings: $250-500/year
- ROI: 1-2 years
Technique #3 – Balloon Framing (Historical Method)
Understanding Balloon Framing Construction
Balloon framing is the grandfather technique—historically important, rarely used today, but absolutely critical for restoration work.
The concept: continuous studs run from the foundation sill plate all the way to the roof, often 20-24 feet long. Floor joists for second stories attach to these vertical studs using a “ribbon board”—a horizontal ledger that supports the joist ends. The exterior wall framing is continuous, hence “balloon” framing.
Popular from 1850s through the 1940s. Chicago was largely built with this technique—it enabled rapid construction during the city’s explosive growth period.
When Balloon Framing Is Still Relevant
You’ll encounter balloon framing primarily in:
- Historic building restorationwhere matching existing framing is required
- Additions to balloon-framed buildings(matching existing structure)
- Very tall wallsexceeding 20 feet (continuous studs eliminate connections)
- Specific architectural styles: Victorian, Chicago bungalows, older farmhouses
I recently worked on a 1920s Victorian restoration. The owner wanted period authenticity. We matched the existing balloon framing in the addition—but with modern fire blocking to meet code.
Balloon Framing Challenges
Fire safety is the biggest concern. Those continuous stud bays create chimneys from basement to attic. Fire spreads vertically with terrifying speed. Modern codes require extensive fire blocking—horizontal 2x4s installed between studs to stop flame spread.
Long lumber availability is another issue. Finding straight, quality 20+ foot studs is expensive and difficult. You’re special-ordering from mills, paying premium prices.
Specialized skills matter. Most framers under 50 have never built with balloon framing. You need experienced carpenters or extensive research.
Modern code compliance? Tricky. While not explicitly prohibited, balloon framing requires additional fire blocking that traditional applications didn’t include. Your inspector will scrutinize it carefully.
Modified Balloon Framing for Modern Use
Sometimes you need balloon framing characteristics—like a tall entryway or great room with 18-foot ceilings—without full balloon construction.
Hybrid approaches work: Use platform framing for most of the house, then balloon-frame specific sections that need tall continuous walls. Install proper fire blocking every 10 feet vertically. Use modern engineered lumber for long spans when necessary.
When in doubt, hire specialists familiar with historical framing methods.
Technique #4 – Post-and-Beam Construction
Post-and-Beam Framework Basics
Now we’re talking serious timber.
Post-and-beam uses large posts (6×6, 8×8, even 10×10) supporting horizontal beams of similar size. These heavy timbers create the structural skeleton. Everything else—exterior walls, insulation, interior partitions—is non-structural infill.
Think of it like a skyscraper’s steel frame, but with wood.
Modern Applications
Post-and-beam shines in:
- Timber frame homeswith exposed beams as design features
- Commercial buildingsneeding wide-open spaces
- Barn conversions—trending heavily in 2025 as people convert agricultural buildings into homes
- Cathedral ceiling designswhere you want dramatic, column-free spaces
I visited a post-and-beam home in Vermont last year. The great room was 30 feet wide with zero intermediate supports—just massive Douglas Fir beams spanning the space. Exposed timber everywhere, pegged connections visible. Stunning.
Post-and-Beam Advantages
Dramatic exposed timber aesthetics: You’re showcasing the structural bones. Hand-hewn beams, visible joinery, natural wood character—it’s architecture and structure.
Large open floor plans: No load-bearing walls means total layout flexibility. Want to remove that wall later? Go ahead—it’s not supporting anything.
Durability: Properly built post-and-beam structures last centuries. European timber frame buildings from the 1400s are still standing.
Historical appeal: There’s something primal about visible wood structure.
Cost and Complexity
Here’s where reality bites.
Material cost: $15-30/sq ft just for premium timber. Quality Douglas Fir or White Oak beams aren’t cheap. If you want hand-hewn character beams? Add another 30-50%.
The joinery requires specialized skills. True timber framing uses mortise-and-tenon connections secured with wooden pegs. Each joint is hand-cut by craftsmen earning premium wages. Timber framing can add 25% to overall building costs, and can run 10-15% more than post-and-beam with simpler metal plate connections.
Post-and-beam (the simpler cousin) uses metal plates and bolts instead of complex joinery. Still expensive, but more accessible.
Both methods typically pair with SIPs (Structural Insulated Panels) for exterior walls since the structure is independent of the enclosure.
Total cost: 20-50% more than platform framing.
Hybrid Approach: Post-and-Beam + Stick Framing
Here’s the smart compromise I recommend to clients.
Use post-and-beam for your great room, dining area, or other showcase spaces where you want exposed timber drama. Frame the rest of the house—bedrooms, bathrooms, utility spaces—with conventional platform framing.
You get the aesthetic impact where it matters, without blowing your entire budget on timber. This hybrid approach balances cost and visual goals beautifully.
Technique #5 – Steel Framing
Light Gauge Steel Framing Overview
Steel framing uses cold-formed steel studs in the same dimensions as wood—”2×4″, “2×6”, etc.—though actual profiles differ. You’re basically replacing wood with metal while keeping similar framing layouts.
Growing in popularity: 10-15% of residential market now uses steel framing in at least some capacity.
Why Builders Choose Steel
No warping, twisting, or shrinking. Ever fight with a bowed 2×6? Steel doesn’t do that. It’s dimensionally stable from installation day forward.
Termite-proof and rot-proof. In termite-prone areas (looking at you, Southern USA and tropical climates), this is huge. No chemical treatments needed.
Fire-resistant. Steel doesn’t burn. This translates to insurance savings—some providers offer 5-15% premium reductions.
Sustainable. Steel framing typically contains 90% recycled content and is itself 100% recyclable at end of life.
Steel Framing Challenges
Higher upfront cost: +15-25% vs. wood. Steel studs cost more than lumber, and labor rates are often higher due to specialized skills.
Different tools and fasteners required. Your framing nailer is useless. You need screw guns with specific bits, metal-cutting saws, and appropriate fasteners. Metal screws, not nails.
Thermal bridging concerns. Steel conducts heat even better than wood. Without continuous exterior foam sheathing, you’ll lose massive amounts of energy through the steel studs. Budget for 1-2 inches of rigid foam insulation on the entire exterior.
Electrical and plumbing complications. Drilling through steel studs requires different techniques. Sharp metal edges can damage wires (grommets required). Plumbing penetrations need careful planning.
Less familiar to trades. Many electricians, plumbers, and finish carpenters learned on wood. Steel requires learning new techniques.
Best Applications for Steel Framing
Steel makes sense in specific contexts:
- Coastal areas(hurricane zones) where high wind loads and salt air are concerns
- Termite-prone regions(Southeast USA, tropical climates)
- Fire risk areas(California wildfire zones, Australian bushfire areas)
- Commercial buildingswhere fire ratings matter
- Basements and foundationswhere moisture is a concern
| Factor | Wood Framing | Steel Framing |
|---|---|---|
| Insulation needs | Standard | Requires continuous exterior foam |
| Tool requirements | Standard carpentry | Specialized metal tools |
| Total cost premium | Baseline | +15-30% |
| Labor cost | $3.50-5.50/sq ft | $4.50-7.00/sq ft |
| Insurance savings | Standard | -5-15% premiums |
| Material cost | $4.50-6.50/sq ft | $5.50-8.00/sq ft |
Technique #6 – Structural Insulated Panels (SIPs)

SIP Construction Method
Structural Insulated Panels are like building with giant LEGO blocks.
Each panel is a foam core (typically EPS or polyurethane) sandwiched between two OSB skins. The foam core provides insulation. The OSB skins provide structural strength. Together, they create a rigid panel that serves as structure, insulation, and sheathing all in one unit.
Panels are factory-built to your plans—walls, roof sections, complete with window and door cutouts. They arrive on-site ready to assemble.
Market growth: 15% annually as builders discover the efficiency benefits.
SIP Installation Process
This is where SIPs shine.
Panels arrive cut precisely to your building plans. A crane lifts each panel into position. Crews seal connections between panels with specialized tape and foam. Install windows and doors in pre-cut openings. Move to the next panel.
A typical 2,000 sq ft house? Fully enclosed (walls and roof) in 1-2 days with a small crew. Compare that to 5-8 days for stick framing.
I watched a SIP house go up last fall. Foundation one week. Complete building envelope the following week. By week three, they were roughing in mechanicals. Jaw-dropping speed.
Energy Performance Benefits
This is why architects love SIPs for high-performance buildings.
R-values: R-20 to R-60 depending on foam thickness. A standard 6.5-inch SIP wall achieves R-23, outperforming 2×6 walls with fiberglass batt insulation.
Minimal thermal bridging. Unlike stick framing where studs create thermal short-circuits, SIPs have continuous insulation.
Superior airtightness. Properly installed SIPs achieve 0.6 ACH50 or better—passive house levels of air tightness.
Energy savings: 40-60% versus conventional framing. Your monthly utility bills reflect the difference.
SIP Limitations and Considerations
Nothing’s perfect, and SIPs have tradeoffs.
Higher upfront cost: +10-20% vs. platform framing. That factory precision and energy performance comes at a price.
Less design flexibility once ordered. Changed your mind about a window location? Too bad—the panels are already manufactured. Design changes after ordering are expensive or impossible.
Electrical chases must be planned. You can’t just run wiring anywhere. Electricians need surface-mounted chases, pre-routed channels, or careful core drilling.
Limited contractor experience. Many areas lack SIP-experienced crews. You might be importing labor or educating local contractors.
When SIPs Make Sense
SIPs excel for:
- Passive house constructionneeding extreme energy performance
- Tight construction scheduleswhere speed justifies premium cost
- Remote building siteswhere minimizing on-site labor saves money
- Energy efficiency priorityover first-cost concerns
- Simple designs—complex designs with many angles lose cost advantages
Technique #7 – Prefab/Modular Panel Construction
Factory-Built Wall Panels
Prefab panel construction sits between traditional stick framing and full modular homes.
Walls are framed in factory settings using jigs and assembly tables. Sheathing applied. Windows installed. Sometimes insulation and exterior finish too. Then panels are loaded on trucks and delivered to your site ready to stand.
Different from modular homes where entire three-dimensional room sections arrive complete. Prefab panels are still flat walls—just built off-site.
Prefab Framing Advantages
Quality control in controlled environments. No rain delays. Consistent temperature. Proper tools always available. Factory conditions mean better quality.
Weather-independent construction. Your walls are being built indoors regardless of jobsite weather.
Speed: walls installed in 1-2 days. Once panels arrive, a crane and small crew stand the entire house shell in a day or two.
Precision. Factory jigs ensure walls are square, plumb, and consistent. No “that looks close enough” eyeballing.
Less job site waste. Offcuts and scraps stay at the factory for recycling. Your site stays cleaner.
Prefab Considerations
Requires crane for installation. Budget $800-2,000 for crane rental depending on house size and access.
Limited customization once ordered. Like SIPs, changes after manufacturing begins are problematic.
Delivery logistics and timing critical. You need foundation ready exactly when panels arrive. Storing panels on-site risks damage.
Cost: similar to stick framing. Labor savings typically offset factory costs. You’re not really saving money—you’re saving time.
Hybrid Approach
The smart play? Prefab exterior walls for speed, stick-frame interior partitions for flexibility.
Exterior walls are complex—insulation, sheathing, windows, weather barrier. Building these in a factory makes sense. Interior partitions are simple—just studs and drywall. Easy to frame on-site and adjust as needed.
This hybrid approach delivers the best of both methods.
Choosing the Right Framing Technique for Your Project
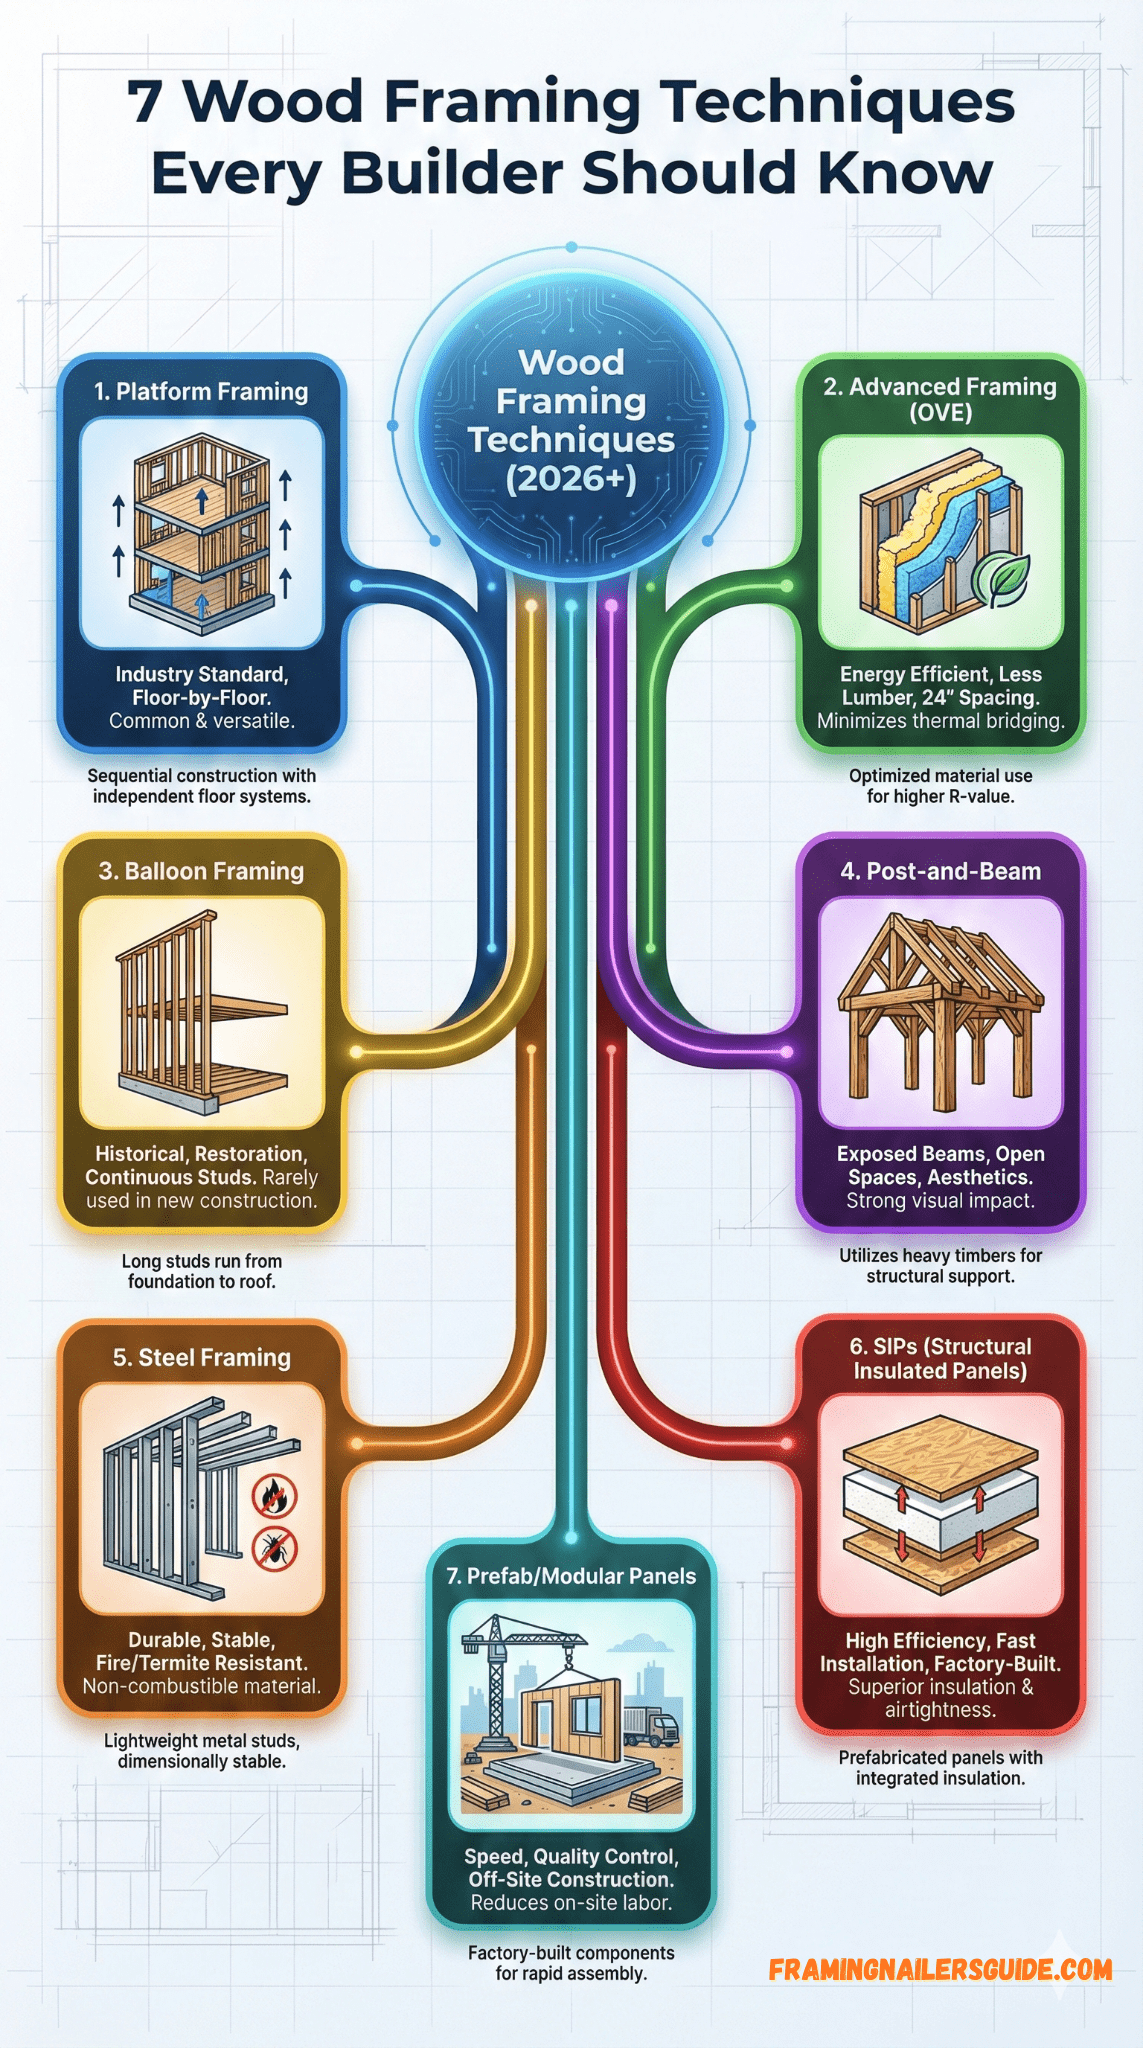
Here’s the truth: there’s no single “best” framing technique. Context matters.
| Project Type | Recommended Technique | Why | Est. Cost Range |
|---|---|---|---|
| Coastal/high-wind zone | Steel framing | Durability, insurance | $10-16/sq ft |
| Passive house | SIPs or advanced framing | Energy performance | $12-20/sq ft |
| Historic restoration | Match existing (often balloon) | Authenticity, code requirements | $12-18/sq ft |
| Fast construction timeline | Prefab panels | Speed to completion | $9-14/sq ft |
| Standard 1-2 story home | Platform framing | Cost, speed, familiarity | $8-12/sq ft |
| Open-plan modern home | Post-and-beam hybrid | Aesthetics, open spaces | $15-25/sq ft |
| Energy-efficient new build | Advanced framing or SIPs | Insulation performance | $9-15/sq ft |
Factors to Consider Beyond Cost
Local building codes: Some jurisdictions restrict certain techniques or require additional engineering.
Contractor availability: Can you find experienced crews? Advanced framing and SIPs require specialized knowledge.
Climate: Humidity, temperature extremes, and precipitation patterns affect material choices. Wood framing excels in dry climates. Steel resists coastal moisture.
Long-term plans: If energy costs are rising or you plan to keep the house 20+ years, investing in advanced framing or SIPs pays dividends.
Personal capabilities: Platform framing is most DIY-friendly. Steel, SIPs, and post-and-beam typically require professionals.
Advanced Framing Details That Separate Pros from Amateurs
Critical Connection Details
Header Sizing and Installation
Headers carry loads over openings. Size them wrong, and you risk sagging and structural failure.
Span tables (available from the American Wood Council) tell you exactly what size header you need based on opening width and load. Don’t guess. Don’t “overbuild just to be safe.” Use the tables.
King studs run full-height alongside openings. Jack studs (or trimmer studs) support the header from below. Header rests on jacks. Kings provide lateral support.
When to use LVL beams vs. dimensional lumber: For spans over 6 feet or heavy loads, consider engineered LVL (Laminated Veneer Lumber) beams. They’re stronger, straighter, and more dimensionally stable than dimensional lumber.
Corner Construction Techniques
Three-stud corners waste lumber and create thermal problems. Two-stud advanced corners with ladder blocking provide the same drywall backing with better insulation access.
Drywall backing is the only reason we need corner studs in specific orientations. Make sure your framing provides nailing surface for drywall on both walls that meet at the corner.
Partition Wall Connections
Where interior partitions meet exterior walls, you need drywall backing. Traditional framing adds extra studs. Ladder blocking—horizontal pieces between studs—provides backing with less lumber.
Load Path Engineering
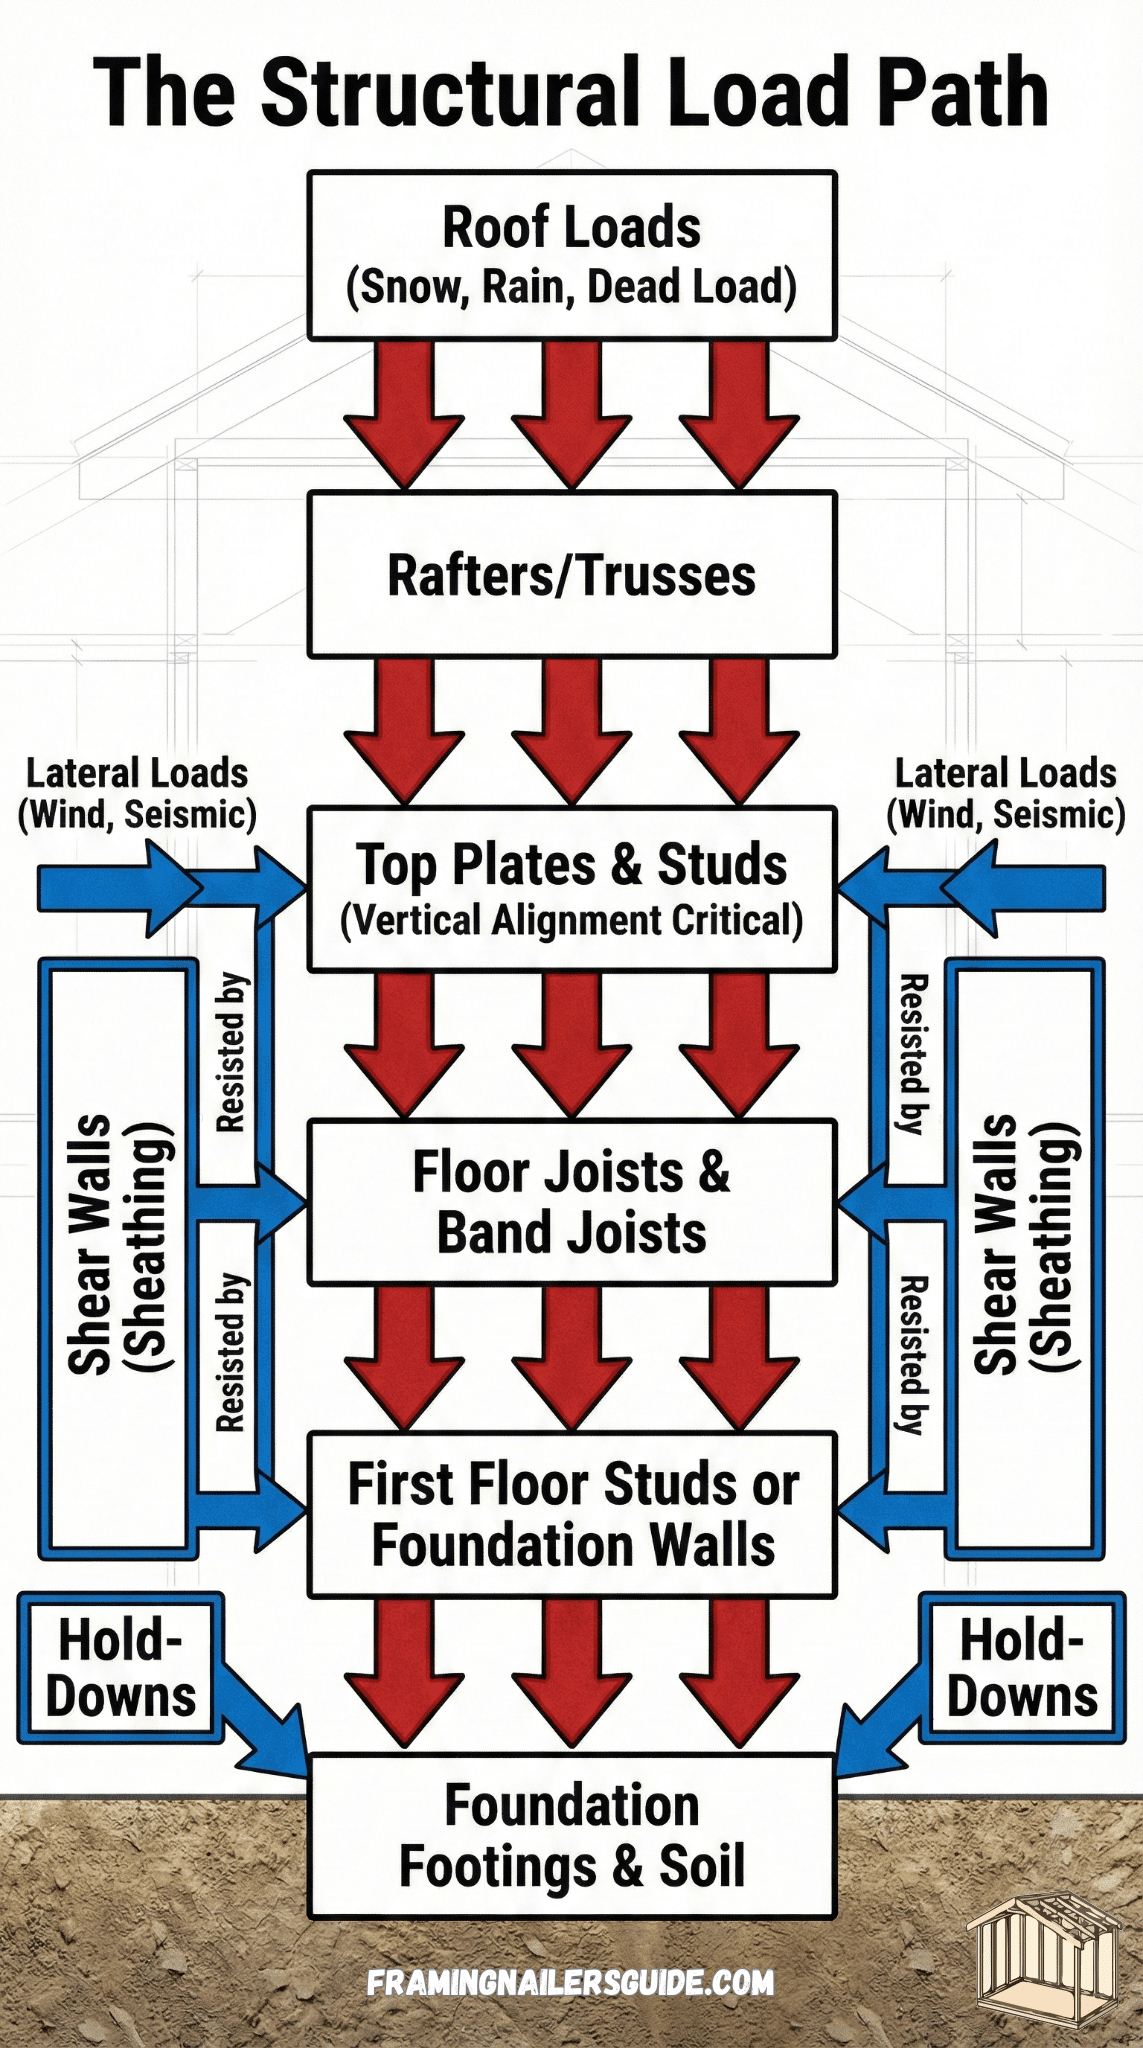
Every pound of load on your roof must transfer through the structure to the foundation. This is the load path.
Vertical load transfer: Roof loads → rafters/trusses → exterior walls → floor joists → foundation. Any break in this path creates a problem.
Lateral loads: Wind and seismic forces create sideways pressure. Shear walls (plywood or OSB sheathing properly nailed) resist these lateral forces. Hold-downs anchor shear walls to the foundation.
Point loads: Sometimes loads concentrate at specific points—like where a beam transfers to a post. These need special attention and often require metal connectors (Simpson Strong-Tie, etc.).
When in doubt, hire a structural engineer. The $1,500-3,000 engineering fee could save you from catastrophic failure.
Tools and Equipment for Different Framing Techniques
| Tool Category | Platform Framing | Advanced Framing | Steel Framing | SIPs/Prefab |
|---|---|---|---|---|
| Framing nailer | Essential | Essential | No (screw gun) | Minimal |
| Miter saw | Essential | Essential | Metal saw needed | No |
| Circular saw | Essential | Essential | Metal blade needed | Minimal |
| Specialized tools | None | None | Track shears, clincher | Panel saws, router |
| Layout tools | Standard | Precision laser | Standard | Minimal |
| Investment | $1,500-3,000 | $1,800-3,500 | $2,500-5,000 | $500-1,200 |
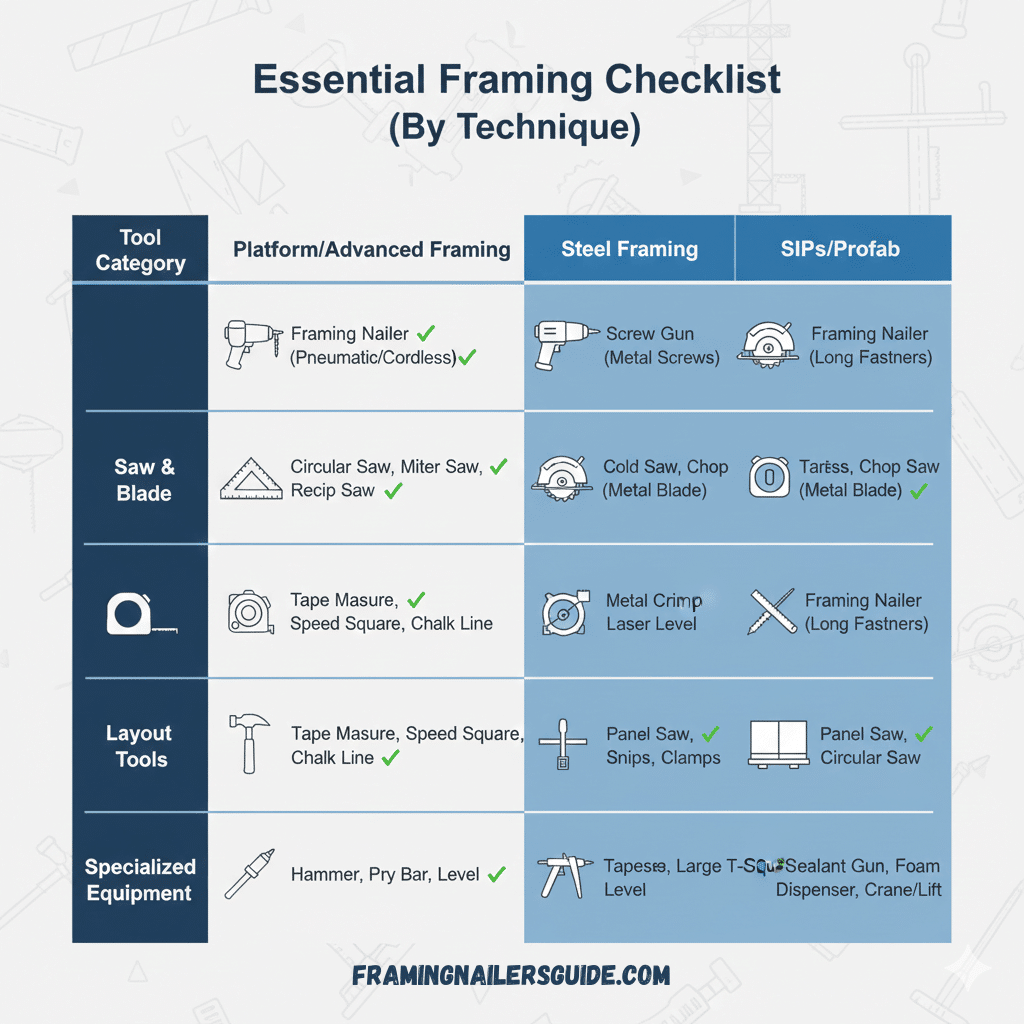
For detailed recommendations on framing nailers—the workhorse power tool for most framing applications—check out comprehensive buying guides specific to pneumatic vs. cordless options.
Regional Variations in Framing Techniques
North American Differences
Pacific Northwest: Douglas Fir framing lumber is readily available and affordable. Advanced seismic details required due to earthquake risk.
Midwest: Traditional platform framing dominates. Tornado tie-downs and hurricane clips increasingly required even in areas not previously specified.
Southeast: Hurricane straps, pressure-treated bottom plates (moisture), and termite barriers are standard.
Northeast: Snow load considerations require steeper roof pitches and stronger roof framing. Insulation requirements are among the highest in North America.
Canada: Metric sizing complicates material sourcing when working with US-sized plans. Higher insulation requirements (R-22 walls minimum in many provinces).
International Framing Practices
UK: Timber frame construction with brick veneer exterior is common. Different lumber grades and sizing (metric). The UK government is pushing expanded timber construction through their 2025 roadmap.
Australia: Cyclone-rated framing in northern regions requires extensive metal ties and straps. Termite barriers (physical or chemical) are code-required across much of the country.
Germany: Advanced thermal bridging solutions and passive house standards are mainstream, not niche. What we call “advanced framing” is often just “normal framing” there.
India: Hybrid concrete/wood systems gaining popularity as lumber becomes more available.
Future of Wood Framing Techniques
Emerging Technologies
Mass timber/CLT (Cross-Laminated Timber): Large timber panels replacing concrete and steel in commercial buildings. Commercial adoption growing rapidly.
Robotic framing: Factory automation increasing. Robotic systems handle precision cutting and assembly.
3D printing integration: Hybrid approaches emerging where 3D-printed concrete foundations pair with traditional wood framing.
AI-optimized layouts: Software analyzing plans to reduce waste by 15-20% through smart material placement.
Sustainability Trends
Locally-sourced lumber preferences: Carbon costs of transportation pushing regional sourcing.
Reclaimed timber framing: Salvaged barn beams and industrial timbers finding new life in post-and-beam homes.
Carbon-negative construction goals: Wood sequesters carbon, making well-designed wood frame buildings carbon sinks.
FSC certification requirements: Forest Stewardship Council certified lumber becoming standard for green building programs.
Common Framing Technique Mistakes
Platform Framing Common Mistakes:
- Not checking floor for square before walls– If your floor deck is out of square, everything built on it will be wrong
- Inadequate temporary bracing– Walls twist and fall without proper diagonal bracing
- Skipping double-check of layout– An error in layout multiplies through the entire structure
- Wrong header sizing for openings– Use span tables, not guesswork
- Improper stud alignment between floors– Loads must transfer vertically
Advanced Framing Pitfalls:
- Failing to inline studs/joists/rafters– Single top plate requires vertical load alignment
- Inadequate drywall backing at 24″ spacing– Need horizontal blocking or thicker drywall
- Not using approved connections for single top plate– Metal plates or specific nailing patterns required
- Inspector unfamiliarity causing delays– Educate your inspector before framing begins
Steel Framing Issues:
- Using wrong fasteners– Wood screws don’t work. Use self-drilling metal screws
- Not accounting for thermal bridging– Steel conducts heat; requires continuous exterior insulation
- Improper electrical penetrations– Sharp edges damage wires; use grommets
- Cutting too many holes– Weakens members; follow manufacturer specs
Frequently Asked Questions
What’s the strongest wood framing technique?
Post-and-beam construction using large timbers (6×6 to 12×12) provides the greatest structural capacity, with individual members supporting massive loads. For conventional residential construction, properly engineered platform framing or steel framing provides more than adequate strength, with ultimate performance determined by connections and engineering rather than technique alone.
Is advanced framing accepted by building codes?
Yes. Advanced framing is explicitly code-compliant and mentioned in the IRC (International Residential Code) sections R602.3 and R602.10. However, some local inspectors unfamiliar with the technique may initially resist. Bring IRC references and consider scheduling a pre-inspection meeting to discuss your plans and address concerns before construction begins.
Can I mix framing techniques in one building?
Absolutely. Hybrid approaches are common and often optimal. Examples include: post-and-beam great room with platform framing for bedrooms; steel framing basement with wood upper floors; prefab exterior walls with stick-framed interior partitions. The key is maintaining proper load paths and using appropriate connections between different framing systems.
Which framing technique is most DIY-friendly?
Platform framing is most forgiving for DIYers due to work platforms at each level, shorter lumber (easier handling), and a forgiving assembly sequence. Advanced framing requires more precision in layout and execution. Steel framing, SIPs, and post-and-beam typically require professional installation due to specialized skills, equipment requirements, or engineering complexity.
What framing technique saves the most money?
Advanced framing offers the best material cost savings at 15-25% reduction in lumber costs while meeting modern energy codes. However, total project savings depend on contractor familiarity. An experienced platform framing crew may complete work faster than learning advanced techniques, potentially offsetting material savings with higher labor costs. For maximum value, use advanced framing with a crew experienced in the technique.
How do framing techniques affect home insurance costs?
Steel framing can reduce insurance premiums 5-15% due to fire resistance and durability. SIPs may qualify for energy-efficient home discounts through some insurers. In hurricane or wildfire zones, non-combustible construction (concrete or steel) offers the greatest insurance savings at 15-30%, though this extends beyond pure wood framing. Always check with insurers during planning—savings can influence technique selection.
Conclusion: Selecting Your Framing Technique
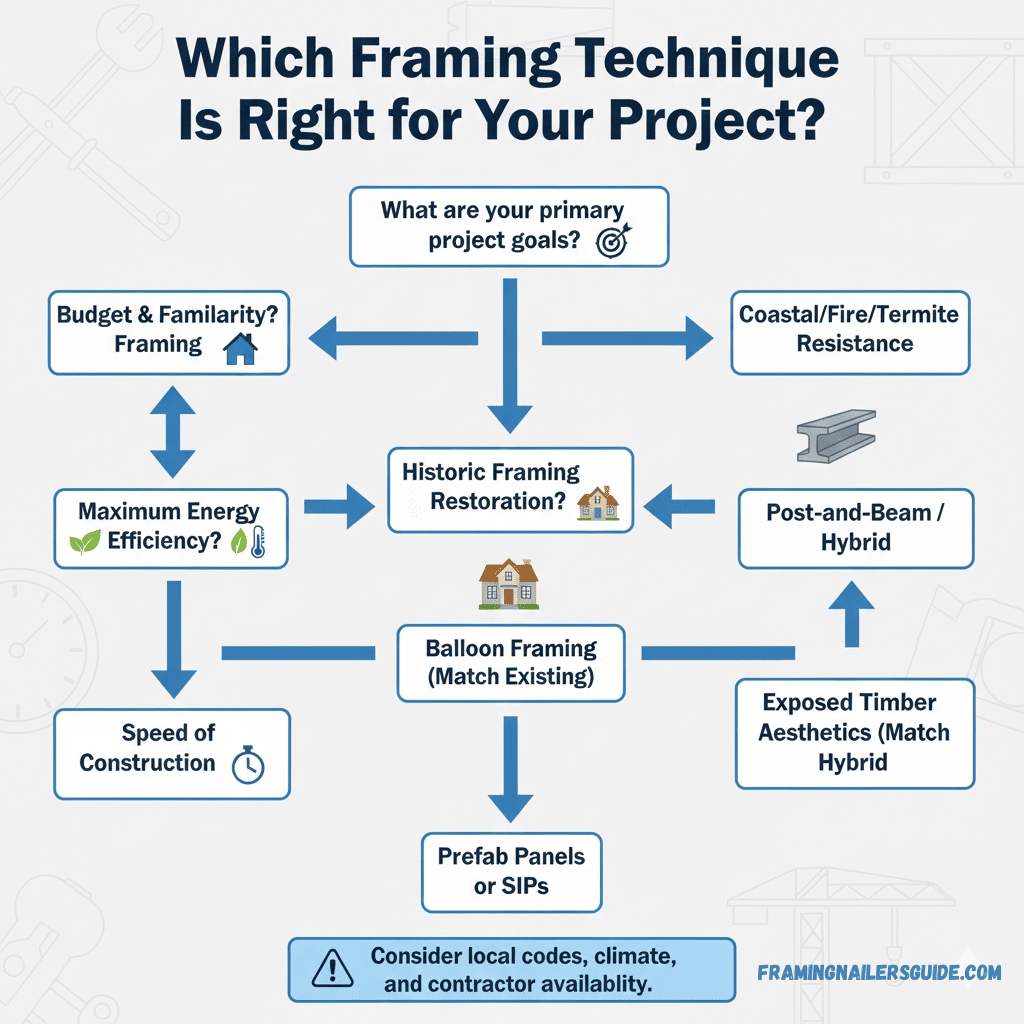
Here’s what I’ve learned after working with all seven techniques…
Match your framing technique to your actual project goals. Not your fantasy. Not what looks coolest on Pinterest. Your real goals.
Building a standard family home on a budget? Platform framing. Want maximum energy efficiency? Advanced framing or SIPs. Restoring a historic home? Match the existing method. Showcasing exposed timber? Post-and-beam hybrid.
Consider your budget honestly, but also think long-term. That extra $2,000 for advanced framing pays back in 2-3 years through energy savings. SIPs cost more upfront but slash utility bills by 40-60% for decades.
Consult with local contractors about regional norms. What works in Arizona might not work in Maine. Wind loads, seismic requirements, and climate conditions dictate feasibility.
If you’re just starting out? Learn platform framing thoroughly before advancing to other techniques. It’s the foundation (pun intended) that helps you understand structural principles applicable to all methods.
The beauty of 2026 is we have more framing options than ever—from centuries-old post-and-beam to cutting-edge CLT panels. The challenge is choosing wisely.
What’s your experience with different framing techniques? Drop a comment below—I’d love to hear which methods you’ve used and what worked (or didn’t) on your projects. And if this guide helped you understand framing options better, share it with someone planning their own build.
