


Last Updated on August 13, 2026 by John Patterson
I’ve been working with snow removal equipment for longer than I care to admit. And if there’s one truth I’ve learned through frozen fingers and early morning frustrations, it’s this: knowing your machine’s parts isn’t just useful—it’s essential.
When something breaks at 5 AM with fresh snow piling up, you don’t have time to figure out part numbers or wonder whether that local hardware store carries what you need. You need answers. Fast.
So let me share what I’ve learned about Husqvarna snowblower parts—the good, the frustrating, and the absolutely critical information that’ll save you time, money, and a whole lot of headaches.
Understanding Husqvarna Snowblower Replacement Parts
Here’s what nobody tells you when you buy a snow blower: you’re not just buying a machine. You’re entering a relationship with a parts ecosystem that’ll either support you for decades or frustrate you every winter.
OEM vs Aftermarket Parts: What You Need to Know
Let’s start with the big question. Should you buy genuine Husqvarna OEM parts or save money with aftermarket alternatives?
The answer isn’t simple. And honestly, anyone who gives you a one-size-fits-all response doesn’t understand how this actually works in practice.
Genuine Husqvarna OEM parts come with specifications tested specifically for your machine. They fit correctly. They’re manufactured to the same tolerances as the original components. And yes, they cost more—usually 20-40% more than aftermarket equivalents.
But here’s where it gets interesting.
For safety-critical components like shear bolts and drive belts, OEM matters tremendously. These parts protect your expensive engine and transmission. Saving $5 on a shear bolt that doesn’t break when it should? That can cost you $300 in gearbox repairs.
Aftermarket compatibility varies wildly. Some aftermarket manufacturers produce excellent components that meet or exceed OEM specifications. Others… well, let’s just say you get what you pay for. The challenge is knowing which is which before you’ve already wasted money.
The part number identification system uses a structured format. For 961 series models, you’ll see numbers like 532-42-05-78 or 587-14-79-01. Each segment tells you something specific—the first three digits often indicate the part family, while the remaining numbers specify the exact component variant.
Now, warranty implications. This matters more than most people realize. Using non-OEM parts can void your warranty coverage if those parts cause damage to other components. I’ve seen this happen. Someone installs a cheap aftermarket carburetor, it runs too rich, damages the cylinder, and suddenly Husqvarna won’t cover the engine repair because non-OEM parts contributed to the failure.
Is that fair? Debatable. But it’s reality.
Essential Husqvarna Snowblower Parts Overview
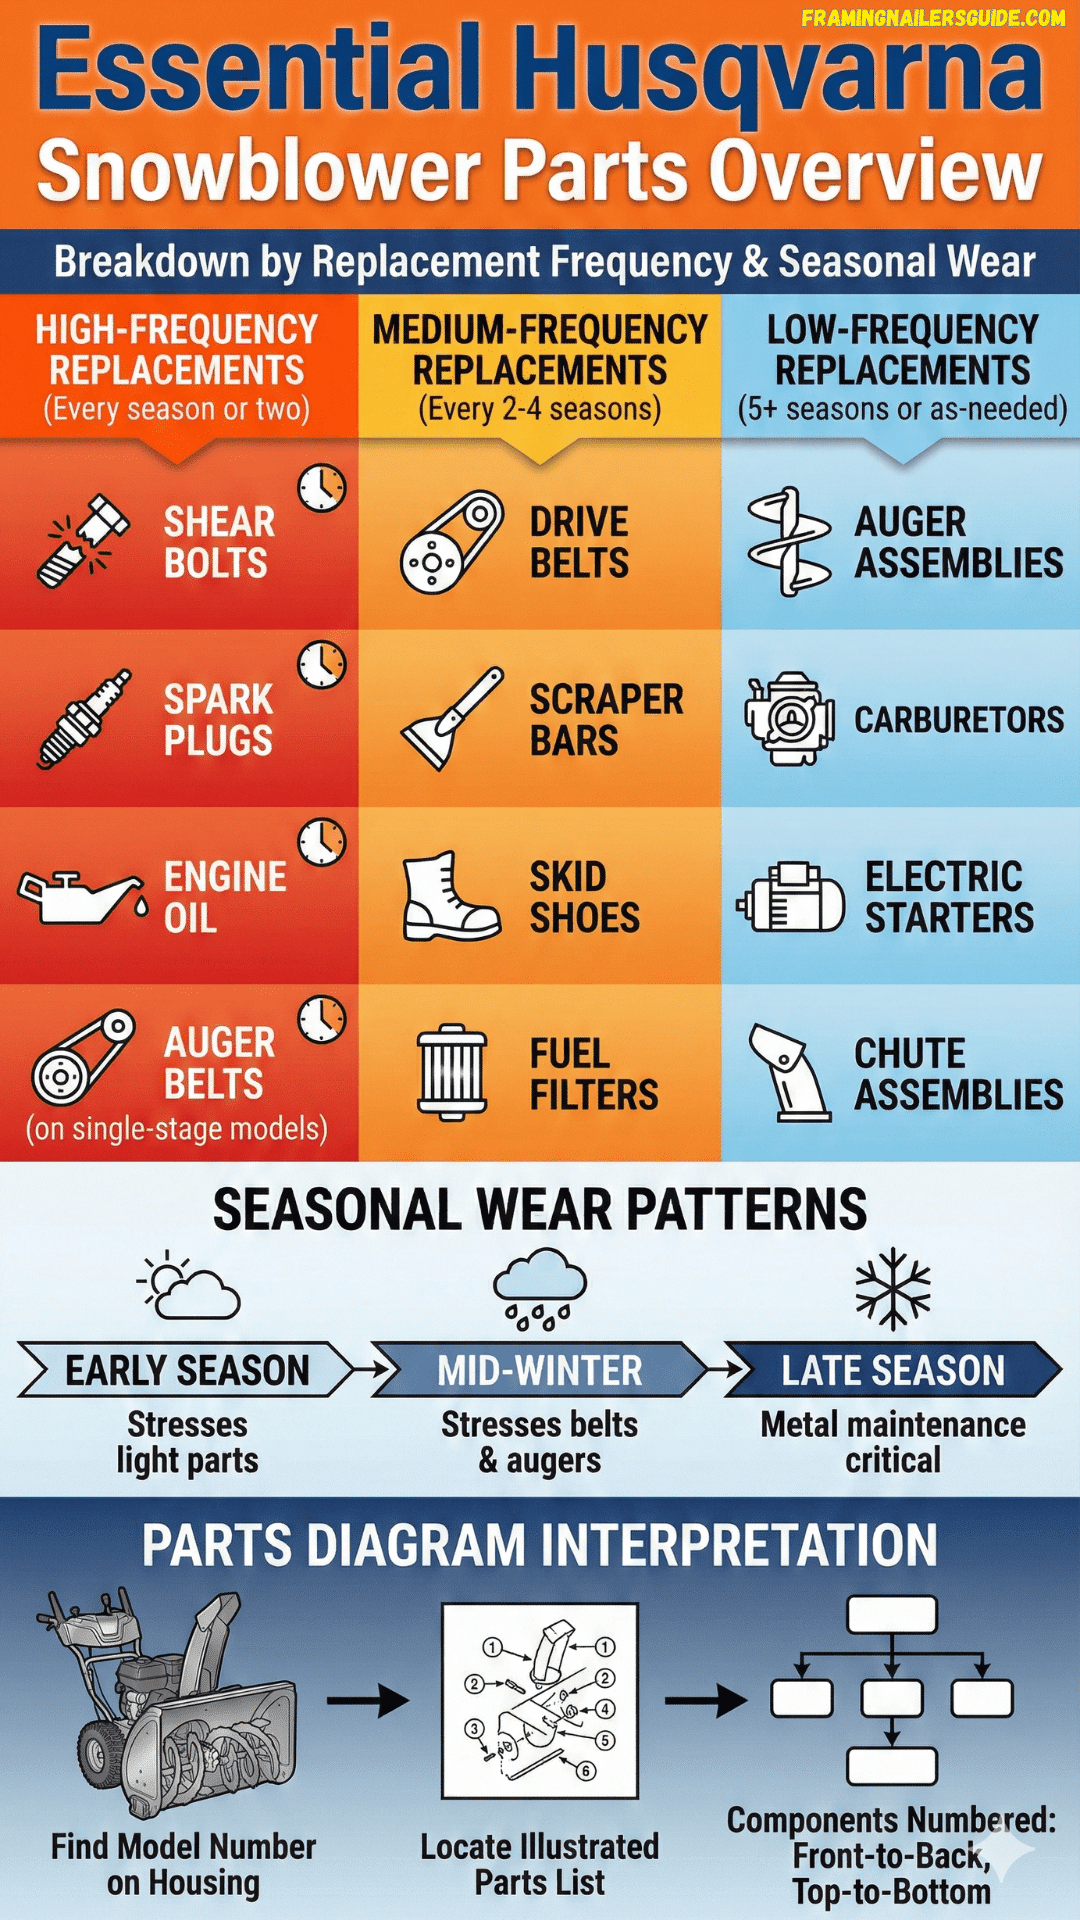
Let me break down the critical replacement components by how often you’ll actually need them.
High-frequency replacements (every season or two):
- Shear bolts
- Spark plugs
- Engine oil
- Auger belts on single-stage models
Medium-frequency replacements (every 2-4 seasons):
- Drive belts
- Scraper bars
- Skid shoes
- Fuel filters
Low-frequency replacements (5+ seasons or as-needed):
- Auger assemblies
- Carburetors
- Electric starters
- Chute assemblies
Seasonal wear patterns follow predictable paths. Early season, you’re dealing with lighter, drier snow. Mid-winter brings heavy, wet snow that stresses belts and augers. Late season introduces freeze-thaw cycles that wreak havoc on anything metal that isn’t properly maintained.
Parts diagram interpretation seems complicated at first. But once you understand the logic, it’s straightforward. Find your model number (it’s on the metal auger housing below the chute), locate the corresponding illustrated parts list, and components are numbered sequentially from front to back, top to bottom.
Where to source parts? That depends on your urgency.
Local dealers offer immediate availability for common items, expert advice, and warranty service. But their inventory is limited, and prices run higher.
Online retailers like PartSelect ship the same day on most parts, eReplacementParts provides excellent diagram support, and Fix.com offers repair help alongside parts. Direct from Husqvarna.com works for hard-to-find component,s but shipping takes longer.
I keep a hybrid approach. Common wear items? I order online at the end of each season when prices dip. Emergency repairs? Local dealer, even if it costs more.
Critical Husqvarna Snowblower Components
Let’s dive into the parts that actually matter—the ones that’ll fail at the worst possible time if you don’t understand them.
Husqvarna Snowblower Auger System
The auger is your machine’s heart. Everything else supports this one critical function: moving snow from point A to point B.
Auger Assembly Components
Auger blade construction uses heavy-gauge steel with serrated edges on most models.
The material specifications matter because cheaper steel wears faster against concrete driveways and gravel surfaces.
Husqvarna’s OEM blades typically use 12-gauge steel with hardened edges that last significantly longer than aftermarket alternatives.
Auger housing protection comes from a combination of the scraper bar, skid shoes, and the housing material itself.
The housing on most Husqvarna models uses stamped steel with a powder-coat finish.
Inspect the bottom edge where snow contacts metal—this area wears first, and if it wears through, you’re looking at expensive housing replacement rather than simple scraper bar replacement.
Auger shaft bearings require lubrication annually, sometimes more frequently if you’re clearing gravel driveways.
The bearings sit at both ends of the auger shaft, protected by seals that keep moisture out and grease in. When these seals fail—and they will eventually—water intrusion causes bearing failure surprisingly quickly.
Lower auger guide replacement procedures vary by model. On most two-stage units, you’ll find a plastic or metal guide strip at the auger housing bottom that protects against ground contact damage.
This guide wears down over seasons of use, and replacing it before metal-to-concrete contact begins extends housing life dramatically.
Common Auger Problems and Solutions
Auger jamming from debris or ice buildup happens more than any other failure mode. You’re clearing away, everything’s working fine, then suddenly—nothing. The engine runs, but the auger stops turning.
First instinct? Clear it manually. Wrong.
According to the U.S. Consumer Product Safety Commission’s snow thrower safety guidelines, most snow thrower injuries occur when consumers attempt to clear snow from the discharge chute or debris from the auger while the engine is running.
Approximately 5,740 hospital emergency room visits happen annually from snow thrower accidents, with 590 finger amputations reported in recent years.
PRO TIP: Never attempt to clear auger blockages with your hands—always use proper clearing tools. I keep a wooden broom handle cut to 18 inches specifically for this purpose. Engine off, clearing tool in hand, then check the blockage.
Worn auger blades reducing clearing efficiency show up gradually. You don’t notice it day-to-day because the decline happens slowly.
But compare your throwing distance this season to last season? If snow isn’t traveling as far with the same snow conditions, worn auger blades are likely the culprit.
Bent or damaged auger shafts from impact damage—hitting rocks, frozen newspaper bundles, that garden hose you forgot to put away—cause vibration and uneven snow clearing.
A bent shaft can’t be effectively straightened; replacement is the only reliable solution.
Husqvarna Snowblower Belt Systems
Belts are the unsung heroes of your snow blower. They transfer power from the engine to everything that moves. And they wear out faster than you’d expect.
Auger Belt (Part Numbers & Specifications)
Husqvarna snowblower auger belt identification requires matching your specific model number. A ST224 uses a different belt than a ST227P, even though they look similar.
The part number is usually stamped on the belt itself—something like 587-58-72-02—but after a season or two of use, that stamp becomes unreadable.
Belt dimensions matter more than people realize. Length, width, and the V-angle all affect performance. A belt that’s 1/8 inch too narrow will slip under load. Too wide and it won’t sit properly in the pulley grooves, causing premature wear.
Replacement intervals vary dramatically based on usage. Light residential use in powdery snow?
You might get 3-4 seasons from an auger belt. Heavy use in wet, sticky snow? Annual replacement becomes necessary, sometimes mid-season if you’re clearing large areas frequently.
Tension adjustment procedures require specific attention to belt deflection. Most Husqvarna models specify 1/4 to 1/2 inch deflection when pressing firmly on the belt’s longest span.
Too loose and it slips. Too tight and it wears prematurely while stressing bearings.
Signs of belt wear appear before complete failure. Look for:
- Cracking along the inner V-surface
- Fraying at the edges
- Glazing (shiny appearance) indicating slippage
- Chunks missing from the belt material
Drive Belt Components
Drive belt routing diagrams look complicated at first glance. Multiple pulleys, idlers, and guides create a path that seems designed by someone who enjoyed puzzles a bit too much.
But there’s logic to it—the routing creates the necessary tension and disengagement capability for safe operation.
Belt guide positioning and alignment affect everything. Guides keep the belt tracking properly through its route. If a guide gets bent—common after replacing belts without proper care—the belt rides unevenly, causing accelerated wear and potential derailment.
Pulley inspection matters more than maintenance manuals emphasize. Pulleys wear grooves over time.
Those grooves change the belt’s effective diameter, altering speed and tension characteristics. Run your finger along the pulley groove—if you feel a distinct ridge or the surface is rough, replacement prevents future belt problems.
PRO TIP: Keep spare belts on hand. Single-stage models wear belts faster than two-stage units due to increased friction from direct auger drive. I learned this lesson at 6 AM during a blizzard when my belt snapped and every hardware store was closed. Now I keep spares in sealed bags on a shelf in my garage.
Belt Tightener Mechanism
Spring tension specifications are precisely engineered. The tightener spring maintains proper belt tension across varying loads. When this spring weakens—usually after 5-7 years—belt slippage begins even with a new belt installed.
Idler pulley bearing replacement becomes necessary when you hear squealing during operation. The idler pulley uses a sealed bearing that eventually fails from exposure to moisture and debris.
Replacing just the bearing costs less than replacing the entire idler pulley assembly, but requires basic mechanical skills.
Cable adjustment for proper engagement prevents that lurching feeling when you engage the drive.
The cable stretches slightly over time, and periodic adjustment compensates for this stretch, maintaining smooth engagement and disengagement.
Husqvarna Snowblower Chute Assembly
The chute directs where your snow goes. Simple concept. But surprisingly complex in execution.
Discharge Chute Components
Chute discharge base assembly—part number 582261901 on many models —serves as the mounting point for the entire chute rotation system.
This base includes the gear mechanism that allows 200-degree rotation (on most models) and houses the friction points that keep the chute positioned where you set it.
Chute deflector adjustment mechanisms control vertical snow projection. Most Husqvarna models use a cable-operated deflector with multiple position settings.
The cable runs from the operator position through protective routing to the deflector itself, and these cables stretch or freeze, requiring periodic adjustment.
Rotation gear and crank handle parts use plastic gears in most residential models. Yes, plastic. Not because Husqvarna is cheap, but because plastic gears provide smooth operation at cold temperatures where metal would require excessive force.
The tradeoff? These gears eventually wear, especially if you force rotation with heavy snow buildup on the chute.
Chute liner material varies by model, but most use a HDPE (high-density polyethylene) liner or powder-coated metal. Anti-stick treatments help, but physics eventually wins—wet snow sticks to everything given enough time.
Chute Deflector Maintenance
Deflector positioning controls and cables need annual inspection. Check for fraying where the cable passes through guides, rust on the metal portions, and smooth operation through the full range of motion.
Lubrication points for smooth rotation include the base gear mechanism, the deflector pivot points, and anywhere metal moves against metal or plastic. I use silicone spray because it doesn’t attract dirt and remains effective at sub-zero temperatures.
Replacement procedures for damaged deflectors are straightforward on most models—usually four bolts and disconnecting the control cable.
The challenging part is adjustment after installation to ensure the deflector points accurately across its entire range.
PRO TIP: Spray silicone lubricant inside the chute before each use to prevent snow adhesion. Takes 15 seconds, and the difference in throwing efficiency is remarkable. Snow that would normally stick and build up slides right through, maintaining maximum throwing distance throughout your clearing session.
Husqvarna Snowblower Shear Bolts
These little guys are criminally underappreciated. Until they’re not there when you need them.
Shear Bolt Function and Safety Design
Shear bolts are engineered failure points protecting your drivetrain. Think of them as the mechanical equivalent of a circuit breaker.
When your auger hits something immovable—a rock, a buried newspaper, someone’s lost car keys frozen in ice—the shear bolt breaks instead of transmitting that massive force to your expensive gearbox or engine.
Correct bolt specifications by model series matter enormously. A shear bolt from a ST224 won’t work properly on a ST327P.
The bolt diameter, length, and material hardness are calibrated to break at specific force thresholds. Use the wrong bolt, and either it breaks too easily (annoying but harmless) or doesn’t break when it should (expensive gearbox damage).
OEM vs hardware store replacements—this is where people get themselves in trouble. A grade 5 bolt from the hardware store looks similar to an OEM shear bolt.
But it’s hardened to NOT break. Install hardware store bolts as shear bolts, hit an obstruction, and something more expensive breaks instead.
Torque specifications for proper installation are typically 15-20 ft-lbs for most Husqvarna models. Too loose and the bolt works free during operation. Too tight and it won’t shear when needed, defeating its entire purpose.
When to Replace Shear Bolts
Auger engagement failure symptoms are obvious. Engine runs, drive engages, but the auger doesn’t turn. That’s usually a sheared bolt doing exactly what it was designed to do.
Post-impact inspection procedures should include checking ALL shear bolts, not just the obvious one. Sometimes an impact bends one bolt while breaking another. The bent bolt will fail soon after, leaving you stranded mid-storm.
Carrying spare shear bolts during operation is non-negotiable in my book. I keep four spares in a small waterproof container zip-tied to the handlebars. Accessible, protected from the elements, and always there when needed.
PRO TIP: Shear bolts are designed to break. Finding broken bolts means the safety system worked correctly. Don’t curse the broken bolt—thank it for protecting your $300 gearbox. Replace it and keep going.
Husqvarna Snowblower Carburetor
The carburetor is where fuel and air meet before entering your engine. Get this wrong, and nothing else matters.
Carburetor Components and Function
Carburetor assembly with idle speed control regulates engine operation across varying loads. The idle circuit maintains smooth running when the engine isn’t working hard.
The main jet provides fuel when you’re under heavy load. The transition between these two must be seamless, and when carburetor components wear or get dirty, that transition becomes rough or fails entirely.
Fuel mixture adjustment considerations on modern Husqvarna models are limited—most carburetors use fixed jets rather than adjustable needles.
This reduces user error but means you can’t compensate for altitude or fuel quality variations through adjustment.
Float bowl and jet specifications control fuel delivery precision. The float bowl maintains a constant fuel level, while jets meter fuel flow based on engine vacuum.
Jets are measured in hundredths of a millimeter—a 0.02mm difference in jet size significantly affects engine performance.
Primer bulb system integration pumps a measured amount of fuel directly into the carburetor for cold starting. When this bulb hardens or cracks, starting becomes difficult because you can’t manually enrich the mixture during startup.
Carburetor Troubleshooting
Engine running rough or stalling symptoms usually point to carburetor issues if the spark plug is good and fuel is fresh. Rough idle, surging under load, or stalling when throttling down all indicate carburetor problems.
Carburetor cleaning and maintenance procedures start with the simple stuff. Drain the float bowl, inspect for water or debris, and clean the main jet with carburetor cleaner spray. Often that’s enough to restore proper operation.
Repair kit components—part number 580-35-36-02 for many Husqvarna models —include gaskets, O-rings, needle valve, and jets. These kits cost $15-25 and contain everything needed for a complete carburetor rebuild short of the body itself.
Fuel system inspection including tank, lines, and petcock should accompany any carburetor service. Old fuel in the tank? Dirty fuel strainer? Cracked fuel lines? Fix those issues first, or your freshly cleaned carburetor will be dirty again within hours.
PRO TIP: Use fresh fuel with stabilizer. Old gas is the #1 cause of carburetor problems. Ethanol-blended fuel absorbs moisture and degrades within 30 days. Non-ethanol fuel lasts longer but still benefits from stabilizer. I drain my tank completely at season’s end, run the carburetor dry, and start fresh each winter.
Carburetor Replacement Guide
Step-by-step removal procedures vary by model, but the general approach remains consistent. Shut off the fuel petcock, disconnect the fuel line, remove the air filter assembly, disconnect throttle and choke linkages, remove two mounting bolts, and lift the carburetor away.
Gasket replacement importance cannot be overstated. Never reuse old gaskets. They compress and conform to imperfections during use, and reinstalling them creates air leaks that make proper engine operation impossible.
Fuel line routing and connection points should be photographed before disassembly. Seriously. Take photos with your phone. Fuel line routing that seems obvious during disassembly becomes confusing during reassembly when you’re cold and frustrated.
Throttle and choke linkage adjustment requires patience. These linkages must operate smoothly through their full range without binding. Too much slack and response becomes sluggish. Too tight and components wear prematurely.
Engine Components and Electrical Parts
The engine and electrical system keep everything running. Let’s break down what actually fails and why.
Engine Replacement Parts
Core Engine Components
Spark plug specifications and replacement intervals are straightforward. Most Husqvarna snow blowers use standard resistor-type plugs like Champion RJ19LM or equivalent. Replace annually as preventive maintenance, or immediately if the electrode is worn, porcelain is cracked, or carbon buildup is excessive.
Recoil starter assembly repair becomes necessary when the rope breaks or the rewind spring fails. The rope itself is cheap—$5-10—but if the spring breaks, you’re often better off replacing the entire recoil assembly unless you enjoy wrestling with spring-loaded mechanisms.
Electric starter components on 120V side-mount systems include the motor itself, solenoid, and wiring. These systems are reliable but vulnerable to moisture intrusion. Store your machine indoors if possible, and if water does get in the starter, let it dry completely before attempting to use it.
Oil dipstick and drain systems should be checked before every use. The dipstick doubles as the oil fill cap on most models. Oil level should stay between the min and max marks. Below minimum? You risk engine damage. Above maximum? You create excessive crankcase pressure and oil leaks.
Fuel System Parts
Fuel tank assembly on most Husqvarna models holds 2.7 liters —enough for 45-60 minutes of operation under normal conditions. The tank itself rarely fails, but the cap seal does. A failed cap seal allows fuel evaporation and prevents proper tank venting, creating starting and running problems.
Fuel tank valve (petcock) maintenance involves periodic inspection for leaks and smooth operation. The valve should move easily between ON and OFF positions. Stiff operation indicates internal corrosion; replace before it fails completely and leaves you with either no fuel flow or uncontrolled fuel flow.
Fuel tank strainer cleaning prevents debris from entering your carburetor. This fine mesh screen sits at the fuel outlet inside the tank, catching rust particles and debris. Clean it annually by removing the fuel line and flushing with clean fuel.
Fuel hose kit replacement becomes necessary when lines crack from age and temperature cycling. Fuel hoses on small engines endure extreme temperature swings—from -20°F to 180°F within minutes. This cycling causes rubber to harden and crack. Replace every 5 years as preventive maintenance.
Electrical System Components
Starting System Parts
The 60-watt AC charging coil generates electricity for the electric start system and lights. This coil sits under the flywheel and rarely fails, but when it does, you lose electric start capability until it’s replaced.
Safety key switch and key sets prevent unauthorized operation. The key completes an electrical circuit that allows the ignition system to function. Lose your key? Replacement keys are available, but you’ll need your model number to order the correct type.
Wire harness configurations connect all electrical components. These harnesses use weather-resistant connectors, but corrosion still happens over years of exposure. Spray electrical contact cleaner and dielectric grease on connections annually to prevent corrosion.
Battery maintenance for electric start models includes keeping terminals clean and maintaining charge during storage. Most snow blower batteries are small 12V lead-acid types. Remove them during off-season storage, keep them in a cool location, and maintain charge with a trickle charger every month or two.
Lighting and Controls
LED headlight assemblies on newer Husqvarna models provide excellent visibility for early morning or evening clearing. LEDs last essentially forever compared to incandescent bulbs, but the plastic lens can crack from impact or become cloudy from UV exposure.
Heated grip wiring and control modules require adequate electrical output from the charging coil. If your heated grips stop working, check the simplest things first—wire connections at the grips, the control switch, and fuse (if equipped).
Control panel switches and indicators vary by model but generally include engine stop, choke control, and various indicator lights. These switches operate in harsh conditions and eventually wear out. Replacement switches are model-specific, so accurate identification is critical.
Drive System and Wheels
Power means nothing if it doesn’t reach the ground effectively.
Drive Wheel Assembly
Wheel Components
Drive wheel assembly parts diagrams show how wheels, axles, and drive mechanisms interconnect. Most Husqvarna snow blowers use a friction disc system that contacts a spinning plate connected to the engine, transferring power to the wheels through a combination of friction and mechanical advantage.
Tire tread patterns affect traction dramatically. Some models use deep X-tread patterns for maximum grip. Others use less aggressive patterns for smoother operation on pavement. Worn tread reduces traction regardless of pattern—replace tires when tread depth drops below 1/8 inch.
Wheel bearing lubrication procedures should be performed annually. Remove the wheels, pack bearings with high-temperature grease, and reassemble. This simple maintenance extends wheel bearing life from 5 years to 15+ years.
Axle shaft inspection and maintenance includes checking for wear where the wheel mounts. Worn axle shafts cause wheels to wobble, reducing traction and creating dangerous handling characteristics.
Gearbox Parts
Gearbox assembly lubrication requirements specify particular oil weights. Most use 80W-90 gear oil or equivalent. Check your owner’s manual—using the wrong oil can cause premature gear wear or poor cold-weather operation.
Internal gear inspection procedures require complete gearbox disassembly. Unless you’re mechanically inclined and have experience with gear systems, this is a job for professionals. Internal gears rarely wear if properly lubricated, so focus on maintaining correct oil level rather than worrying about internal condition.
Output shaft seal replacement becomes necessary when oil leaks from the gearbox output shaft. The seal costs $5-10, but accessing it requires removing the wheel and sometimes the entire gearbox depending on model design.
PRO TIP: Check gearbox oil level annually. Low oil causes premature wear and expensive gearbox replacement. Most Husqvarna models have a check plug or sight glass on the gearbox. Oil level should reach the bottom of the check plug hole or the middle of the sight glass.
Frame and Housing Parts
Structural Components
Auger housing material and durability on Husqvarna models use stamped steel with powder-coat finish. Quality varies between model lines—professional series machines use heavier gauge steel than entry-level models.
Frame assembly and hood components provide structural support and protection. The frame must remain rigid for proper belt alignment and component operation. Check frame bolts annually and tighten any that have loosened from vibration.
Skid shoe adjustment and replacement affects how close the scraper bar sits to the ground. Adjust skid shoes higher for gravel driveways to prevent rock pickup. Lower for smooth pavement to maximize snow removal. Replace when worn through—usually after 5-8 seasons depending on surface types.
Scraper bar wear indicators include visible thinning or deformation of the steel bar. The scraper bar should be replaced when it’s worn to half its original thickness. Waiting longer risks damaging the auger housing, which costs dramatically more to replace.
Finding Husqvarna Snowblower Parts Near Me

When you need parts, location matters. Fast.
Authorized Dealer Networks
Husqvarna dealer locator tools on their website help you find nearby authorized dealers. These dealers stock common parts, provide warranty service, and offer expert advice for troubleshooting.
Benefits of purchasing from authorized dealers include immediate availability for common items, hands-on inspection before purchase, and support if parts don’t fit or don’t solve your problem. The price premium—typically 15-25% over online prices—buys convenience and expertise.
Warranty service and parts availability at dealers is better for newer models than older ones. If your machine is under warranty, using authorized dealers for repairs and parts maintains that warranty coverage.
Local inventory vs special order timelines create decision points. Common items like belts and spark plugs? Usually in stock. Specialized components like carburetor assemblies or electric starters? Often require ordering, with 3-7 day wait times depending on distributor availability.
Online Parts Retailers
Reputable Online Sources
PartSelect offers OEM parts with same-day shipping on most items. Their website includes detailed diagrams and usually ships parts within hours of order placement if ordered before afternoon cutoff times.
eReplacementParts provides model-specific diagrams and expert support. Their customer service team can help identify parts from descriptions if you don’t know the part number.
Fix.com stocks official Husqvarna parts with repair help videos and guides. They’re particularly useful if you’re tackling repairs yourself for the first time.
Direct from Husqvarna.com parts department ensures genuine OEM parts. Shipping takes longer—typically 7-10 business days—but for hard-to-find components, it’s often your only option.
How to Order the Correct Part
Locating model and serial numbers on your machine is the first step. The model number is stamped on a metal plate attached to the auger housing below the chute. It’ll be something like “ST224P 961430047” with additional serial number information.
Using parts diagrams to identify components eliminates guesswork. Find your model’s illustrated parts list, locate the component you need, note the part number, and order confidently knowing it’s the correct part.
Cross-referencing part numbers across model years helps when your specific model year isn’t listed. Many parts interchange between model years. A reputable parts supplier can confirm compatibility if you’re unsure.
Return policies and fitment guarantees vary by retailer. PartSelect offers 365-day returns. Others provide 30-90 day windows. Read the policy before ordering to understand your options if the part doesn’t fit.
Expert Maintenance Schedule for Maximum Parts Longevity
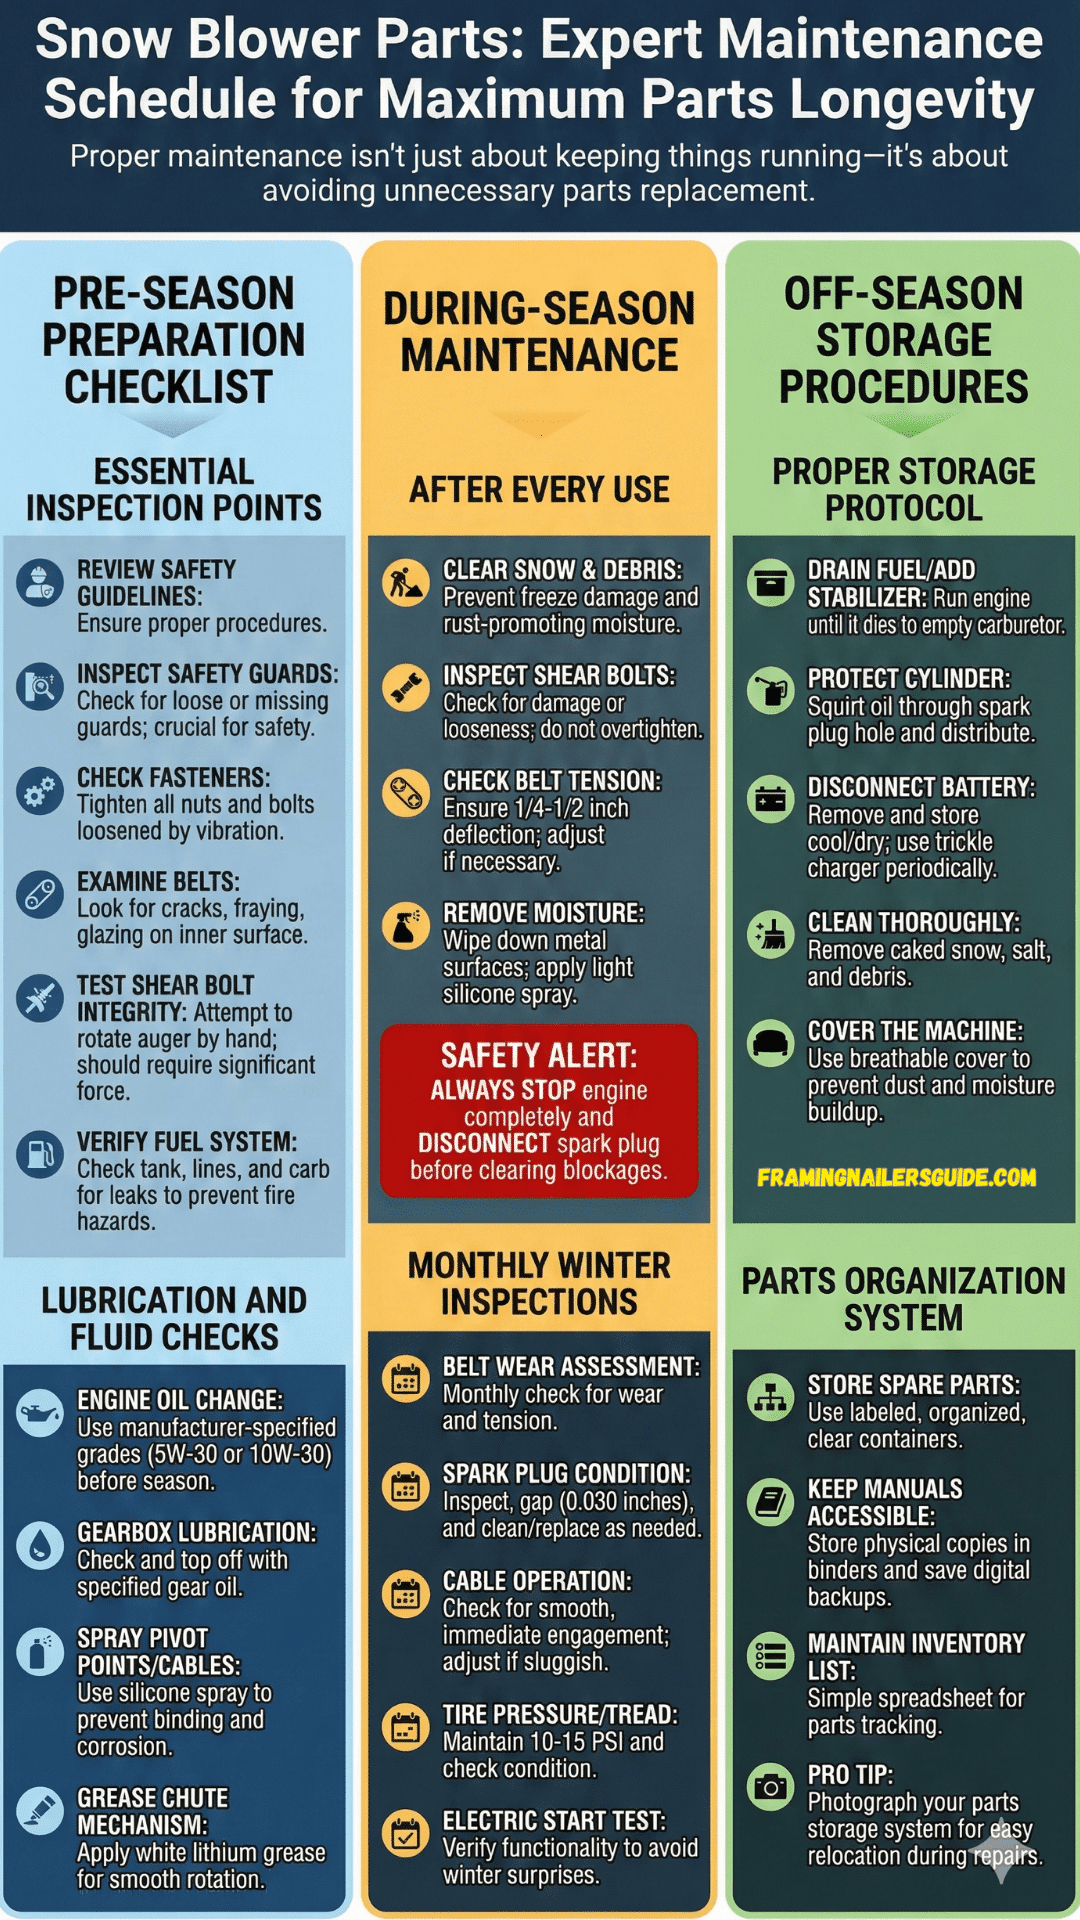
Proper maintenance isn’t just about keeping things running—it’s about avoiding unnecessary parts replacement.
Pre-Season Preparation Checklist
Essential Inspection Points
Before performing any maintenance, review official safety guidelines for snow thrower operation to ensure proper procedures.
Inspect your machine for loose or missing safety guards. These guards protect you from moving parts. Missing guards turn inconvenient into dangerous.
Check all nuts, bolts, and fasteners for tightness. Vibration loosens fasteners over summer storage. Walk around the machine with appropriate wrenches and snug everything up.
Examine belts for cracks, fraying, or glazing. Hold the belt up to light and flex it. Cracks on the inner surface indicate the belt has reached end of life even if it hasn’t failed yet.
Test shear bolt integrity and have spares ready. Attempt to rotate the auger by hand (with the engine off). It should require significant force but should rotate. If it’s locked solid, investigate before starting.
Verify fuel system components are leak-free. Check the tank, fuel lines, petcock, and carburetor for any signs of fuel seepage. Fix leaks before operation—fuel leaks near hot engines create fire hazards.
Lubrication and Fluid Checks
Engine oil change using manufacturer-specified grades should be done annually at minimum. Most Husqvarna snow blowers use 5W-30 or 10W-30 oil. Change before season start, not at season end, so your engine starts with fresh, clean oil.
Gearbox lubrication verification involves checking the oil level through the check plug or sight glass. Top off if needed using the specified gear oil weight.
Spray lubricant at all pivot points and cables prevents binding and corrosion. I use silicone spray because it doesn’t attract dirt and remains effective at sub-zero temperatures where petroleum lubricants thicken.
Chute rotation mechanism greasing keeps operation smooth. A small amount of white lithium grease on the gear teeth and rotation points prevents binding when you’re redirecting snow flow.
During-Season Maintenance
After Every Use
Clear snow and debris from the auger and chute. This prevents freeze damage to components and eliminates rust-promoting moisture. Takes five minutes and prevents hours of repair time later.
Inspect shear bolts for damage or looseness. They should be snug but not overtightened. Look for bending or partial cracks that indicate impending failure.
Check belt tension and alignment. The belt should have 1/4 to 1/2 inch deflection when pressed firmly at its longest span. More deflection means adjustment is needed.
Remove moisture to prevent rust formation. Wipe down metal surfaces, especially around the chute and auger. A light coat of silicone spray provides additional protection.
SAFETY ALERT: Always stop the engine completely before clearing blockages. Not just to idle—completely off. And disconnect the spark plug wire if you’re reaching into the auger area for any reason.
Monthly Winter Inspections
Belt wear assessment and tension adjustment should happen monthly during active use. Belts wear gradually, and monthly checks catch problems before complete failure.
Spark plug condition and gap verification ensures reliable starting. Remove the plug, inspect for heavy carbon deposits or electrode wear, check gap with a feeler gauge (typically 0.030 inches), and clean or replace as needed.
Cable operation and adjustment needs become apparent through feel. Drive engagement should be smooth and immediate. Auger engagement likewise. Sluggish or delayed engagement indicates cable stretch requiring adjustment.
Tire pressure and tread evaluation affects traction and handling. Most snow blower tires run 10-15 PSI. Check with a low-pressure gauge and adjust as needed.
Electric start system functionality test prevents surprises during the next snowfall. Press the start button before you need it. If it’s sluggish or doesn’t work, diagnose and repair while you have time.
Off-Season Storage Procedures
Proper Storage Protocol
Drain fuel or add stabilizer per manufacturer guidelines. I prefer draining completely—run the engine until it dies from fuel starvation. This empties the carburetor bowl, preventing gum formation during storage.
Remove the spark plug and add protective oil to the cylinder. Squirt a tablespoon of engine oil through the spark plug hole, pull the recoil handle a few times to distribute oil, then reinstall the plug. This prevents cylinder rust during humid summer storage.
Disconnect the battery from electric-start models. Remove it completely if possible, store it somewhere cool and dry, and maintain charge with a trickle charger periodically.
Clean the entire machine thoroughly before storage. Remove caked-on snow, road salt, and debris. These materials attract moisture and promote corrosion during storage.
Cover the machine to prevent dust and moisture exposure. A breathable cover works better than plastic—plastic traps moisture while fabric covers allow air circulation.
Parts Organization System
Store spare parts in labeled, organized containers. I use clear plastic boxes with snap lids—you can see what’s inside without opening them, and they stack efficiently.
Keep parts diagrams and manuals accessible. I store physical copies in sheet protectors inside a three-ring binder kept on the shelf above my workbench. Digital copies get saved to cloud storage as backup.
Maintain a parts inventory list for quick reference. Simple spreadsheet with part numbers, descriptions, quantities on hand, and purchase dates. Update it when you use or buy parts.
PRO TIP: Photograph your parts storage system for easy relocation. When you’re searching for that one specific component in the middle of a repair, photos on your phone help you find things quickly without tearing apart your entire organization system.
Common Parts Failures and Troubleshooting
Real-world problems require practical solutions.
Diagnosing Parts Problems
Symptom-Based Diagnosis Chart
| Symptom | Likely Failed Part | Part Number Reference |
|---|---|---|
| Auger won't engage | Shear bolts or auger belt | Check bolts first, then belt |
| Chute won't rotate | Chute gear or cable | Discharge chute 582261901 |
| Engine won't start | Spark plug or carburetor | Part 532-42-49-39 / 587-14-79-01 |
| Rough engine operation | Carburetor or fuel system | Carb repair kit 580-35-36-02 |
| Machine won't drive forward | Drive belt or cable adjustment | Drive belt assembly |
| Weak throwing distance | Worn auger belt or clogged chute | Belt guide 587-58-72-02 |
This chart provides starting points, not definitive diagnoses. Multiple factors can cause similar symptoms, so systematic troubleshooting works better than jumping to conclusions.
Emergency Repair Scenarios
Field Repairs During Operation
Replacing broken shear bolts mid-session is straightforward if you have spares. Stop the engine, let it cool for a minute, remove the broken bolt pieces, install new bolts, and resume clearing. Five-minute job if you’re prepared.
Temporary belt tension adjustments can get you through an emergency clearing session. Most Husqvarna models include adjustment nuts or mechanisms for belt tension. A quarter-turn adjustment can restore adequate tension to finish the job before proper replacement.
Clearing frozen discharge chute safely requires patience. Engine off, use wooden or plastic clearing tools, and chip away ice carefully. Never force anything—damaged plastic chute components cost more than the time saved by rushing.
Managing fuel system issues in cold weather often involves fuel line freeze-up from water contamination. If your engine runs briefly then dies, and this repeats, suspect water in the fuel. The solution? Warm environment and fresh fuel. Prevention? Better fuel storage practices.
When to Call a Professional
Engine internal component failures—loss of compression, serious knocking, or catastrophic breakage—exceed typical homeowner repair capabilities. These repairs require specialized tools and expertise.
Gearbox oil leaks or noise indicate internal problems. While topping off oil is simple, addressing internal wear requires complete disassembly and potentially replacement. Professional diagnosis prevents throwing money at the wrong problem.
Electrical system troubleshooting beyond basics becomes complicated quickly. Charging coil testing requires specialized meters and knowledge. Wiring diagram interpretation isn’t intuitive. When electrical problems exceed your skill level, professional help saves time and frustration.
Frame or housing structural damage from impacts or corrosion may compromise machine safety. Welding repairs on snow blower frames work for some damage but require proper welding skills to maintain structural integrity.
Cost Analysis and Budgeting
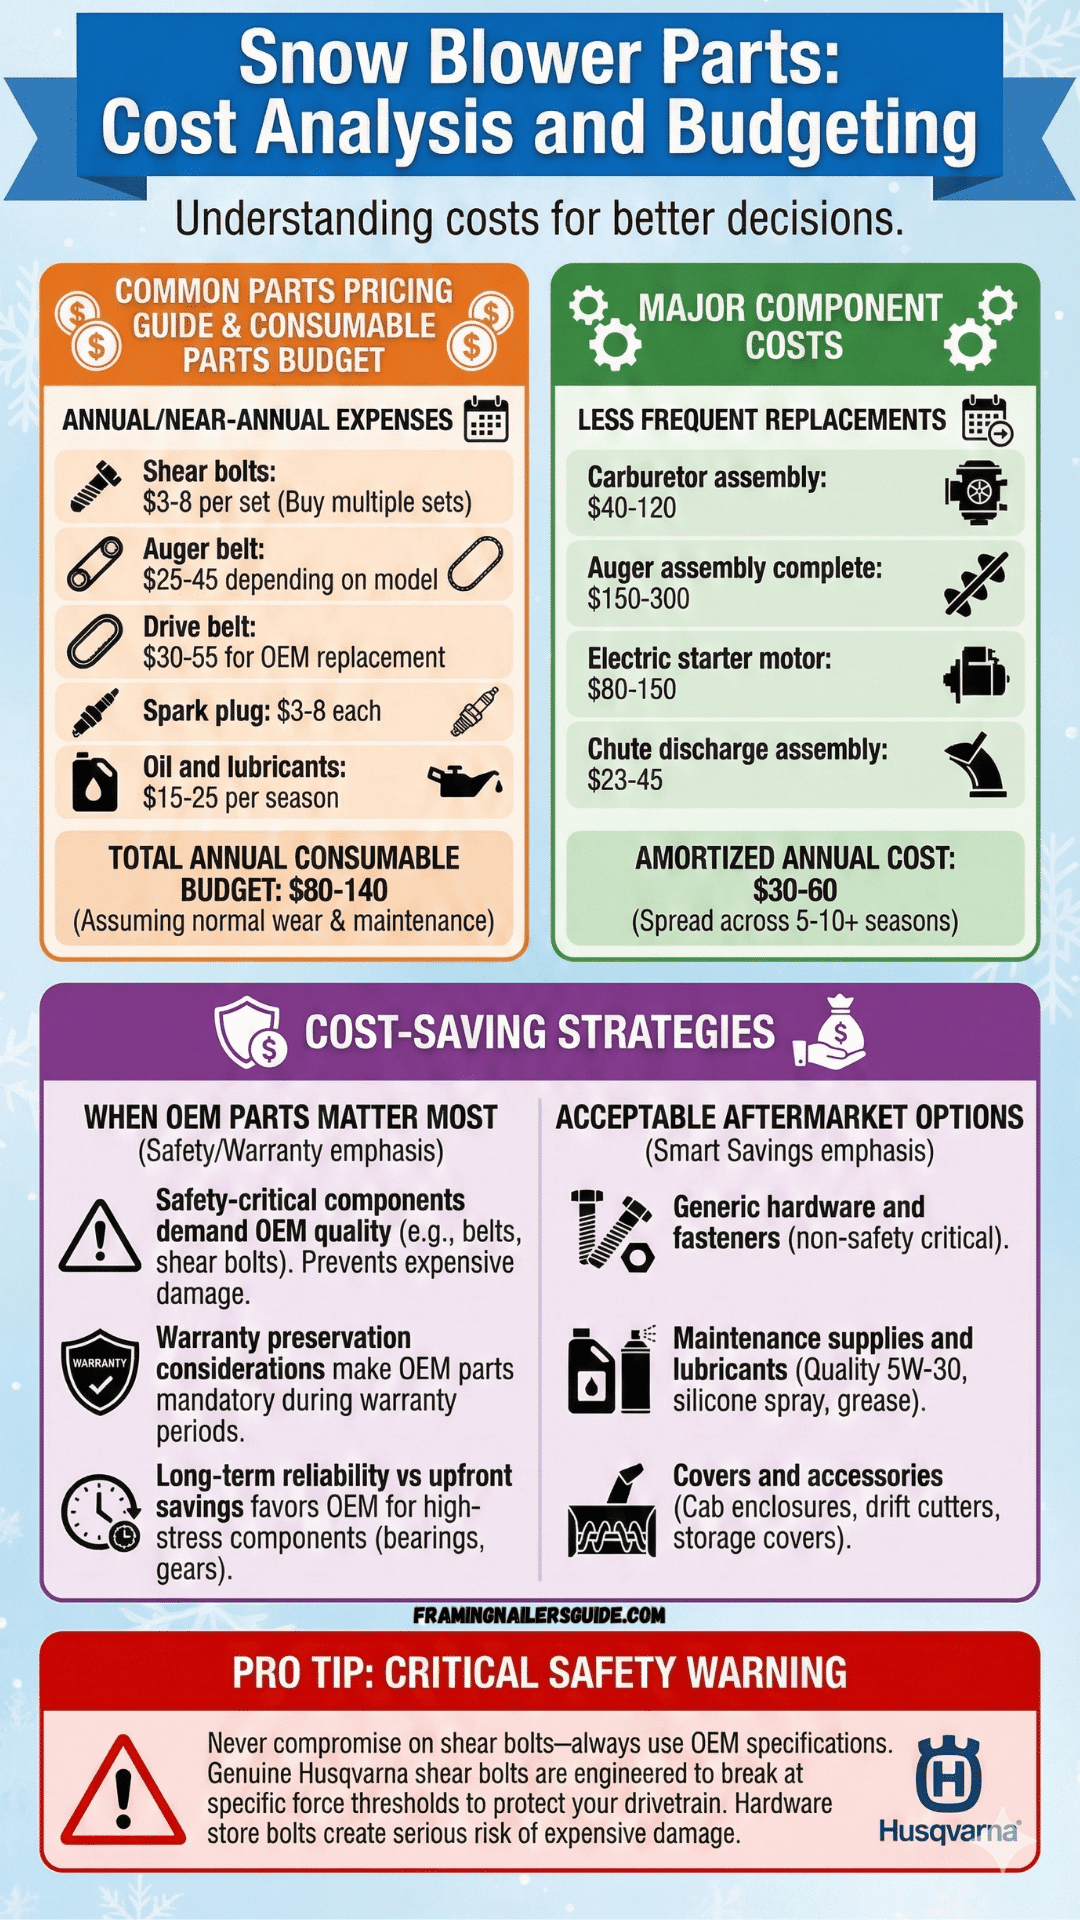
Let’s talk money. Because understanding costs helps you make better decisions.
Common Parts Pricing Guide
Consumable Parts Budget
Plan for these annual or near-annual expenses:
- Shear bolts: $3-8 per set (buy multiple sets)
- Auger belt: $25-45 depending on model
- Drive belt: $30-55 for OEM replacement
- Spark plug: $3-8 each
- Oil and lubricants: $15-25 per season
Total annual consumable budget: $80-140 assuming normal wear and proper maintenance.
Major Component Costs
Budget for these less frequent but more expensive replacements:
- Carburetor assembly: $40-120
- Auger assembly complete: $150-300
- Electric starter motor: $80-150
- Chute discharge assembly: $23-45
These major components typically last 5-10+ seasons with proper maintenance, so annual amortized cost is relatively low—$30-60 per year spread across component lifespan.
Cost-Saving Strategies
When OEM Parts Matter Most
Safety-critical components demand OEM quality. Shear bolts and belts directly affect safety and protection of expensive components. Saving $10 on an aftermarket belt that fails prematurely and damages your $200 auger assembly is poor economics.
Warranty preservation considerations make OEM parts mandatory during warranty periods. Using aftermarket parts that cause failures voids warranty coverage on related components.
Long-term reliability vs upfront savings favors OEM for high-stress components. Bearings, gears, and critical fasteners should be OEM specifications to ensure proper fit, material quality, and longevity.
Acceptable Aftermarket Options
Generic hardware and fasteners—standard bolts, nuts, washers that aren’t safety-critical—can be aftermarket without concern. A $0.50 hardware store bolt works identically to a $3 OEM bolt for mounting a non-critical component.
Maintenance supplies and lubricants don’t require OEM specifications. Any quality 5W-30 engine oil works fine. Silicone spray from any manufacturer performs equally. Grease is grease provided you match the type (lithium, synthetic, etc.).
Covers and accessories like cab enclosures, drift cutters, and storage covers function fine from aftermarket suppliers. These items don’t affect machine operation or safety.
PRO TIP: Never compromise on shear bolts—always use OEM specifications. This is the one component where aftermarket substitution creates serious risk of expensive damage. Genuine Husqvarna shear bolts are engineered to break at specific force thresholds, protecting your drivetrain. Hardware store bolts aren’t.
Safety Considerations When Replacing Parts
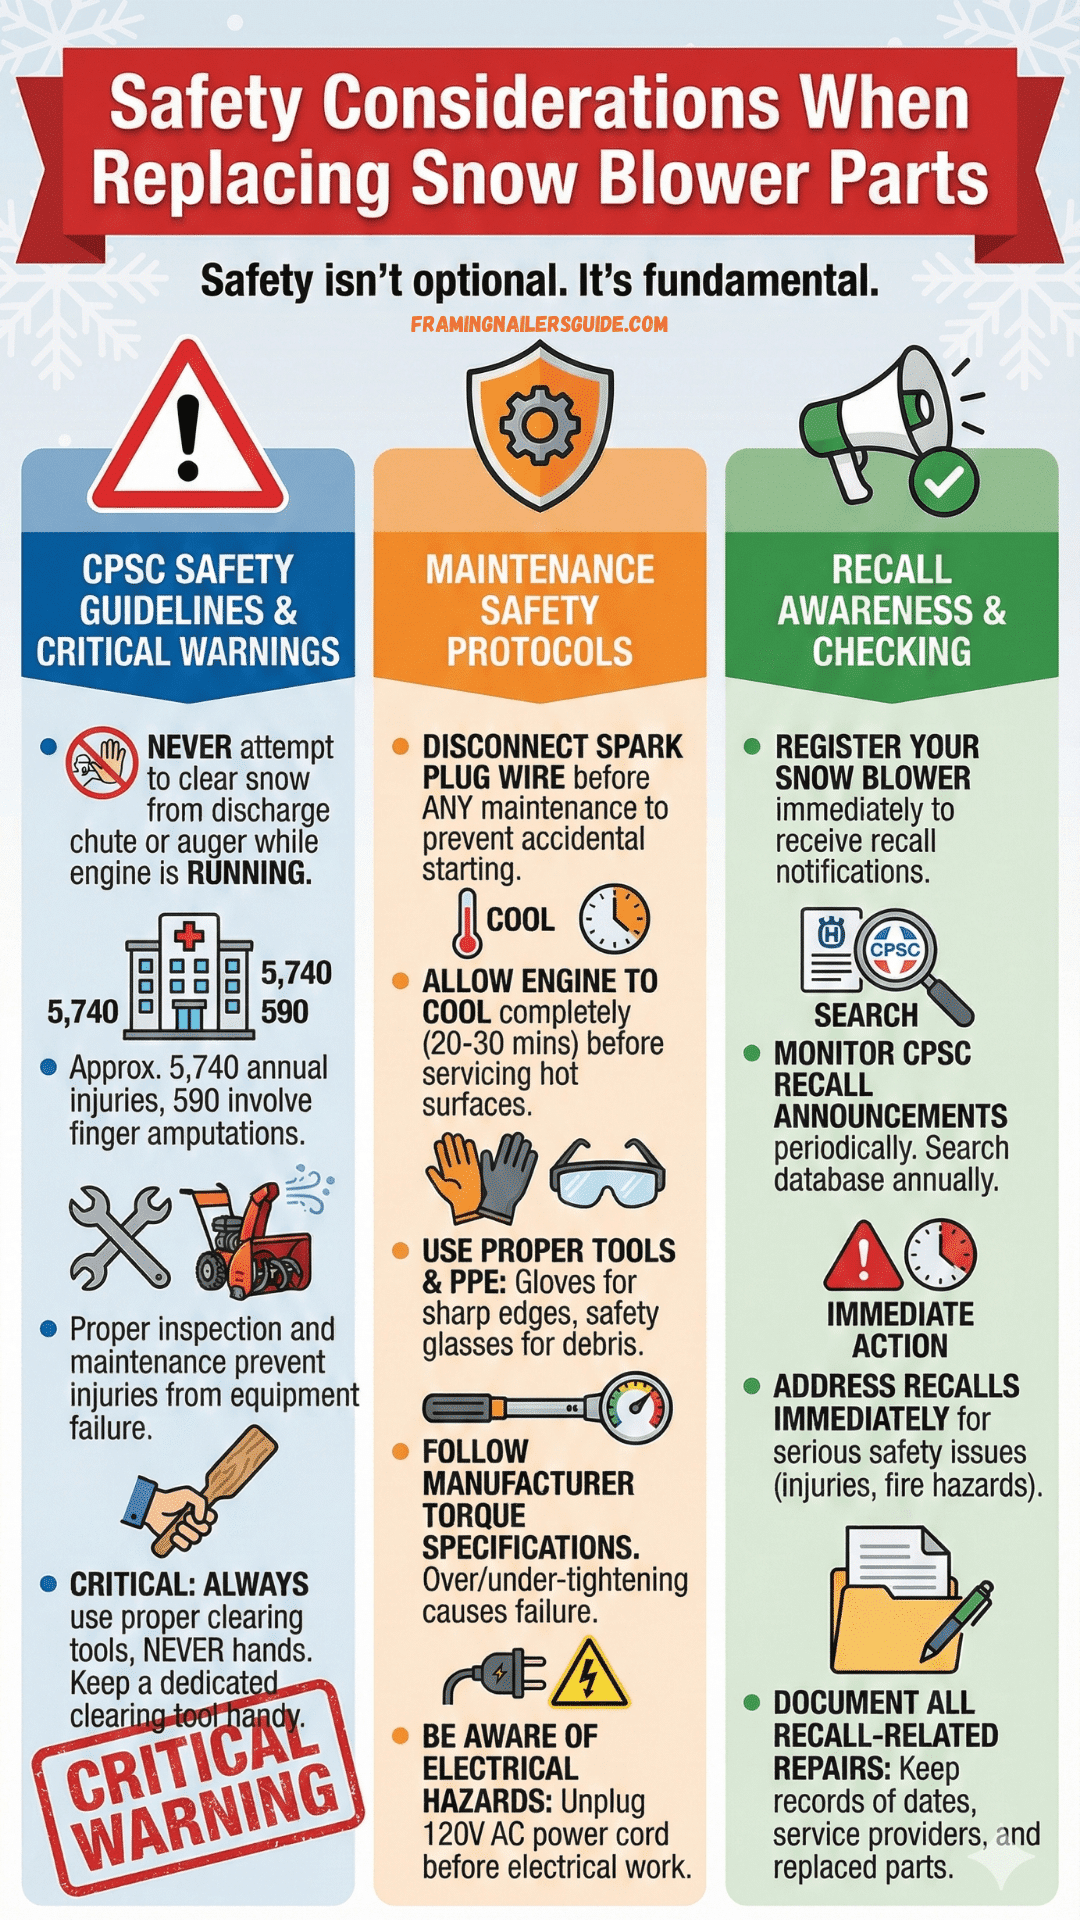
Safety isn’t optional. It’s fundamental.
CPSC Safety Guidelines
Critical Safety Warnings
According to the U.S. Consumer Product Safety Commission’s snow thrower safety guidelines, never attempt to clear snow from the discharge chute or auger while the engine is running.
The statistics are sobering. Approximately 5,740 hospital emergency room injuries occur annually with snow throwers. Of those, 590 involve finger amputations. Most happen when operators attempt to clear clogs with their hands while the machine is running.
The CPSC’s comprehensive snow thrower safety guide emphasizes the importance of proper part inspection and maintenance to prevent injuries associated with equipment failure.
Always use proper clearing tools, never hands. I keep a wooden broom handle cut to 18 inches zip-tied to my machine specifically for clearing blockages. Wood won’t damage components if accidentally contacted with the auger, and it keeps my hands far from danger.
Maintenance Safety Protocols
Disconnect the spark plug wire before any maintenance work. This single step prevents accidental engine starting during maintenance. It takes two seconds and could prevent life-changing injuries.
Allow the engine to cool completely before servicing. Mufflers and engine surfaces remain dangerously hot for 20-30 minutes after shutdown. Exercise patience.
Use proper tools and protective equipment. Gloves protect against sharp edges. Safety glasses prevent debris from entering eyes. Proper wrenches prevent rounded bolt heads and injured knuckles.
Follow manufacturer torque specifications. Over-tightening breaks components. Under-tightening allows them to work loose. Torque specs exist for good reasons—follow them.
Be aware of electrical hazards with electric-start models. 120V AC electric starters present shock hazards if wiring is damaged or connections are made incorrectly. Unplug the power cord before performing any electrical system maintenance.
Recall Awareness
Checking for Safety Recalls
Register your snow blower with Husqvarna immediately after purchase. Registration ensures you receive notification of any safety recalls affecting your model.
Monitor CPSC recall announcements periodically. The CPSC website maintains a searchable database of recalls. Search for “Husqvarna snow” annually to check for issues affecting your machine.
Address recalls immediately for safety. Recalls happen for serious reasons—component failures that cause injuries or create fire hazards. Don’t procrastinate on recall repairs.
Document all recall-related repairs. Keep records of when repairs were performed, by whom, and what parts were replaced. This documentation proves compliance if warranty or liability questions arise later.
Parts Resources and Documentation
Knowledge is power. Knowing where to find information matters as much as the information itself.
Official Husqvarna Resources
Manuals and Diagrams
Accessing illustrated parts lists (IPL) by model provides visual identification of every component. These exploded-view diagrams show how parts relate spatially and include part numbers for ordering.
Owner’s manual download from Husqvarna support provides operating instructions, maintenance schedules, and specifications. Download a digital copy even if you have the printed manual—digital versions are searchable and always accessible from your phone.
Parts diagram interpretation guide—the IPL numbers parts sequentially, usually front to back and top to bottom. Reference numbers on the diagram correspond to part numbers in the accompanying list.
Service bulletin notifications address known issues and improvements. Husqvarna issues bulletins when they identify problems or develop better repair procedures. Authorized dealers receive these bulletins, and sometimes they’re available through customer service.
Customer Support Channels
Husqvarna customer service contact information includes phone support, email assistance, and online chat for many regions. Support quality varies by region and representative, but most can help with parts identification and warranty questions.
Warranty claim procedures require documentation. Keep your purchase receipt, register the product, document the problem with photos if applicable, and contact an authorized dealer to initiate warranty service.
Technical support for parts identification helps when you know something’s wrong but can’t identify the specific component. Describe the problem and location, and experienced support staff can often identify the likely failed part.
Third-Party Resources
Parts Identification Tools
PartsTree provides model-specific diagrams for thousands of outdoor power equipment models. Their interface is user-friendly and allows zooming into diagram details for precise identification.
Manuals.plus hosts repair documentation and illustrated parts lists. Coverage varies by model and age, but for common models, they provide excellent resources.
Video tutorials for common repairs exist on YouTube and manufacturer websites. Watching someone perform the repair you’re attempting builds confidence and reveals details that written instructions miss.
Online forums and community support—enthusiast forums for snow blowers and outdoor power equipment connect you with experienced users. These communities share knowledge about common problems, repair techniques, and parts substitutions.
Frequently Asked Questions
What are the most commonly replaced Husqvarna snowblower parts?
The most frequently replaced parts include shear bolts, auger belts, spark plugs, and carburetor components. These wear items typically need replacement every 1-3 seasons depending on usage intensity and maintenance practices. Shear bolts break by design when the auger hits immovable objects. Belts wear from friction and heat. Spark plugs foul from combustion byproducts. Carburetors gum up from fuel degradation. All are normal wear items rather than indicators of poor quality.
How do I find the correct part number for my Husqvarna snowblower?
Locate your model number on the metal auger housing below the chute, then reference the illustrated parts list (IPL) available from Husqvarna or authorized dealers. Each part has a unique number like 532-42-05-78 for specific components. The model number typically includes the model name followed by a series of digits—something like “ST224P 961430047.” With this information, online parts retailers and authorized dealers can provide exact part numbers for every component on your machine.
Can I use aftermarket parts instead of OEM Husqvarna parts?
While some aftermarket parts work acceptably for non-critical components, safety-critical parts like shear bolts and belts should always be OEM specifications. Using non-OEM parts may void warranty coverage and compromise safety. Aftermarket options work
Final Thoughts
Here’s what it comes down to.
Parts will fail. Belts will wear. Shear bolts will break at the most inconvenient moment possible—usually at 6 AM when you’re already running late and there’s eight inches of fresh snow blocking your driveway.
That’s not a defect. That’s reality.
But understanding your Husqvarna snowblower parts—knowing what fails, why it fails, and how to fix it quickly—transforms winter frustration into manageable maintenance. It’s the difference between standing helplessly in your garage waiting for a repair shop to open, and confidently replacing a shear bolt in five minutes while your neighbors are still shoveling.
I’ve learned this through years of cold mornings and broken components. Through ordering the wrong part twice before getting it right. Through that sinking feeling when something breaks mid-storm and you realize you should have replaced it during pre-season maintenance.
The knowledge in this guide? It cost me time, money, and more than a few choice words muttered in freezing temperatures.
But you don’t have to learn it the hard way.
Keep spare shear bolts accessible. Stock critical belts before winter arrives. Know your model number and where to find parts diagrams. Follow the official safety protocols because those 5,740 annual emergency room visits aren’t just statistics—they’re real people who thought “just this once” wouldn’t matter.
Invest in OEM parts for safety-critical components. Save money on aftermarket options where it makes sense. But never compromise on the parts that protect your expensive engine and transmission from catastrophic damage.
Most importantly? Maintain what you have rather than replacing what you neglected.
A $45 belt replaced during pre-season preparation beats a $300 auger assembly damaged by a failed belt mid-winter. Fresh fuel with stabilizer prevents $120 carburetor replacements. Five minutes of post-use cleaning prevents hours of rust remediation.
Your Husqvarna snowblower is a significant investment. Treat it accordingly, understand its parts and systems, and it’ll serve you reliably for decades.
Because when that next storm hits—and it will—you want to be the one confidently clearing your driveway in twenty minutes while everyone else is still hunting for their shovel.
Stay safe out there. Keep those parts organized. And may your shear bolts only break when they’re supposed to.
Winter’s coming. Be ready.
