

Last Updated on December 2, 2025 by John Patterson
Look.
I get it.
You’re standing in the optical equipment aisle (or more likely, scrolling through Amazon at 2 AM), and you’re wondering: Do I need the one that looks at tiny things, or the one that looks at distant things?
It seems simple on the surface. But here’s the thing—these two instruments get confused more often than you’d think. And honestly?
I understand why. They both use lenses. They both magnify things. They both make you look like you’re doing something important and scientific.
But that’s where the similarities end.
Quick answer: Microscopes reveal the invisible world of cells, bacteria, and tiny structures right in front of you. Telescopes bring distant galaxies, planets, and celestial wonders closer to your eyes. One peers inward at the miniature. The other reaches outward into the cosmos.
Let me walk you through everything you need to know to make the right choice. And trust me, after years of working with both, I’ve learned that picking the wrong one… well, it’s frustrating.
The Fundamental Differences Between Microscope VS Telescope
Here’s what most people don’t realize right away.
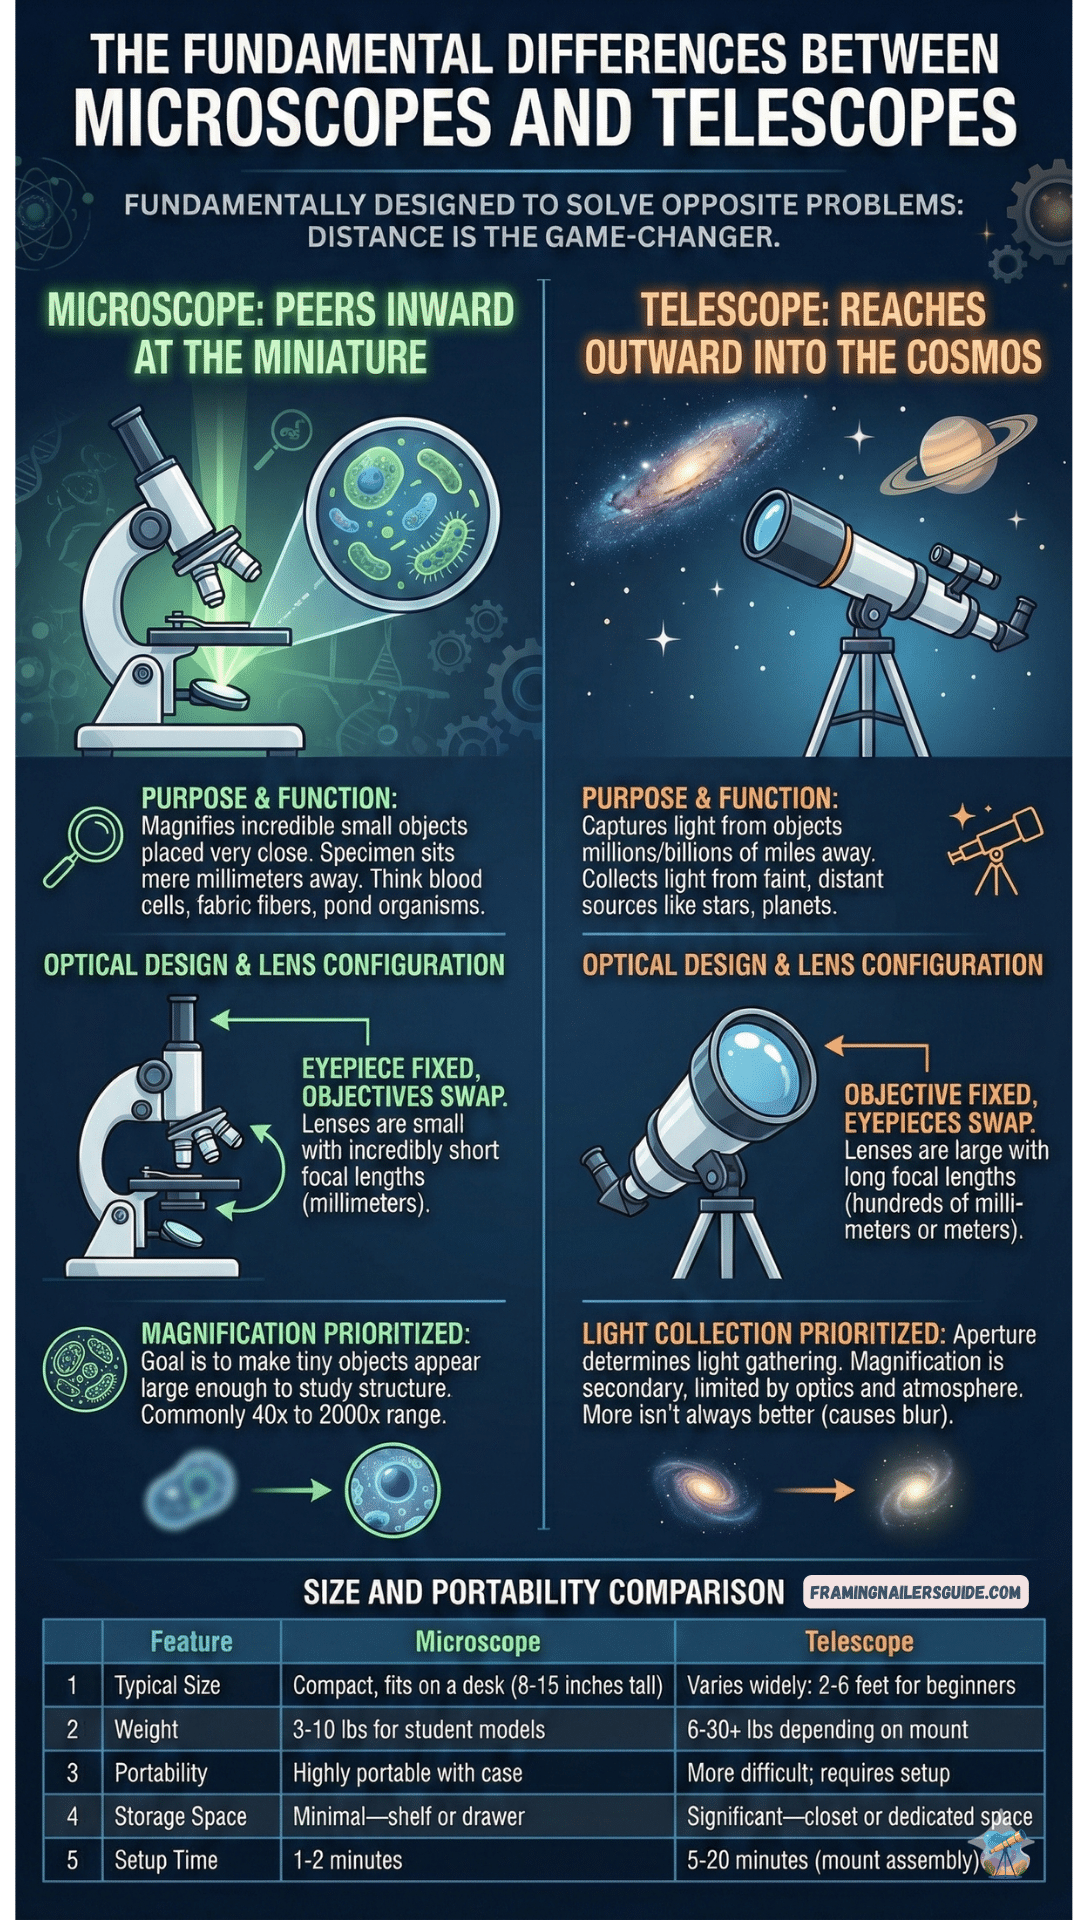
These instruments aren’t just “different sizes” of the same thing. They’re fundamentally designed to solve opposite problems.
Purpose and Function
A microscope magnifies objects that are incredibly small and placed very close to the lens—think blood cells, pond water organisms, fabric fibers. The specimen sits mere millimeters away from the objective lens.
A telescope, on the other hand, captures light from objects millions (or billions) of miles away. It’s designed to collect as much light as possible from faint, distant sources like stars and planets.
See the difference? Distance. That’s the game-changer.
Optical Design and Lens Configuration
This is where it gets interesting.
In a microscope, the eyepiece remains fixed while you swap out objective lenses to change magnification. You might rotate a turret to switch from 10x to 40x to 100x objectives. The lenses are small, with incredibly short focal lengths—sometimes just a few millimeters.
In a telescope, it works the opposite way. The objective lens (or mirror) stays fixed, and you change eyepieces to modify magnification. Telescope lenses are much larger—often several inches in diameter—with long focal lengths that can measure hundreds of millimeters or even meters.
(Side note: This confused me for weeks when I first started. I kept trying to swap the wrong parts on each instrument. Don’t be like me.)
Magnification vs Light-Gathering Power
Here’s a critical distinction that trips up beginners.
Microscopes prioritize magnification—you’ll commonly see ranges from 40x to 2000x. The goal is to make tiny objects appear large enough to study their structure.
Telescopes prioritize light collection first, magnification second. A telescope’s aperture (the diameter of its main lens or mirror) determines how much light it can gather. Magnification can be adjusted by changing eyepieces, but it’s limited by the quality of optics and atmospheric conditions.
More magnification doesn’t always mean better. I learned this the hard way trying to push a small telescope beyond its capabilities… everything just looked like a blur.
Size and Portability
| Feature | Microscope | Telescope |
|---|---|---|
| Typical Size | Compact, fits on a desk (8-15 inches tall) | Varies widely: 2-6 feet for beginners |
| Weight | 3-10 lbs for student models | 6-30+ lbs depending on mount |
| Storage Space | Minimal—shelf or drawer | Significant—closet or dedicated space |
| Setup Time | 1-2 minutes | 5-20 minutes (mount assembly) |
| Portability | Highly portable with case | More difficult; requires setup |
How Microscopes Actually Work
Let me demystify this.
The Light Path
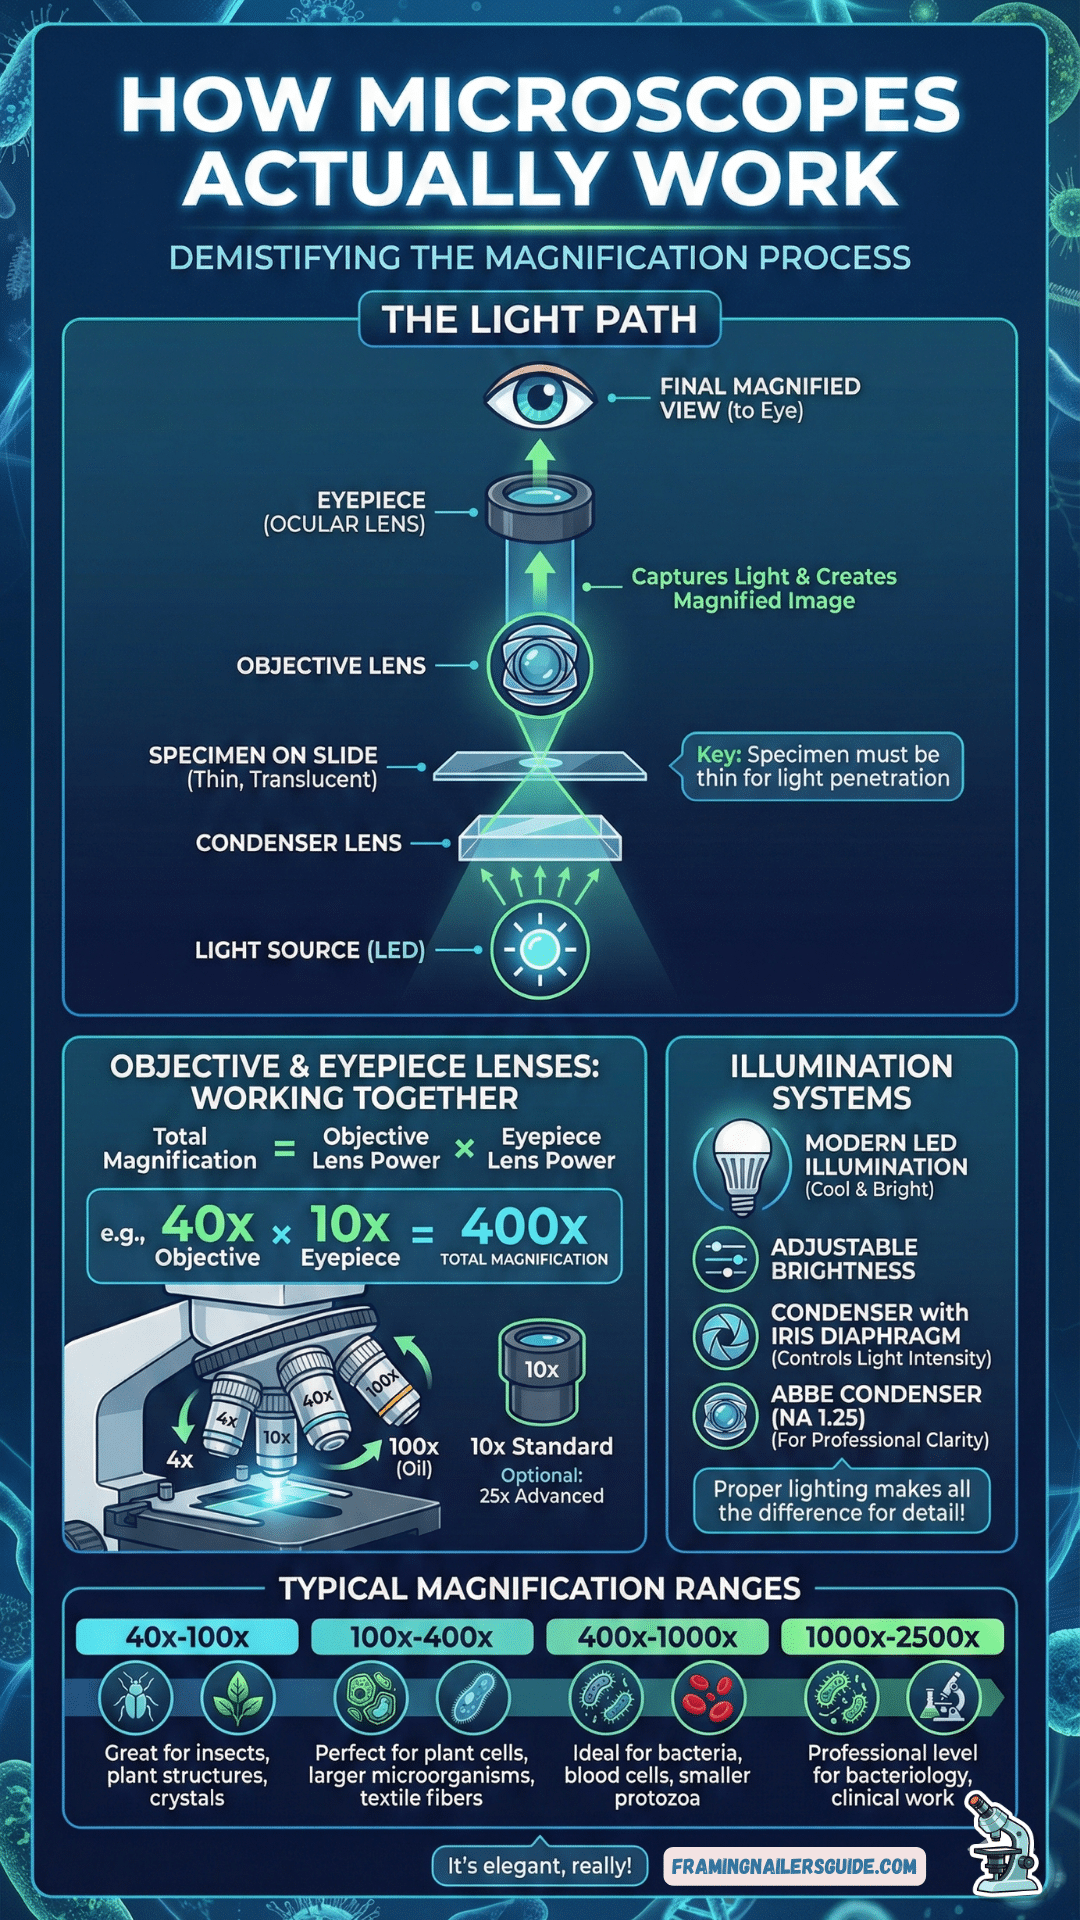
Most compound microscopes use transmitted light—meaning light passes through the specimen. Here’s the journey:
- Light source at the base illuminates upward
- Condenser lens focuses light onto the specimen
- Light passes through the thin specimen on a slide
- Objective lens captures the light and creates a magnified image
- That image travels up to the eyepiece (ocular lens)
- Your eye receives the final magnified view
It’s elegant, really. The specimen must be thin enough for light to penetrate—which is why you prepare slides with razor-thin slices or translucent samples.
Objective and Eyepiece Lenses Working Together
Here’s the formula you need to remember:
Total Magnification = Objective Lens Power × Eyepiece Lens Power
So if you’re using a 40x objective with a 10x eyepiece, you’re viewing at 400x total magnification.
Most microscopes come with multiple objectives mounted on a rotating turret: typically 4x, 10x, 40x, and sometimes 100x (oil immersion). The eyepiece is usually a standard 10x, though some advanced models offer 25x eyepieces.
Illumination Systems
Modern microscopes use LED illumination instead of those old halogen bulbs (thank goodness—those things got HOT).
Better models include:
- Adjustable brightness control
- Condenser with iris diaphragm to control light intensity
- Abbe condensers (numerical aperture 1.25 NA) for professional clarity
Proper lighting makes the difference between “I think I see something” and “Holy cow, look at those cell structures!”
Typical Magnification Ranges
- 40x-100x: Great for viewing insects, plant structures, crystals
- 100x-400x: Perfect for plant cells, larger microorganisms, textile fibers
- 400x-1000x: Ideal for bacteria, blood cells, smaller protozoa
- 1000x-2500x: Professional level for bacteriology, clinical work
How Telescopes Actually Work
Telescopes operate on a completely different principle.
Refractor vs Reflector Designs
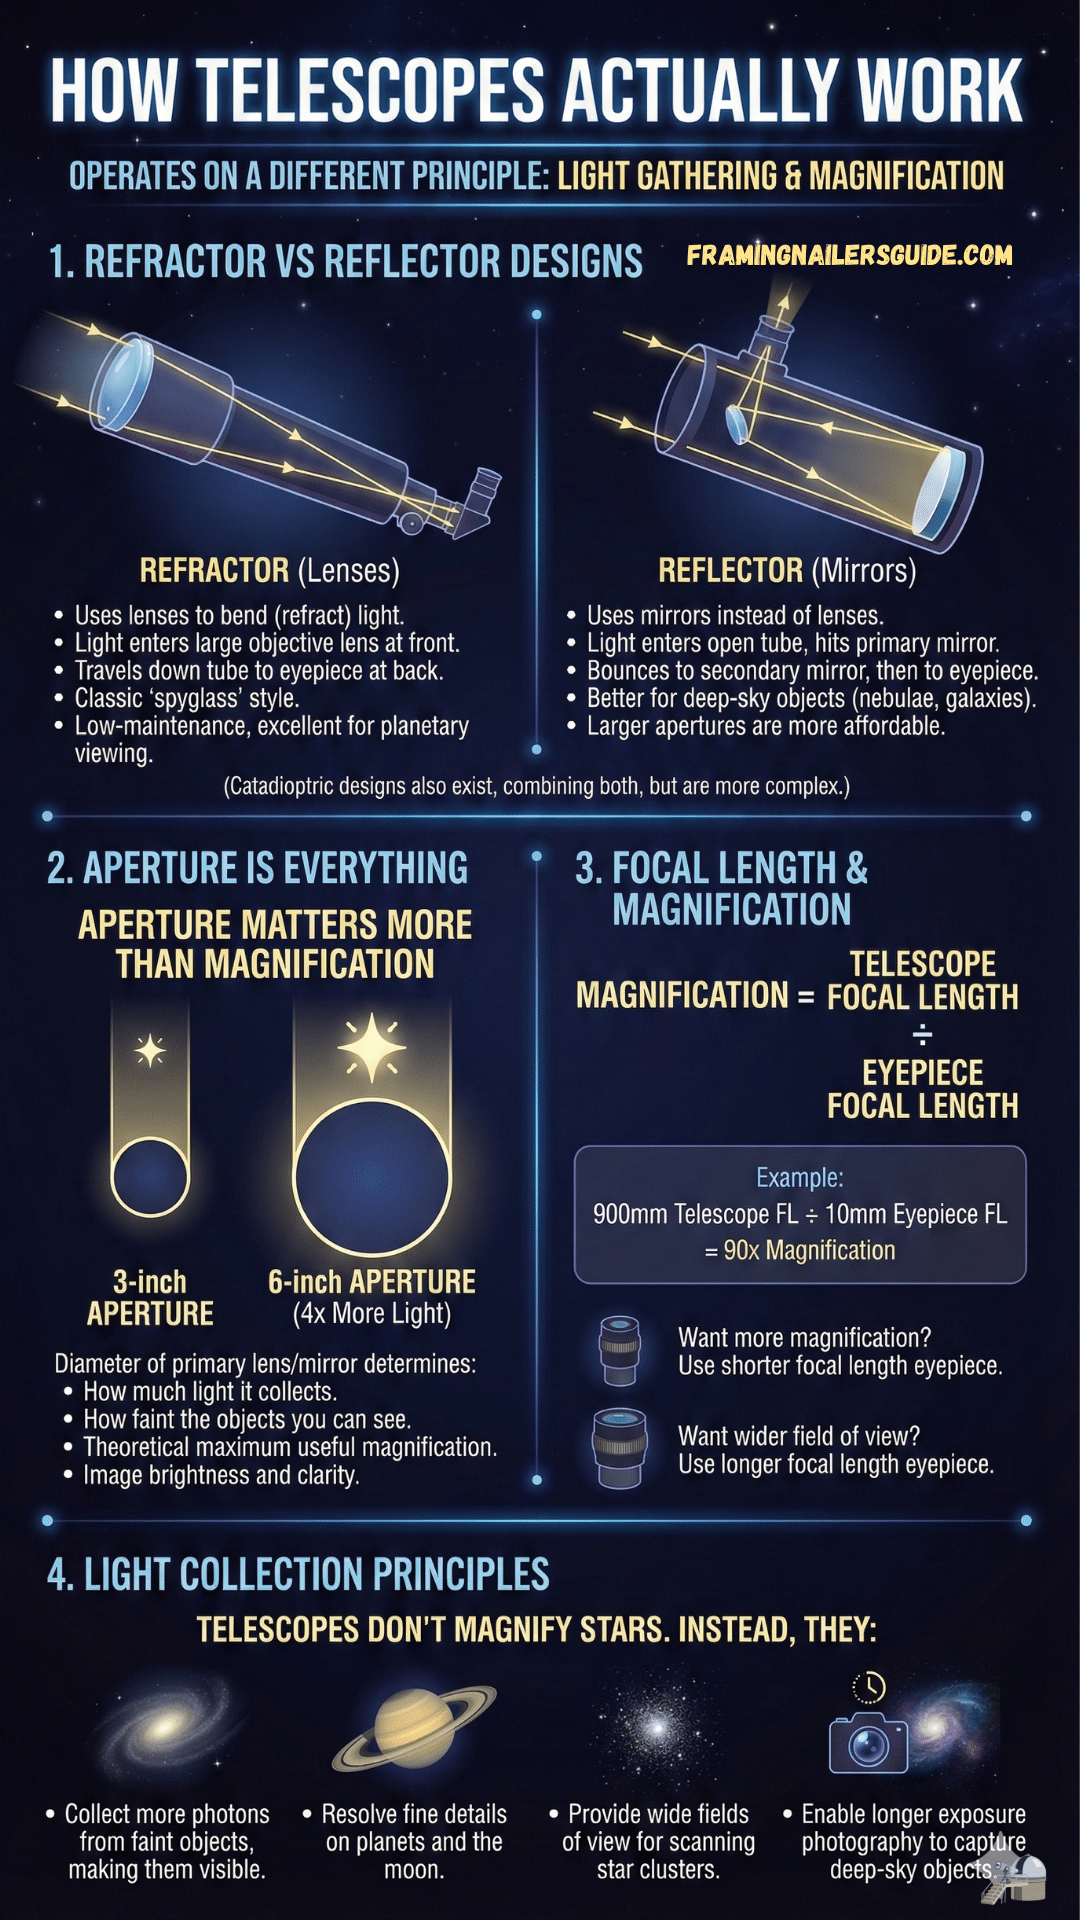
Refractor telescopes use lenses to bend (refract) light. Light enters through a large objective lens at the front, travels down the tube, and reaches your eyepiece at the back. These are classic “spyglass” style telescopes. They’re low-maintenance and excellent for planetary viewing.
Reflector telescopes use mirrors instead. Light enters the open tube, hits a curved primary mirror at the base, bounces to a smaller secondary mirror near the top, and redirects into an eyepiece on the side. These are typically better for deep-sky objects like nebulae and galaxies because you can build larger apertures affordably.
(There are also catadioptric designs that combine both, but let’s not overcomplicate things.)
Aperture Is Everything
If I could teach you one thing about telescopes, it’s this: aperture matters more than magnification.
A telescope’s aperture—the diameter of its primary lens or mirror—determines:
- How much light it collects
- How faint the objects you can see
- The theoretical maximum useful magnification
- Image brightness and clarity
A 6-inch (150mm) telescope will always outperform a 3-inch telescope at the same magnification, because it’s gathering four times as much light.
Focal Length and Magnification
Telescope magnification is calculated differently:
Magnification = Telescope Focal Length ÷ Eyepiece Focal Length
So a telescope with a 900mm focal length using a 10mm eyepiece gives you 90x magnification (900 ÷ 10 = 90).
Want more magnification? Use a shorter focal length eyepiece. Want a wider field of view? Use a longer focal length eyepiece.
Light Collection Principles
Telescopes don’t magnify stars (which appear as points of light no matter what). Instead, they:
- Collect more photons from faint objects, making them visible
- Resolve fine details on planets and the moon
- Provide wide fields of view for scanning star clusters
- Enable longer exposure photography to capture deep-sky objects
Head-to-Head Comparison
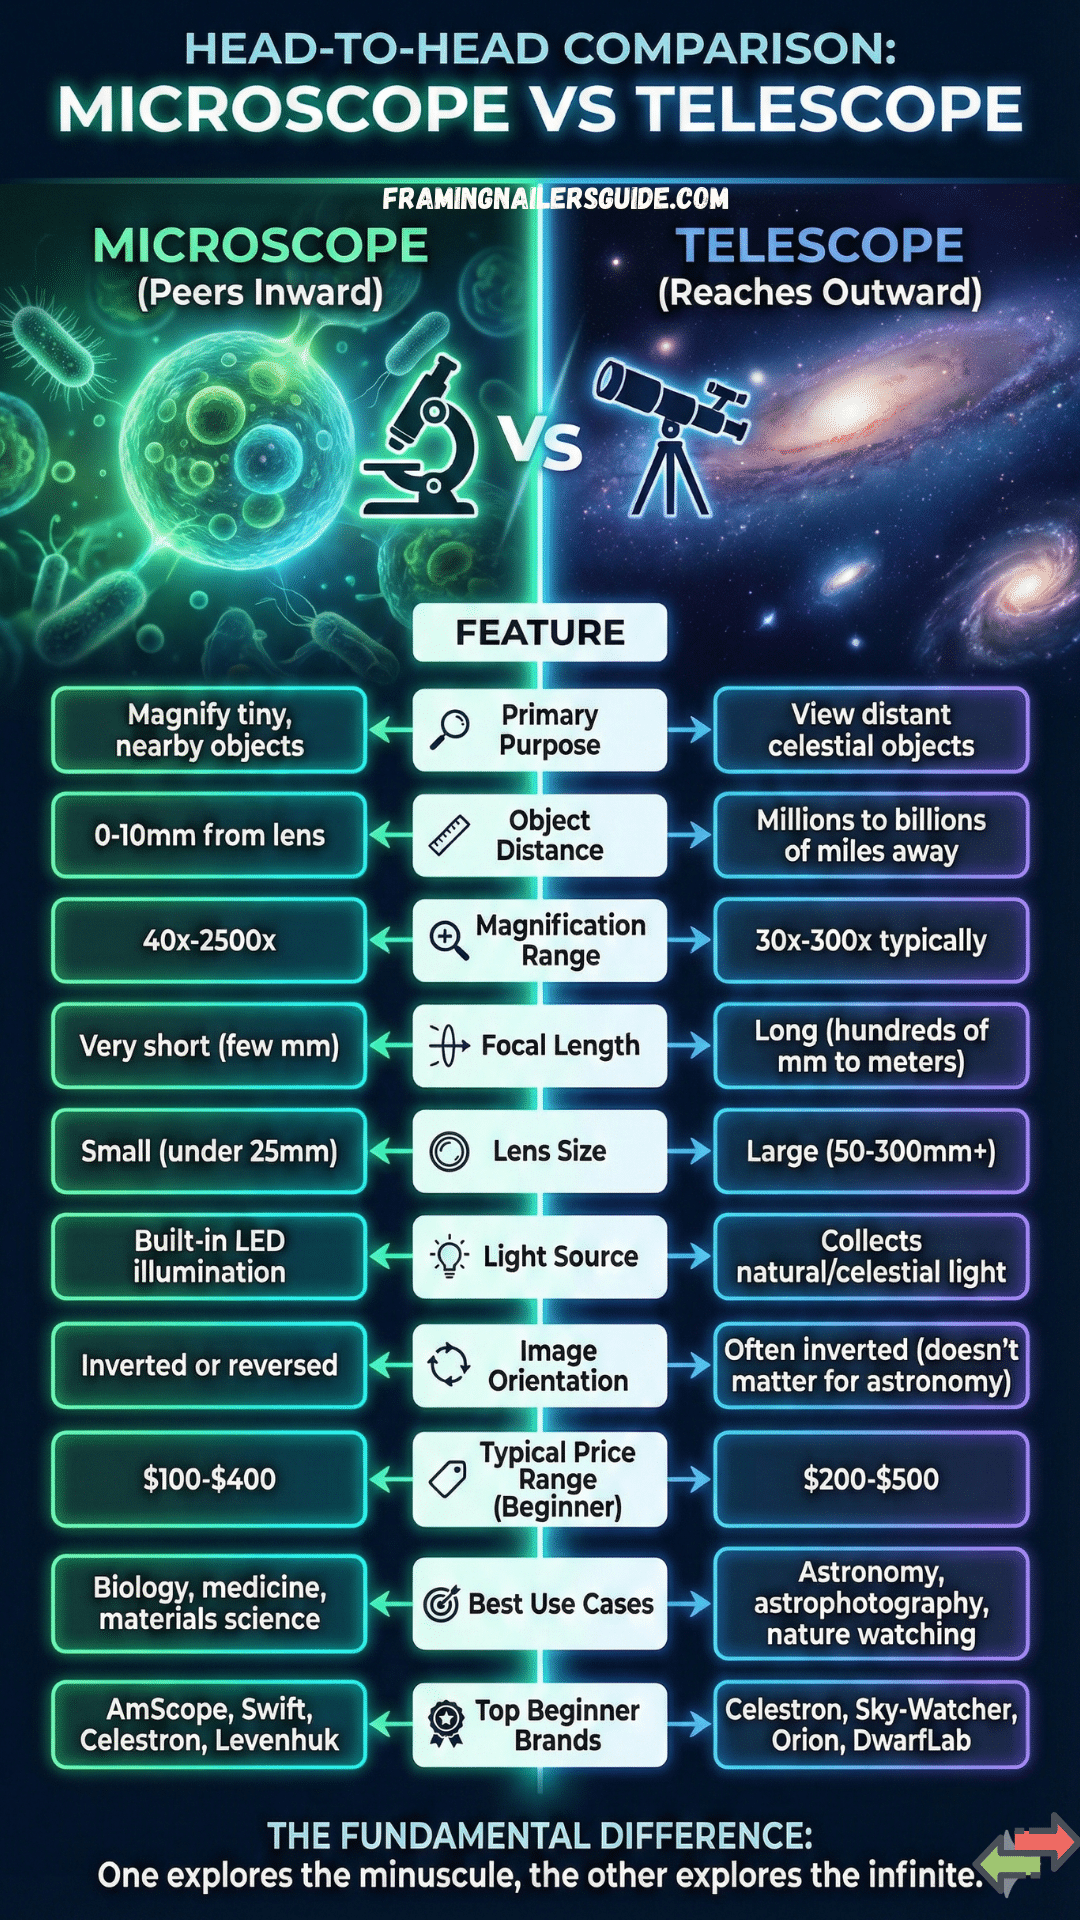
Let me lay this out clearly:
| Feature | Microscope | Telescope |
|---|---|---|
| Primary Purpose | Magnify tiny, nearby objects | View distant celestial objects |
| Object Distance | 0-10mm from lens | Millions to billions of miles away |
| Magnification Range | 40x-2500x | Long (hundreds of mm to meters) |
| Focal Length | Very short (few mm) | 5-20 minutes (mount assembly) |
| Lens Size | Small (under 25mm) | Large (50-300mm+) |
| Top Beginner Brands | AmScope, Swift, Celestron, Levenhuk | Celestron, Sky-Watcher, Orion, DwarfLab |
| Best Use Cases | Biology, medicine, materials science | Astronomy, astrophotography, nature watching |
| Typical Price Range (Beginner) | $100-$400 | $200-$500 |
| Image Orientation | Inverted or reversed | Often inverted (doesn't matter for astronomy) |
| Light Source | Built-in LED illumination | Collects natural/celestial light |
When You Should Choose a Microscope

Let’s get specific.
Biology Students and Hobbyists
If you’re taking biology courses—high school, college, medical school—you need a microscope. There’s no substitute for directly observing:
- Cell structure in onion skin or cheek cells
- Mitosis stages in prepared slides
- Pond water teeming with paramecia and amoebas
- Blood cells and tissue samples
The hands-on experience? It changes how you understand life at the cellular level. Reading about cells in a textbook doesn’t come close.
Medical and Lab Professionals
Clinical work demands quality optics. Medical students studying pathology, lab technicians examining specimens, veterinarians checking parasites—all rely on compound microscopes daily.
Professional features matter here: binocular viewing to reduce eye strain, Siedentopf adjustments for interpupillary distance, Abbe condensers for optimal resolution.
Electronics Repair and Inspection
This surprised me when I first discovered it.
Stereo microscopes (also called dissecting microscopes) are invaluable for:
- SMD soldering and circuit board repair
- Quality control inspection
- Watch and jewelry repair
- Examining tiny mechanical components
You need magnification in the 10x-40x range with good working distance—space between the lens and your work piece.
Jewelry and Gemstone Examination
Jewelers use microscopes constantly to:
- Identify inclusions and determine gem authenticity
- Perform detailed engraving work
- Inspect prong settings and metalwork
- Grade diamond clarity
A good stereo microscope with 20x-40x magnification is the industry standard.
When You Should Choose a Telescope
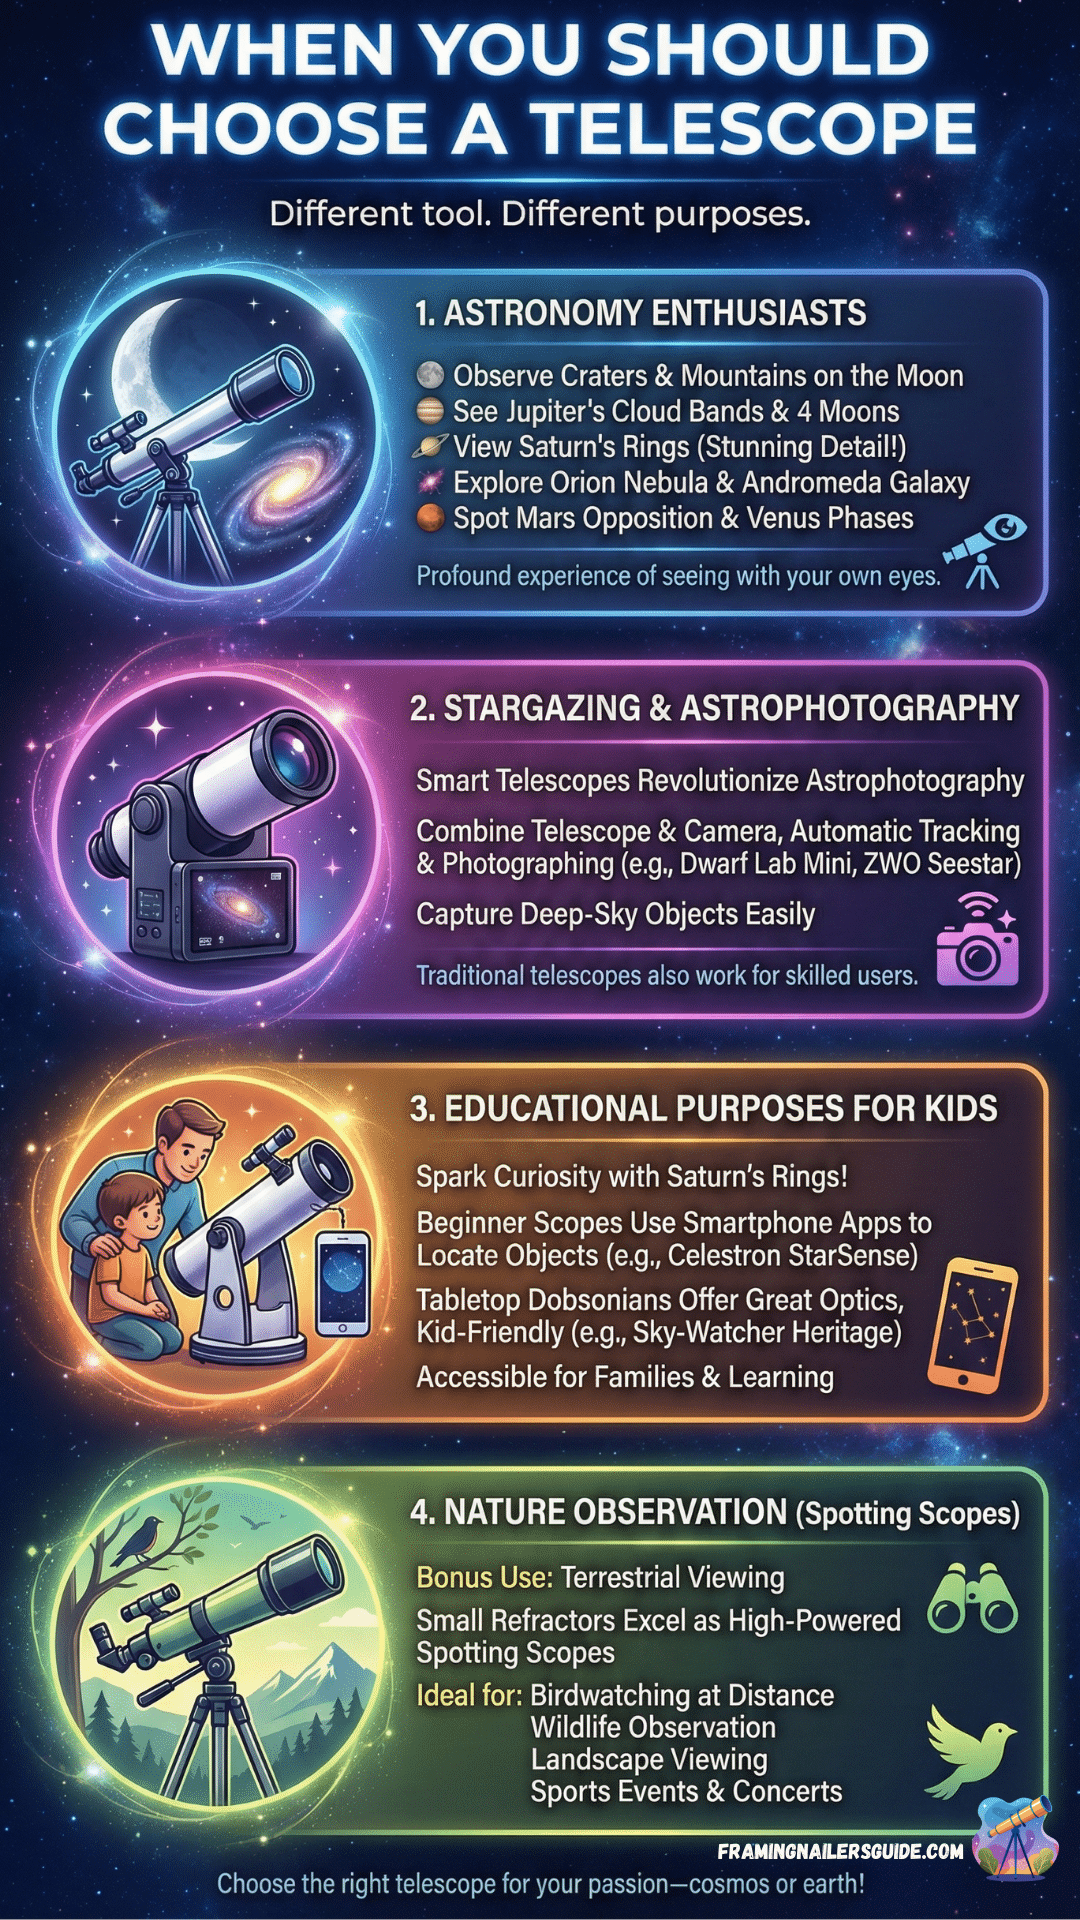
Different tool. Different purposes.
Astronomy Enthusiasts
If the night sky fascinates you, this is your gateway. Telescopes let you observe:
- Craters and mountains on the Moon in stunning detail
- Jupiter’s cloud bands and its four Galilean moons
- Saturn’s rings (genuinely breathtaking the first time)
- The Orion Nebula, Andromeda Galaxy, star clusters
- Mars during opposition, Venus phases
There’s something profound about seeing these with your own eyes, not just in photographs.
Stargazing and Astrophotography
Modern smart telescopes have revolutionized astrophotography. Models like the Dwarf Lab Mini (around $399) and ZWO Seestar combine telescope and camera, automatically tracking and photographing deep-sky objects.
Traditional telescopes work too—just requires more skill and equipment.
Educational Purposes for Kids
Want to spark curiosity in children? Show them Saturn’s rings through a telescope.
Beginner scopes like the Celestron StarSense Explorer (around £299.99) use smartphone apps to help locate objects, making it accessible for families. Tabletop Dobsonian models like the Sky-Watcher Heritage 150 ($390-$400 range) offer great optics in a kid-friendly package.
Nature Observation (Spotting Scopes)
Here’s a bonus use most people forget: terrestrial viewing.
Small refractor telescopes work excellently as high-powered spotting scopes for:
- Birdwatching at distance
- Wildlife observation
- Landscape viewing
- Sports events and concerts
Can You Use a Microscope as a Telescope (or Vice Versa)?
Short answer: No.
Longer answer: Really no.
The Technical Explanation
A telescope’s optical system is designed for parallel light rays coming from essentially infinite distance. Its objective has a long focal length—hundreds of millimeters—to focus light from faraway objects.
A microscope’s objective has an extremely short focal length—sometimes just 2-3mm. It’s designed to focus on objects mere millimeters away. If you tried to point it at the moon… nothing. The focal point would be somewhere inside the objective lens itself.
Why the Optics Simply Don’t Work
The focal lengths are incompatible. A microscope objective expects the specimen to be at a specific, very close distance. A telescope objective expects light from astronomical distances.
You can’t just “reverse” them either. The magnification calculations, lens configurations, and light-gathering requirements are fundamentally different.
Could you theoretically build a hybrid using specialized optics? Maybe in a lab setting. But practically? Just… no. Save yourself the headache and frustration.
Best Microscopes for Beginners in 2026
Based on current market offerings, here are my top recommendations:
1. AmScope B120C Siedentopf Binocular Microscope
Price: ~$250-$350
Magnification: 40x-2500x
Why it’s great: Professional-grade features at a student-friendly price. Includes advanced LED lighting, Abbe condenser (1.25 NA), binocular viewing with 30-degree angled tubes to prevent neck strain. Perfect for serious biology students or medical school prep.
Best for: College students, hobbyists wanting professional quality
2. Swift SW200DL Dual-Light Microscope
Price: ~$150-$200
Magnification: 40x-1000x
Why it’s great: Excellent value with both transmitted and reflected LED illumination. Simple to use for beginners but packed with enough features for experienced users. Great build quality that’ll last through years of use.
Best for: High school students, beginners who might grow into advanced work
3. AmScope M150C-MS Monocular Student Microscope
Price: ~$80-$120
Magnification: 40x-600x
Why it’s great: Budget-friendly entry point with surprising quality. Monocular design with 45-degree viewing angle and 360-degree rotation. Perfect starter scope. Won’t break the bank if you’re just exploring.
Best for: Young students (ages 10-15), testing whether microscopy interests you
Outbound Resource: For detailed microscopy techniques, the National Institutes of Health provides excellent educational resources on cellular biology observation.
Best Telescopes for Beginners in 2026
Current best brands based on value and performance:
1. Sky-Watcher Heritage 150 Tabletop Dobsonian
Price: ~$390-$400
Specifications: 150mm (6-inch) aperture, 450mm focal length, f/4 ratio
Why it’s great: Best value in this price range right now. Large aperture for excellent light gathering. Simple Dobsonian mount that’s intuitive to use. Compact tabletop design. No electronics to fail or batteries to die. Pure, reliable optics.
Best for: Serious beginners ready for quality views, adults and teens
2. Celestron StarSense Explorer 114mm Newtonian
Price: ~£299.99 (~$380 USD)
Specifications: 114mm (4.5-inch) aperture, 450mm focal length
Why it’s great: Smartphone-assisted navigation makes finding objects effortless for beginners. Solid parabolic mirror optics. Includes multiple eyepieces and smartphone dock. The StarSense app turns your phone into a sky guide.
Best for: Tech-savvy beginners, families with older children
3. Dwarf Lab Mini Smart Telescope
Price: ~$399 (with possible 10% pre-order discount)
Specifications: 35mm aperture, automated tracking, built-in camera
Why it’s great: Modern smart telescope that handles setup and tracking automatically. Perfect for astrophotography beginners. Compact and portable. Ships December 2025. Combines telescope and camera in one package.
Best for: Astrophotography enthusiasts, those wanting instant results
Outbound Resource: NASA’s Eyes on the Solar System provides incredible context for what you’re viewing through your telescope, with real-time positions of planets and spacecraft.
Frequently Asked Questions
Which is more expensive, microscope or telescope?
It depends on quality level, but generally comparable entry-level options cost similar amounts—roughly $100-$400 for beginner models.
Budget microscopes start around $80-$120 for basic student models, while quality beginner scopes run $150-$300. Entry-level telescopes range from $200-$500 for decent options.
At the professional level, both can cost thousands. Research-grade microscopes with advanced optics easily exceed $5,000. Large amateur astronomy telescopes (10-14 inch apertures with computerized mounts) run $2,000-$10,000+.
The real cost difference comes in accessories. Telescopes often require additional eyepieces ($50-$200 each), filters, mounts, and potentially astrophotography equipment. Microscopes need prepared slides and possibly slide preparation supplies.
Can kids use both microscopes and telescopes?
Absolutely, yes—with age-appropriate models and supervision.
Microscopes for kids: Children as young as 8-10 can use basic microscopes successfully. Models like the Levenhuk Rainbow series are specifically designed for younger users with colorful, engaging designs. The key is choosing one with:
- Simple controls
- Durable construction
- Lower magnification range (40x-400x)
- Built-in light source
Telescopes for kids: Children 10 and older typically do well with beginner telescopes, especially smartphone-assisted models like the Celestron StarSense series. Younger children (6-8) can observe with adult help.
Tabletop Dobsonians are excellent for families—stable, simple to operate, no complicated alignment procedures.
Both instruments teach observation skills, patience, and scientific thinking. Just manage expectations. Kids get frustrated if they can’t see results quickly.
What magnification do I need for each?
For microscopes:
- Basic biology/student work: 40x-400x is sufficient for most applications
- Bacteria and blood cells: 400x-1000x required
- Clinical/professional work: up to 2500x with oil immersion
More isn’t always better. Higher magnification reduces light and field of view, making it harder to locate specimens. I always recommend starting at the lowest power to find and center your subject.
For telescopes:
- Moon observation: 50x-150x shows excellent detail
- Planets (Jupiter, Saturn, Mars): 100x-200x ideal
- Deep-sky objects (nebulae, galaxies): 30x-80x for wider field of view
- Maximum useful magnification: roughly 50x per inch of aperture
Beware of telescopes advertised with excessive magnification (600x! 900x!). These are marketing gimmicks. A 60mm telescope pushed to 600x will show nothing but blur.
Which one is better for educational purposes?
Both serve crucial educational roles—it depends on the curriculum and learning goals.
Microscopes excel for:
- Biology and life sciences education
- Hands-on laboratory skills
- Understanding cellular structure and microbiology
- Meeting science course requirements (most biology classes require microscope work)
Schools and educational programs prioritize microscopes because biology curricula demand them.
Telescopes excel for:
- Physics and astronomy education
- Teaching scale, distance, and cosmic perspective
- Inspiring broader scientific curiosity
- Independent learning (easier for kids to use at home without supervision)
For younger children (under 12), telescopes often generate more immediate excitement—seeing Saturn’s rings creates a memorable “wow moment.” For older students and science majors, microscopes become essential tools.
If you can only choose one for a child showing general science interest, I’d lean toward a telescope initially. It’s more forgiving, requires less preparation, and provides instant visual rewards. But for students seriously pursuing life sciences? Microscope becomes necessary.
Do I need special training to use either?
Not really—but a little guidance helps immensely.
Microscopes: Basic operation takes 10-15 minutes to learn. Key skills include:
- Proper slide preparation
- Starting at lowest magnification
- Using coarse/fine focus correctly (never use coarse focus at high power!)
- Adjusting lighting with the diaphragm
- Cleaning lenses with proper lens paper
Most beginners struggle with lighting more than anything else. Too much light washes out the image; too little makes it invisible.
Telescopes: Initial setup and alignment require more time—30-60 minutes for your first session. You’ll need to learn:
- Assembling the mount and tripod
- Balancing and securing the optical tube
- Aligning the finder scope
- Understanding celestial coordinates (for some models)
- Dealing with dew, focusing, and collimation (mirror alignment)
Smart telescopes like the Dwarf Lab series eliminate much of this learning curve. Traditional scopes have steeper initial challenges but teach you more about optics and astronomy.
YouTube tutorials and included manuals cover basics well. Neither instrument requires formal training—just patience and practice.
Can I attach a camera to both?
Yes, absolutely—though the approaches differ.
Microscope photography (photomicrography):
Most modern microscopes accommodate cameras through:
- Smartphone adapters ($20-$50) that position your phone camera over the eyepiece
- Dedicated USB microscope cameras ($100-$300) that replace the eyepiece
- Trinocular heads with a third port specifically for camera attachment
The OMAX M83EZ-C02, for example, features a trinocular design for simultaneous viewing and photography. This is invaluable for documentation, teaching, or sharing discoveries.
Telescope photography (astrophotography):
Options include:
- Smartphone adapters similar to microscope adapters
- DSLR camera adapters (T-rings and adapters, ~$30-$100)
- Dedicated astronomy cameras (ZWO, QHY, etc., $300-$2000+)
- Smart telescopes with built-in cameras
The Dwarf Lab Mini includes an integrated Sony IMX678 sensor designed specifically for astrophotography. These automate tracking, stacking, and processing.
Traditional astrophotography is more complex—requiring precise tracking mounts, long exposures, and image processing software. But smartphone adapters let beginners capture moon shots and bright planets with surprising ease.
Outbound Resource: For camera attachment techniques, the Optical Society of America offers technical papers and educational materials on both microscopy and telescope imaging.
So, which one do you need?
Here’s my final take…
If you’re drawn to understanding the biological world—cells, microorganisms, the building blocks of life—get a microscope. If you’re captivated by the cosmos—planets, stars, the vast universe surrounding us—get a telescope.
Both open doors to invisible worlds. Both inspire wonder.
You really can’t go wrong with either choice. The “mistake” isn’t picking one over the other. It’s not picking at all.
Because either way… you’re about to see things you’ve never seen before.
And that changes everything.
